Netmon is a recently retired CTF VM on Hack
the Box with the objective – Capture the user and root flag. Hack the Box
offers a wide range of VMs for practice from beginner to advanced level and it
is great for penetration testers and researchers.
Level: Intermediate
Task: To find user.txt and root.txt file
Note: Since these labs are online
available, therefore, they have a static IP. The IP of Help is 10.10.10.152
Penetration Methodology
Scanning
Network Scanning (Nmap)
Enumerating
Browsing the webpage
Enumerating FTP
Exploiting
Anonymous Login in FTP
Reading user.txt
Privilege Escalation
Enumerate for config file
Logging in Administrator Panel
Exploiting RCE
Reading
root.txt
Walkthrough
Scanning
Let’s start off with scanning with the nmap
to check open ports.
nmap -A 10.10.10.121
Here I found port 21 for FTP, 80 for HTTP,
135 for RPC, 139 for NetBIOS, 445 for SMB are opened, rest were filtered.

We immediately proceed towards port 80 when
we see it open. We find PRTG Network Monitor page. But to use this dashboard,
we need the login credentials. But we don’t have the access to those
credentials at this stage.

In the nmap scan earlier, we saw that the
FTP port 21 is open as well allows Anonymous Login. So, we login the FTP using
the Anonymous as Login as well as password. After successfully logging, we use
the ls command to list all the files that are shared. We see that we Users
Directory available so we traverse into it using the cd command. Here, we have
2 more directories, Administrator and Public. We don’t have permission to
access the Administrator directory so we move into the Public Directory. Here
we find the user.txt file. We use the get command to download this file onto our
system. Hence, we got our first flag, that is; the user flag.
ftp 10.10.10.152
ls -la
cd Users
ls
cd Public
ls
get user.txt

Now we need to get the root flag. For this we went to our most dependable friend, Google. After working our way through some of the PRTG Network Monitor manuals and help pages, we found this post. This gives us the location of the data that PRTG Network Monitor stores, that is “%programdata%\Paessler\PRTG Network Monitor”. As we still have the FTP connection, we went to ProgramData directory and then traversed all the way to the location mentioned. Here we located an old configuration file. We downloaded this file to our system, so that we can analyse it closely.
cd ProgramData
ls -la
cd Paessler
ls
cd "PRTG Network Monitor"
ls
get "PRTG Configuration.old.bak"

After successfully downloading and
searching through many lines of code, we stumbled upon the password, that was
used previously. We took a guess here, as this was the previous configuration
and it contains the year 2018 and whenever there is a current date in the
password then they could be updated with the change in the date to the latest
date.
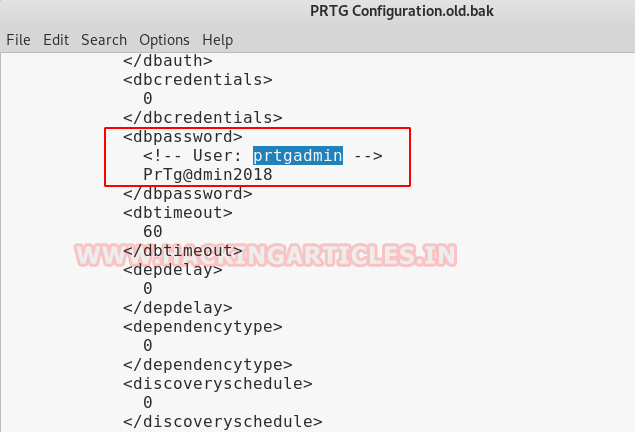
This means, that the previous password was
PrTg@dmin2018 and since the current year is 2019, we replaced the 2018 in the
password by 2019. This was an educated guess we made. So, using the new login
credentials, we successfully logged in the PRTG Network Monitor Dashboard.
Login Name: prtgadmin
Password: PrTg@dmin2019

After looking around the dashboard for some
time, we didn’t find anything that could help us in our quest to get the root
flag. So, we went to another dependable friend, Exploit DB. We searched the
exploit dB for PRTG Network Monitor and found this exploit. On further
researching on the internet about this exploit, we found this script on
GitHub. This script creates a PowerShell file and then it uses it to run
commands on the target system to create a user. But in order to work, it need
the cookie that was used in the original login in the dashboard of the PRTG
Network Monitor. We capture the request using the Burp Suite. Upon close
inspection of the captured packet, we find the cookie that we require.

Now, we clone the git directory that
contains the script that we require to create a new user. After giving the
necessary permissions to the file to run. We run the prtg-exploit.sh file, with
the Target IP Address and the cookie captured as parameters. This script can
take some time to run depending on your connectivity speed. But after
successfully running it creates a user with following credentials.
Username: pentest
Password: P3nT3st!
./prtg-exploit.sh -u http://10.10.10.152
-c "_ga=GA1.4.780888731.156187260; _gid=GA1.4.641622581.1562574873;
OCTOPUS1813713946=ezQ3N0RENjcwLUFCQzItNDQ1Ri04Q0IyLUZDMjlFOUU3QjQ0Qn0%3D"

Now that, we have the user created on the
target machine with Administrative Rights, let’s nab that root flag and
complete this challenge. We will use the psexec.py script form the impacket
tool kit to connect to the Target machine. You can use any of the methods that
are provided in this
article. Here, we chose to run it directly as a python file. We need the
username, password and target IP address as parameters as shown in the image
given below. As we can see that after running, psexec gives the shell with
Administrator rights. Now, we used the cd command to traverse into the Desktop
Directory to find the root flag.
python psexec.py 'pentest:P3nT3st!@10.10.10.152'
cd ..
cd Users\Administrator\Desktop
type root.txt


0 comments:
Post a Comment