Hack the VM Bsides London 2017(boot2root)

Hello friends! Today we are going to take another CTF challenge known as Bsides London 2017. The credit for making this vm machine goes to “Hacker House” and it is another boot2root challenge in which our goal is to get root to complete the challenge. You can download this VM here.
Let’s Breach!!!
Let us start form getting to know the IP of VM (Here, I have it at 192.168.0.7 but you will have to find your own)
Let’s do an nmap scan for port enumeration.

nmap -A -p- 192.168.0.7
We find port 80 to be open, port 80 is running http.
So we first open 192.168.0.7 in our browser.
We find a hint to use rafting directory, it is a wordlist that is used to enumerate directories. So we enumerate the directories using raft-large-directories for further information.
dirb http://192.168.0.7 raft-large-directories


Now we enumerate the directories with common wordlist and find a directory called cgi-bin/.


As the dirb scan gave us a forbidden error on cgi-bin/ directory. We try to look through the files inside cgi-bin


We open the links found using dirb, one of those links contains a login page.


We take a look at the source code and find a hexadecimal string.


We decode it using xxd and find a base64 encoded string. After decoding it we found that the base64 string starts from Y so we select the string from Y and found a hexadecimal string inside a flag. We decode it and find a string.


We use this string as password to login through the login page, we use username as admin.


Even after login we don’t find anything on the login page, so we move to the links provided by the dirb scan.
We found one page that looks like a blank page.

When we take a look at the source page, we found that it is xml based page that may be vulnerable to XML Entity Injection(XXE).


We use burpsuite to capture request of that page and then send it to repeater, we then use XXE to exploit the system.


We find that only /etc/passwd is visible in plain text, to get the rest of the files we need to php base64 filter.  So we get apache.conf file to know about the system.


Now we decode and save it in a file ‘bsides-apache.conf’.


Now when we check the configuration to find information about the system.


Now we use XXE to get the rest of the configuration files.


We decode the base64 encoded string and then save it as bsides-default.conf.


Now we take a look at the configuration file, we get the location of the cgi configuration file.


Now we use XXE to get the configuration file for CGI files.


We decode the base64 encoded string and save it as bsides-cgi.conf


Now we take a look at the cgi configuration file and find the location of load file that we dirb scan showed us.


Now we download the load file using XXE to find more information about the file.


We decode the base64 encoded string and save it as bsides-load.


Now we check the file type and find it is an elf executable file.


We use strings to check the content of the file and find that it is compressed using UPX.


Now we use UPX to decompress the file
upx -d bsides-load


After decompressing the file we check the strings and find that it read a file and decrypts the file using the hex value of WannaCry?


Now we use radare to reverse engineer the file and find that it can run files that are encrypted with hex value of ‘WannaCry?’


Now we create a hex value of ‘WannaCry?’. We use od to convert it into hex and sed to remove the space between values.
Echo -n “WannaCry?” | od -A n -t x1 |sed ‘s/ *//g’


We create a reverse shell first to exploit the system. We create pipe files to execute our command.


Now we create a 32-bit shared object file using gcc and convert it to a binary file using the hex value of ‘WannaCry?’ as key with openssl.
gcc -m32 -shared -fPIC -o exploit.so exploit.c
openssl aes-128-cbc -K ‘key’ -iv 0 -e -in exploit.so -out exploit.bin


Now we upload the file to the server, dirb scan gave us a link that can be used to bin files. After upload file we get the location of the file where it is uploaded. The name of our file also changes after we upload it.


We copy the new file name and use the load file to run our shell.


We setup our listener using netcat, as soon as we execute the shell we get the reverse shell.


Now we find files with suid bit set and find a file in /home/level1/ called shisu

Find / -perm -4000 2>/dev/null


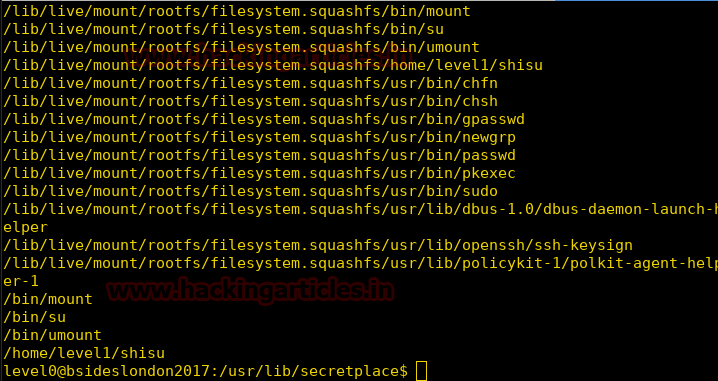
We move to the directory and run the command and find that it is an executable file.
File shisu


When we run the file we find that it runs the command ps.


We are unable to read debugging symbols in gdb so we use objdump to reverse engineer the file and found that the file has a string copy after which it removes the top 10 bytes in stack.
Objdump -M intel -d shisu


We now use gdb to add a breakpoint before it removes the memory from the stackpoint. We use python to print 500 ‘A’. Then we check the stack and find it is overwritten with A’s.


Now this file maybe vulnerable to buffer overflow.  After fuzzing a few times we find that at 516 bytes of data we can overwrite the EIP and we get a segmentation fault.


Now we run the file along with a 516 byte of shellcode and we get a privileged shell.


Now we use id command and find that we are root user now.


Digital Forensics Investigation through OS Forensics (Part 3)

In Part 2 of this article we have covered Recent Activity, Deleted File Search, Mismatch File Search, Memory Viewer and Prefetch Viewer. This article will cover some more features/ functionalities of OSForensics.
To Read Part 2 of this article click here.
Raw Disk Viewer
On a drive data is generally stored in file system files and directories but when it comes to forensics we need a more deeper inspection of drives we can have a evidence within the raw sectors of the drive , image . These sectors are not accessible through Operating system but we can access the raw sectors through OS Forensic’s Raw Disk Viewer.
Raw Disk Viewer includes text/hex searching, highlighting of relevant disk offsets, and decoding of known disk structures (such as MBR, GPT)

To start with open OSF and click on Raw Disk Viewer
From the disk dropdown select the Evidence we want to investigate.
Click on the config button and make the required changes. We can specify the sector range limit, highlight the file types by different colors, include/exclude file system objects.
To look for a particular file/sector/offset click on Jump To button, we can see a screen to select any particular file or offset.
To get the details of any particular file select file and browse the file .
Click on open and then OK, the file will open in HEX for investigation.

Click on the decode button to get the details of the file. This will provide the cluster number and sector of the file.
Right click on the file to get all the available options of the file/offset/cluster.
Click on Search button, a screen will appear where we can search for Hex or Text and continue . This will search the particular text or Hex within the raw sectors and will display the result.
Click on bookmark button on the main screen of Raw Disk Viewer . we can create the bookmarks for the relevant evidences.
Create a new bookmark by specifying its start offset and end offset. We can differentiate the bookmark through its color.
The bookmark saved will get listed .
 If we click on the bookmark the offset range will get highlighted on the main screen and will mark the starting of the offset with a flag and color of the the flag is that of the bookmark.
This concludes Raw Disk Viewer.

Registry Viewer
Registry viewer enables  to investigate  the registries of an evidence.
To start with open the registry viewer, we can select the drive/evidence we want to work on. All the registry files in that particular drive/evidence will get listed on the right side.
Double Click on any file and we can navigate to the registries and can get all the details.
This concludes Registry Viewer

File System Browser
File system browser enables us to navigate to the Drive/Evidence.
We can navigate through all the files/directories and perform multiple activies . In file system browser we have the other options of OSF as well like File search, Mismatch search, Create Index, Create signature. Some of these features we have already talked about and some of them we will discuss in coming articles.
WE can check the “Show Deleted File” option  by clicking on Tools > Option > Show Deleted File.
 The deleted files/directories (if any) will also get listed and will marked with a red cross .
This concludes File System Browser.

Passwords
Passwords feature enable us to retrieve the password related information of the evidence. These passwords could be passwords stored within the browser, Windows Login Passwords, WE can also create a rainbow table by making the multiple combination of the passwords and retrieve the passwords from the rainbow table. Under OSF passwords  also have an option to decrypt an encrypted file.
To start with open OSF and select passwords
The first tab is to Find Passwords & Keys , this will allow to the recover the stored password from the browser , outlook , windows auto logon passwords , etc.  We can either do the live acquisition of current machine or Scan Drive and select any drive or evidence.
Click on Config button, check the passwords you want to recover. Select the decrepton settings based on requirements, we can include our dictionary file or can use an automatic dictionary. If credentials are known we can provide windows login credentials and click OK.

Click on Acquire passwords button to start the process.
All the passwords / product keys will get listed.
The below image is the passwords  acquisition of the Current Machine for better understanding as the evidence we re working on doesn’t any stored wireless network.
Select Windows Login Password , select the Drive/evidence and click Acquire passwords

All the information will get listed. If there is any saved password it will get listed also we can get info about it also we can get NT hash and LM Hash of the password from which we can recover the password.
We have an option to generate rainbow table. This is used to create a list of passwords with different combinations and permutations. We can choose from the different options / combinations from the drop down . More huge and  complex the inputs are the longer the time it will take.
Browse the file path where we want to save the table and if required modify the parameters. Click on create rainbow table button to start with the process.
Depending on the complexity the process will start.
Password through rainbow table. If the password is within the rainbow table we have created and we have the NT hash and LM Hash we can recover the passwords  (however this ). TO achieve this we need to add the folder of the Rainbow table under “Select Rainbow Table” and can either enterthe raw hash or can browse the file which may contain the hash , if the password is present within the rainbow table , we will get the password .
In the image we are browsing the file “hash.txt” , we have saved in windows login password (shown above)and the rainbow table we have created .
Click on recover Password/s button to start the process , if the password present in Hash.txt is found in rainbow table we will get the result .

In the above we haven’t found the password as it must be not present inside the table. Also these tables have certain limitations and have the success rate of 95 % (approx). Their are other methods as well for recovery of passwords we will be discussing on other articles.

This concludes Passwords.
For more on OSForensics wait for the next article.


Convert Virtual Machine to Raw Images for Forensics (Qemu-Img)

This is a very handy little application. It’s been developed by the QEMU team. The software is very useful when dealing with virtualization, Qemu-img is available for both windows and Linux. Its function is to give you the ability to change the format of a given virtual disk file to the majority of the popular virtual disk formats that are used across platforms. Let’s say you are using virtual box in Windows and want to migrate the virtual disk to be used on a mac, in parallels, you can use this simple program to achieve this with minimum effort.
Our purpose of writing about this today is slightly different from Qemu-img’s mainstream usage, we want to focus on how we can use this application to convert a virtual disk image, whole or split into a .raw file that can be used with most of the popular forensic frameworks that are available.
Let’s start up Qemu-img on our Linux machine
At the terminal prompt type “qemu-img –h”

This will show you all the options that can be used with qemu-img,


Right at the end of the information that is presented after the command given above is used, we can see all the formats supported by this application.
Here is a list of all the formats that are compatible with Qemu-img

Now let’s see how this application comes in handy for use in forensics.
In a situation where a virtual disk is part of the acquisition and further dedicated analysis is required, the virtual disc can be converted into .raw format.
Let’s begin.
Since our goal is to analyze the virtual disk, we are using the image file from Windows 7 installed on VMWare. The file in question is in .vmdk format.
Just a heads up, when you convert a virtual disk file to a .raw file, the size of the converted file can be quite big, so make sure you have enough space.
Here is our .vmdk file
For ease of use, we have placed the .vmdk file in a folder named Qmeu on the desktop. The terminal is opened from within the folder.
At the terminal prompt type “qemu-img convert -f vmdk -O raw Windows\ 7.vmdk win7.raw”
A breakdown of the command that we just gave:
qemu-img convert  is invoking the convert function of qemu-img.
-f is the format of the input file, which in this case is .vmdk
-O is the format of the output file that we want, a .raw file.
Windows\ 7.vmdk is the name of the input file that we have in our folder.
win7.raw is the name we have given the output file with its file extension.


Give it a few minutes and check the folder, you will find the converted file.
As you can see, the size of the .raw file is 10.7 GB and the size of the .vmdk file was 6.0 GB, that’s quite a jump in size!

We can now use Foremost to carve the .raw file to see what’s inside.
At the terminal type “foremost -t jpeg,png -i win7 -o output”


With this command we are carving the .raw file for .jpeg and .png files which will be collected in a folder named output. If you have any doubts about foremost you can refer this article.
As you can see, our .raw file has been successfully carved, the results are visible below.
We have successfully carved a .raw file made from a virtual disk, now let’s mount the .raw file to view its contents. We will be using a Windows for this operation.

Now we will mount this .raw file using FTK Imager to see its contents. The image mounting option can be found under the File menu. Navigate to the .raw file from within the mounting menu.
Select Mount, leave the other options as they are and the file will appear on the Mapped Image List.
Next we navigate to My Computer and we can see that the .raw has been mounted as a partition.
The windows file system can be seen within and explored for content.


Qemu-img is a very simple application with a high potential. It can be a very valuable tool in your forensic toolkit due to its large list of compatible formats. It will make sure that the format of the acquired image does not keep you from using your forensic tool of choice to run your investigation or carve out data.
We hope you enjoy using this tool.

Have fun and stay ethical.

About The Author
Abhimanyu Dev is a Certified Ethical Hacker, penetration tester, information security analyst and researcher. Connect with him here