How to Secure Port using Port Knocking

Port knocking is a technique use for sending of information through closed ports on a connected computer in a network behind a firewall. It will add security in your network for establishing connection with a particular port until the correct sequence of port is not knocked. The network administer configure port knocking using iptable which act like firewall.
Iptable chain allows a client who is familiar with the secret knock to enter the network through a specific port by performing a sequence of connection attempts. 

The main reason of port knocking is to avoid an attacker from scanning a system for potentially vulnerable services by performing a port scan, because if the attacker will not sends the accurate knock sequence, the protected ports will appear closed.

Port knocking with Iptables

Iptables is a command-line firewall service in Linux kernel that uses rule chains to permit or obstruct traffic. It defined various tables that contain a number of integrated chains which may be containing user-defined chains also. Iptable chain is a list of policy that is used to match a set of packets. Every rule/policy specifies the function that should be done with packets that matches

Type given below command with the help of following option which will create a new iptable chain:

-F: --flush [chain]
Flush the selected chain (all the chains in the table if none is given). This is equivalent to deleting all the rules one by one.
-X: delete-chain [chain]
Delete the optional user-defined chain specified. There must be no references to the chain. If there are, you must delete or replace the referring rules before the chain can be deleted. The chain must be empty, i.e. not contain any rules. If no argument is given, it will attempt to delete every non-builtin chain in the table.
-Z: --zero [chain [rulenum]]
Zero the packet and byte counters in all chains, or only the given chain, or only the given rule in a chain. It is legal to specify the -L, --list (list) option as well, to see the counters immediately before they are cleared. 
-N: --new-chain chain
Create a new user-defined chain by the given name. There must be no target of that name already.
-A: --append chain rule-specification
Append one or more rules to the end of the selected chain. When the source and/or destination names resolve to more than one address, a rule will be added for each possible address combination.
-p: --protocol protocol
The protocol of the rule or the packet to check. The specified protocol can be one of tcp, udp, udplite, icmp, esp, ah, sctp or the special keyword "all", or it can be a numeric value, representing one of these protocols or a different one. A protocol name from /etc/protocols is also allowed. A "!" argument before the protocol inverts the test. The number zero is equivalent to all. All will match with all protocols and is taken as default when this option is omitted.
-m: --match match
Specifies a match to use, that is, an extension module that tests for a specific property. The set of matches make up the condition under which a target is invoked. Matches are evaluated first to last as specified on the command line and work in short-circuit fashion, i.e. if one extension yields false, evaluation will stop.
-j: --jump target
This specifies the target of the rule; i.e., what to do if the packet matches it. The target can be a user-defined chain (other than the one this rule is in), one of the special built-in targets which decide the fate of the packet immediately, or an extension. For example ACCEPT DROP and REJECT.

From ipset.netfilter.org

Iptables -F
Iptables -X
Iptables -Z
Iptables -N STATE0
Iptables -A STATE0 -p tcp -dport 1200 -m recent -name KNOCK1 -set -j DROP
Iptables -A STATE0 -j DROP
Iptables -N STATE1
Iptables -A STATE1 -m recent -name KNOCK1 -remove
Iptables -A STATE1 -p tcp -dport 1300 -m recent -name KNOCK2 -set -j DROP
Iptables -A STATE1 -j STATE0
Iptables -N STATE2
Iptables -A STATE2 -m recent -name KNOCK2 -remove
Iptables -A STATE2 -p tcp -dport 1400 -m recent -name KNOCK3 -set -j DROP
Iptables -A STATE2 -j STATE0
Iptables -N STATE3
Iptables -A STATE3 -m recent -name KNOCK3 -remove
Iptables -A STATE3 -p tcp -dport 22 -j ACCEPT
Iptables -A STATE3 -j STATE0
Iptables -A INPUT -m state - state ESTABLISHED,RELATED -j ACCEPT
Iptables -A INPUT -s 127.0.0.1/8 -j ACCEPT
Iptables -A INPUT -p icmp -j ACCEPT
Iptables -A INPUT -p tcp -dport 80 -j ACCEPT
Iptables -A INPUT -m recent -name KNOCK3 -rcheck -j STATE3
Iptables -A INPUT -m recent -name KNOCK2 -rcheck -j STATE2
Iptables -A INPUT -m recent -name KNOCK1 -rcheck -j STATE1
Iptables -A INPUT -j STATE0


Let’s verify it through port scanning using NMAP command.
Nmap -ST 192.168.0.25
From given below image you can observe that NMAP found only PORT 80 is open.


Type apt-get install knockd command to install knockd.
Knockd is a port-knock command-line utility. It snoops to all traffic on an Ethernet interface, come across for particular "knock" sequences of port knocks. A client makes these port-hits through sending a TCP or UDP packet to a port on the server.


Now type following command for port knocking
Knock -v 192.168.0.25 1200 1300 1400
From given image you can observe that it will start hitting on a particular port which is actually known as port knocking. Since client is aware of sequence he can make correct knocked sequence for connection attempts.


Again use port scanning with NMAP on same target
Nmap -p 192.168.0.25
Hence you can see the difference between both NMAP’s result as this time we got port 22 open for SSH service.
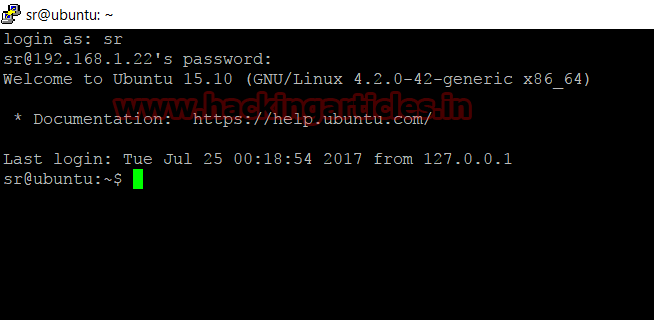

Now client will use credential for login into SSH server.
Conclusion! Network admin adds the filter with specific port that will wait for correct knock sequence which will then open the port to establish the connection otherwise it will remain closed the port until correct port knocked

How to Perform Local SSH Tunneling

Hello Friends! Previously we have discussed on SSH tunnel and step to perform dynamic tunneling (port forwarding) which you can read from here. Today we will talk on same scenario and perform local tunneling (port forwarding).
Local tunneling is a process to access a specific SSH client machine for communication. It let you establish the connection on a specific machine which is not connected from internet.
The only difference between dynamic tunneling and local tunneling is that, dynamic tunneling requires socks proxy for tunneling all TCP traffic and local tunneling only required destination IP address.
Let’s Begin!!
Objective:  To establish SSH connection between remote PC and local system of different network.
Here I have set my own lab which consist three systems in following network:
1.      SSH server (two Ethernet interface) 
                 i.   IP 192.168.1.217 connected to remote system 192.168.1.219
               ii.   IP 192.168.10.2 connected to local network system 192.168.10.2
2.      SSH client (local network) holds IP 192.168.10.2
3.      Remote system (outside network) holds IP 192.168.1.219


Given image below is describing the network configuration for SSH server where it is showing two IP 192.168.1.217 and another 192.168.10.1 as explain above.


Another image given below is describing network configuration for SSH client which is showing IP 192.168.10.2


Remote Pc (192.168.1.219) is trying to connect to SSH server (192.168.1.217) via port 22 and get successful login inside server.


Similarly now Remote PC (192.168.1.219) trying to connect with Client PC (192.168.10.2) via port 22, since they belongs to different network therefore he receive network error.


Step for SSH Local tunneling
·         Use putty to connect SSH server (192.168.1.22) via port 22 and choose option SSH >Tunnel given in the left column of category.
·         Give new port forwarded as 7000 and connection type as local 
·         Destination address as 192.168.10.2:22 for establishing connection with specific client and click on ADD at last.


 This will establish connection between remote pc and SSH server.


Open new window of putty and follow given below step:
·         Give hostname as localhost and port 7000 and connection type SSH.
·         Click on open to establish connection.


Awesome!! We have successfully access SSH client via port 7000 

Beginner Guide to SSL Tunneling (Dynamic Tunneling)

Basically tunneling is process which allows data sharing or communication between two different networks privately. Tunneling is normally perform through encapsulating the private network data and protocol information inside the public network broadcast units so that the private network protocol information visible to the public network as data. 

SSH Tunnel:  Tunneling is the concept to encapsulate the network protocol to another protocol here we put into SSH, so all network communication are encrypted. Because tunneling involves repackaging the traffic data into a different form, perhaps with encryption as standard, a third use is to hide the nature of the traffic that is run through the tunnels.

Types of SSH Tunneling:
1.      Dynamic SSH tunneling
2.      Local SSH tunneling
3.      Remote ssh tunneling
Let’s Begin!!

Objective:  To establish SSH connection between remote PC and local system of different network.
Here I have set my own lab which consist three systems in following network:
1.      SSH server (two Ethernet interface)
                    i.         IP 192.168.1.22 connected to remote system 192.168.1.21
                  ii.         IP 192.168.10.2 connected to local network system 192.168.10.2
2.      SSH client (local network) holds IP 192.168.10.2
3.      Remote system (outside network) holds IP 192.168.1.21

In following image we are trying to explain SSH tunneling procees where a remote PC of IP 192.168.1.21 is trying to connect to 192.168.10.2 which is on INTRANET of another network. To establish connection with SSH client, remote Pc will create SSH tunnel which will connect with the local system via SSH server.


NOTE: Service SSH must be activated on server as well as client machine.


Given image below is describing the network configuration for SSH server where it is showing two IP 192.168.1.22 and another 192.168.0.1 as explain above.


Another image given below is describing network configuration for SSH client which is showing IP 192.168.10.2


Remote Pc (192.168.1.21) is trying to connect to SSH server (192.168.1.22) via port 22 and get successful login inside server.


Similarly now Remote PC (192.168.1.21) trying to connect with Client PC (192.168.10.2) via port 22, since they belongs to different network therefore he receive network error.

Step for SSH tunneling
·         Use putty to connect SSH server (192.168.1.22) via port 22 and choose option SSH >Tunnel given in the left column of category.
·         Give new port forwarded as 7000 and connection type as Dynamic and click on ADD at last.
·         Click on open when all things are set.

This will establish connection between remote pc and SSH server.

Open previous running window of putty choose Proxy option from category and follow given below step:
·         Select proxy type as SOCKS 5
·         Give proxy hostname as 127.0.0.1 and port 7000
·         Click on open to establish connection.


Awesome!! We have successfully access SSH client via port 7000 

Fuzzing SQL,XSS and Command Injection using Burp Suite

Hello friends!! Today we are going to perform fuzzing testing on bwapp application using burp suite intruder, performing this testing manually is a time consuming and may be boring process for any pentester.

The fuzzing play a vital role in software testing, it is a tool which is use for finding bugs, errors, faults and loophole by injecting a set of partially –arbitrary inputs called fuzz into a program of the application to be tested. Fuzzer tools take structure input in file format to differentiate between valid and invalid inputs. Fuzzer tool are best in identifying vulnerability like sql injection, buffer overflow, xss injection and OS command injection and etc.

Let’s start!!

Fuzzing XSS


Start burp suite in order to intercept the request and then send intercepted data into Intruder.


Many input-based vulnerabilities, such SQL injection, cross-site scripting, and file path traversal can be detected by submitting various test strings in request parameters, and analyzing the application's responses for error messages and other anomalies.

Considered following as given below:

Configure the position where payload will be inserted, the attack type determine the way in which payloads are assigned to payload positions.

Payload position: test (user input for first name)
Attack type: Sniper (for one payload)


Set payload which will be placed into payload positions during the attack. Choose payload option to configure your simple list of payload for attack. Configure the payload list using one of Burp's predefined payload lists containing common fuzz strings.

Burp suite intruder contain fuzzing string for testing xss injection, therefore choose fuzzing –xss and click on ADD tab to load this string into simple list as shown in screenshot and at final click on start attack.

It will start attack by sending request which contains random string to test xss vulnerability in the target application. Now from given list of applied string select the payload which has highest length as output as shown in given image, we have select request 1 having length equal to 13926.


Insert selected payload into intercepted request and then forward this request as you can see in given image.


Bravo!!  Fuzzing test is completed and it found that application have bug which lead to xss vulnerability. From screenshot you can see it is showing an xss alert prompt.


Fuzzing OS command injection
Similarly repeat the same process in order to intercept the request and then send intercepted data into Intruder.


Configure the position where payload will be inserted, the attack type determine the way in which payloads are assigned to payload positions.

Payload position: www.nsa.gov (user input for target)
Attack type: Sniper (for one payload


Burp suite intruder contain fuzzing string which will test for os command injection, therefore choose fuzzing full and click on ADD tab to load this string into simple list as shown in screenshot and at final click on start attack.


It will start attack by sending request which contains arbitrary string to test OS command injection vulnerability in the target application. Now from given list of applied string select the payload which has highest length as output as shown in given image, we have select request 34 having length equal to 13343.
Insert selected payload into intercepted request and then forward this request as you can see in given image.


Great Job!!  Fuzzing test is completed and it found that application have bug which lead to OS command vulnerability. From screenshot you can see application is showing ID as per the request of the selected payload.


Fuzzing SQL
Similarly repeat the same process in order to intercept the request and then send intercepted data into Intruder.


Configure the position where payload will be inserted, the attack type determine the way in which payloads are assigned to payload positions. It is much similar like brute force attack.
Payload position: 1:1 (user input for login: password)
Attack type: Cluster bomb (for two payloads)


Burp suite intruder contain fuzzing string which will test for SQL injection, therefore choose fuzzing –SQL Injection for first payload postion and click on ADD tab to load this string into simple list as shown in screenshot and at final click on start attack.


Similarly repeat the same process to set payload option for second payload position.


It will start attack by sending request which contains arbitrary string to test SQL injection vulnerability in the target application. Now from given list of applied string select the payload which has highest length as output as shown in given image, we have select request 168 having length equal to 13648.


Insert selected payload into intercepted request and then forward this request as you can see in given image.


Wonderful!!  Fuzzing test is completed and it found that application have bug which lead to SQL injection vulnerability. From screenshot you can see we had login into Neo’s account without valid input this happens only as per the request of the selected payload.

Time Scheduling on SSH Port

This article is related to network securities which help the network administrator to secure running service on any server through scheduling task.  We are going to schedule task for SSH service in order to add another layer in security in network , in simple word we are going to set timing limit for SSH service on the server .
Cron is a UNIX like computer utility which schedules a command or script on your server to run automatically at a specified time and date. A cron job is the scheduled task itself. 
Service ssh start
Service ssh status

As you can see from given below image the service SSH is running.


We are going to schedule SSH services using crontab, crontab is built in service of linux to schedule task.

User required root permission to open the crontab, now type following command:
Sudo crontab -e

We had open crontab using nano, the given below image shows crontab interface.


Crontab uses the format of “m h dommondow [command]”, Following table will help you in writing schedule for crontab:

Field
value
’m’ stands for minute
0-59
h’ for hour
0-23
‘dom’ for date
1-31
‘mon’ stands for month
1-12
‘dow’ stands for day of week
1-7[1 stands for Monday]
command
the required command to be

Now if we need to schedule a task at 8:00 am on Monday we will write the command as following:
0 8 * * 1 [command]

Now we are going to use crontab to schedule “ssh service”. We are going to schedule ssh service for 3 minutes and get stop after 4 minutes of use when it is activated.
We use the command for scheduling task:

* * * * * sleep 180;/usr/sbin/service ssh start
Above command will schedule the task for only 3 minutes where 180 is equal to 3 minute and to stop this service ssh after that, type given below command where 240 is equal to 4 minute.

* * * * * sleep 240;/usr/sbin/service ssh stop

Let’s check whether above command is working or not.
Wait for service to reboot. Using nmap we scan port 22
nmap  -p 22 127.0.0..1
After scanning you will observe that ssh service is running port 22 is open.


Nmap  -p 22 127.0.0..1
Now if our command is working properly it should stop itself after 4 minutes get finished, we again check using nmap.
The port is now closed at 4th minute .


Now if I want to schedule a task at a particular time, let’s say I want to schedule my ssh service to start at 5:00 am and close at 5 pm, we use this command:
0 5 * * * /usr/sbin/service ssh start
0 17 * * * /usr/sbin/service ssh stop
This command schedules the ssh service to start every day at 5:00 am and stop the ssh service at 5:00 pm.


Author: Sayantan Bera is a technical writer at hacking articles and cyber security enthusiast.