Today, in this article, we’ll focus on the Repeater and its options featured by the Burp Suite Professional Version, which will help any Pentester to send the request inside the burp and observe its Response in real-time without disturbing the request captured from the browser.
Table of Content
·
Introduction
·
Renaming the Tabs
·
Request Method
·
Request History
·
URL as Request
·
URL Encode
·
Following Redirection
·
Search
·
Reopening Closed Tab
·
Views
·
Exporting Repeater Data
·
Conclusion
Introduction
Even the users that are just beginning to
use the Burp Suite are likely to be familiar with the functions of the
Repeater. However, let’s go over them to recall the functionality of the
Repeater. It is a tool that is designed to allow the user or attacker to change
or resend particular HTTP requests and understand and analyze the response
generated by it. Here in the demonstration below, we have captured an HTTP
request from the browser. This request is captured inside the Intercept sub-tab
inside the Proxy tab. By Right Clicking on the captured request, a drop-down
menu appears. This menu contains an option that says “Send to Repeater”.
Clicking this option will send the request to the repeater. You can also use
the shortcut Ctrl and R to send any request to the repeater.

Now that we have successfully sent the
request to the Repeater, we can move to the Repeater and toggle with the
request, and observe the response generated for that particular request. In
line with the Proxy Tab, we have the Repeater tab as well. Here, we can see
that we have the request that was captured earlier. The request can be edited
as per the user’s requirements. Click the Send Button, the request will be sent
to the target and the response that was generated will be presented in the
Response section as shown below.

Renaming the Tabs
During any assessment, the Repeater tends
to get cluttered with multiple tabs with numbers as shown in the image below. Since
each time, a request is being sent to the Repeater, the tab gets incremented by
one. This can get confusing to catch up after a while of working on a project.

Upon double Clicking the Tab, you can
rename the Tab based on your preference. This can be anything that can help you
remember and sort. In the Demonstration below, we renamed the Tabs concerning
the Testing that we were performing on that particular session.

Request Method
Next, we will discuss the ability of the
Repeater to change the Request Method type. These are the HTTP methods such as
the GET, POST, PUT, OPTIONS, etc. Some web pages are configured to work with
multiple methods. Suppose, you want to request a page with input fields, to
request that form, we need to use the GET methods, and to submit the data from
the fields to the server, you will require the POST methods. This can be managed with just an option
present in the right-click menu by the name of “Change request method”. In the
demonstration provided below, we have a GET request.

Upon changing the request method we can see
that the method was changed to POST from GET and any parameters that were
present in the URL were shifted to the body of the request as per the norms of
POST request.

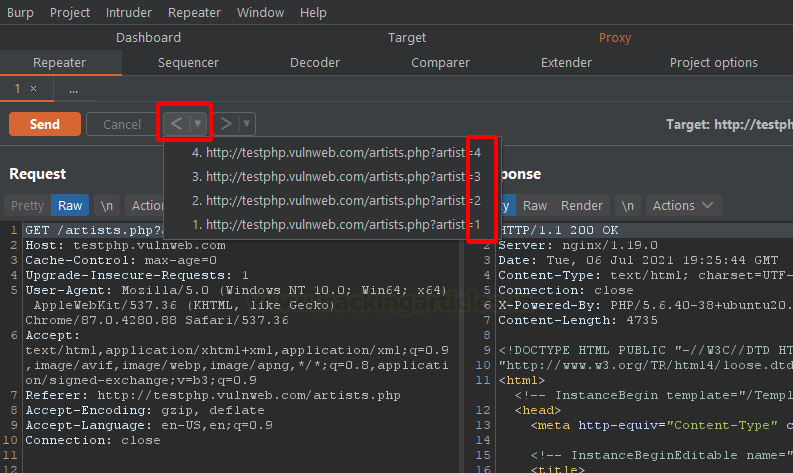
Request History
When using any Web Browser, we have the
Forward and Backwards buttons on the browser. These help us to navigate to the
Previous or Next Page. The repeater has the Back (<) and Forward (>)
buttons as well. These can help where we get a 301 Response for our request.
This means that we can follow the Redirection. Using the Forward (>) button
we can choose to move to the next request and its subsequent response. However,
in case you are using the repeater to test different parameters and their
effects on the response, then you can go back to any response that might be
working as per your requirement. The Request history can be viewed by clicking
the Drop-Down button next to the Backward (<) button as demonstrated below.
URL as Request
In a Penetration testing environment, there
are situations where it is required to test the response of a particular URL
without actually capturing the request. Or there can be a scenario where you
were able to get a particular finding but you don’t have the request in the
response. So, you will have to go to the HTTP History and locate that
particular request and send it to the repeater. This process can be shortened
by just using the URL. Here, we are copying the URL from our Web Browser.

Now we are going to the repeater and we
will be creating a new tab by right-clicking on the section. We will be asked
if the new tab is supposed to be an HTTP request or a Web Socket request. Since
we are trying to work with a Webpage, we choose HTTP.

Now, we right-click on the empty Request
section and choose the “Paste URL as request” option from the dropdown menu.

We can see from the image below that the
URL was converted into a proper request with all the basic header added to it
by the Burp. This is done automatically.
Now that we have the request for the URL that we want to investigate, we
can just click on the Send button and observe the response generated by it.

URL Encode
Web servers don’t deal with the spaces and
certain symbols easily. Hence, the space and certain symbols such as the &
are encoded in URL Encode format. Developers program the websites to encode the
data Client side before generating the request and then send it to the web
server. Now, when making changes to the request inside the Repeater, you forget
to provide the proper encoding the request may behave in an unpredicted way.
Also, some filters are placed to find certain symbols such as < > but the
URL may Encode equivalent of those are not filtered and that filter can be
bypassed by just encoding them. In the demonstration below, we have a request
inside the Repeater and we right-click on the request and choose the URL-encode
as you type option. This will encode our text to URL Encode format as we type
without any effort from our end.

We can see that we have added the values to
the searchFor parameter and the spaces are converted into + and the entire
string has been converted into URL Encode format. This can be disabled by
choosing the same option from the menu.

Following Redirection
Redirection is an important part of any web
application. This can help the user navigate the web pages in a way that the
developer intended. It can also help the developer to integrate multiple
different web applications into a single website. Web Browsers follow the
redirection by default and it poses a problem to a penetration tester because
while testing certain scenarios such as Open Redirection or Web Cache
Poisoning, the penetration tester needs to toggle and observe the redirection
response from the application. The Repeater has an option that can help with
this or similar situations. It provides the user with an option to either never
to follow redirections or follow the redirection for the on-site redirection or
follow the redirection for In-scope domains only or to just Always Follow the
Redirection. This provides the user to configure the Repeater as per their
requirement that is based on the build of the application.

Since, in the previous step, we choose
Never to follow the redirections, we see a 302 response in the image below. Now
that we have a Redirection response, to move forward with the request, we can
click on the Follow redirection button as shown in the image below to continue.

Search
In both sections i.e., Request and Response
of the Repeater, we have a search bar at the bottom. Since the response would
contain all the HTML code to create the webpage, it tends to be very lengthy
and it can be very difficult to look for any particular keyword in the code.
This is a problem when we are trying to see if any parameters that we passed
were reflected in the response or not. The Search is configured to
automatically move to the first keyword it finds and the Left and Right arrow
keys can be used to toggle between the different occurrences of the keyword. Some
settings can be toggled while using the Search. We can check the box to make
the search Case Sensitive or we can use a Regex value to search for a general
type of occurrence. At last, the Auto-scroll can be triggered each time any
change be made to the Search bar. This can also help look for particular
keywords quickly.

Reopening Closed Tab
If you have been using Burp for some time
now, you might have accidentally closed the Repeater Tab that you don’t want to
close. You are not alone and it is not your fault. The Close (X) is placed in
such a way that it is very possible to close the tab without any intention to
do so. After numerous requests to the PortSwigger, They made this option where
you can Right Click on the location where all the tabs lie and Choose The
Reopen Closed Tab option to open any tab that you closed accidentally.

Views
Multiple views are provided to view the
Request and the Response sections in the Burp Suite. This pretty much sums
based on the user’s preference. The three options that are provided are the
classic Side by Side Panels as shown in the image below.

Next, we have the Top-Bottom Approach. This
can be useful if any user is comfortable with this orientation.

Finally, we have the Tabs approach that adds
another set of tabs to the Burp’s Tab scheme. It gives the user a complete area
with a particular section. This can come in handy with certain scenarios. It
provides the Tabs for Request and Response and we can click on those to access
both of them.

Exporting Repeater Data
As we know that documentation is a vital
part of any engagement. As we send multiple requests to form the repeater and
with each request, we tend to make some changes to the request. So, to keep a
track of it outside of Burp, we have the feature that allows us to save the
history of all the requests sent. After
working with multiple requests, we right-click on the request and choose the “Save
entire history” option from the drop-down menu.

This opens up a window that asks us to
provide the location of the file that we want to save. Upon browsing the
location, we name the file as per our requirement and provide the extension as
XML. We can also encode the requests in Base64 as well. However, in this case,
we are not doing so.

Now, the history of all the requests that
were sent will be found at the provided location in the XML format. In the
image provided below we can see that we have the IP Address of the target,
Domain of target, Port of the target, Protocol used, and the complete contents
of the Request and the Response.

Conclusion
The repeater is one of the basic tools of
the BurpSuite. However, through extensive research and developments, a lot of
hidden features are added to the tool. It has reached a point where many of
these features can ease the life of any Pentester.


0 comments:
Post a Comment