Over the last few years, attackers used the Remote Desktop Protocol (RDP) for accessing unsecured servers and company networks. In ransomware malware attacks since 2017, RDP has become a major vector. Security professionals have focused their attention increasingly on this protocol by writing signatures to detect and prevent attacks of RDP vulnerabilities.
RDP supports
several operating modes to encrypt network traffic, as a proprietary protocol
from Microsoft. This encryption, unfortunately, makes it hard to write RDP
signatures because the content of RDP is hidden.
We can,
fortunately, develop a test environment that provides the key file to decrypt
the packet capture (pcap) of Wireshark's RDP traffic.
This article
shows how the environment is prepared, a decryption key is obtained, and how
RDP traffic can be deciphered.
Table of contents
·
Prerequisites
·
Trace File
·
Virtual Environments Setup
·
Remove Encrypted Ciphers from
RDP Client
·
Generate and Download RDP
Server’s Private Key
·
Capture RDP Traffic
·
Analyzing and Decrypting
Wireshark Traffic
·
Forensics with Captured RDP
Data
§ The RDP Data Protocol
§ Security Protocols Used by RDP Server
§ Analyze Connectivity between Client & Host
§ Analyzing Credentials
·
Conclusion
Prerequisites
§ A good understanding of RDP Setup and Usage.
§ A virtual environment to run Two Windows host.
·
First windows host act as an
RDP Client.
·
Second windows host act as an
RDP Server.
§ A Linux OS for Decryption of pfx file
§ Wireshark Running in another host
Trace
file
You can download the trace file from here
Virtual
Environments Setup
VirtualBox or VMware Workstation for
Windows and Linux are the two most common virtual environments for this sort of
testing. For macOS, VMWare Fusion is used.

Two Windows 10 hosts were included in
our test lab setup. One of the hosts was an RDP server, while the other was an
RDP server. We have recorded RDP traffic with Wireshark as a man in the middle between
these two hosts.
Remove
Encrypted Ciphers from RDP Client
Machine 1
In cryptography, forward
secrecy (FS), also known as perfect forward secrecy (PFS), is a
feature of specific key agreement protocols that gives assurances that session
keys will not be compromised even if long-term secrets are used in the session
key exchange are compromised. For HTTPS, the long-term secret is typically the
Private signing key of the server. Forward secrecy protects past sessions
against future compromises of keys or passwords. By generating a unique session
key for every session a user initiates, the compromise of a single session key
will not affect any data other than that exchanged in the specific session
protected by that particular key.

The value of forwarding secrecy is
limited not only by the assumption that an adversary will attack a server by
only stealing keys and not modifying the random number generator used by the
server but it is also limited by the assumption that the adversary will only
passively collect traffic on the communications link and not be activated using
a Man-in-the-Middle (MITM)
attack. Forward secrecy typically uses an ephemeral Diffie-Hellman key exchange
to prevent reading past traffic. The ephemeral Diffie-Hellman key exchange is
often signed by the server using a static signing key.
More can be ridden at - Wikipedia.org

This whole scenario looks like a Perfect
Forward Secrecy. Isn’t it…?
These types of ciphers create multiple
SSL/TLS connection session keys. We can't decrypt SSL/TLS traffic with the forward
secrecy using RDP server private key. Therefore, we have to delete settings that
support the Forward Secrecy on the RDP client.
For this, we are using a Windows 10
host as an RDP Client.
To do this, open Group Policy Management
console gpedit.msc as an administrator

After opening the console navigate to
the following menu path:
Administrative Templates > Network
> SSL Configuration Settings
And then Double-click to the entry of
the SSL Cipher Suite Order

After that select the “Enable” option
to Enable the SSL Cipher Suite Order.
Double-click the list of Ciphers and
then select and copy the entire list.

Paste the copied ciphers into a notepad
and remove all the ciphers that support Elliptic Curve Cryptography using
Diffie-Hellman Ephemeral (ECDHE) or Digital Signature Algorithm (ECDSA)
encryption. Remove all the ciphers that contain the word ECDSA and ECHDE. All
of these ciphers are managed sequentially, so they were easy to delete from the
text.

Now, an updated list of ciphers is shown
below
TLS_AES_256_GCM_SHA384,TLS_AES_128_GCM_SHA256,TLS_RSA_WITH_AES_256_GCM_SHA384,TLS_RSA_WITH_AES_128_GCM_SHA256,TLS_RSA_WITH_AES_256_CBC_SHA256,TLS_RSA_WITH_AES_128_CBC_SHA256,TLS_RSA_WITH_AES_256_CBC_SHA,TLS_RSA_WITH_AES_128_CBC_SHA,TLS_RSA_WITH_3DES_EDE_CBC_SHA,TLS_RSA_WITH_NULL_SHA256,TLS_RSA_WITH_NULL_SHA,TLS_PSK_WITH_AES_256_GCM_SHA384,TLS_PSK_WITH_AES_128_GCM_SHA256,TLS_PSK_WITH_AES_256_CBC_SHA384,TLS_PSK_WITH_AES_128_CBC_SHA256,TLS_PSK_WITH_NULL_SHA384,TLS_PSK_WITH_NULL_SHA256

Copy the updated ciphers list and paste
it back into the SSL Cipher Suites field but make sure you have overwritten the
original list and then click on the Apply button to save the
configuration and hit OK to close the window.

Generate
and Download RDP Server’s Private Key
Machine 2
We have used another Running Windows 10
Host as an RDP server.
Now our main task is to extract the
private key from the host’s operating system. First of all, we have to be
ensured that our host is acting like an RDP Server or not, if not go to the “Settings
> System > Remote Desktop” and then “Enable Remote Desktop”.

After that, we have to Extract Private
Key from its Operating system. Windows don’t allow to export of any kind of
certificate so we are going to use tools like Mimikatz or Jailbreak.
Mimikatz or Jailbreak is a tool that can
dump or export any kind of Certificate easily.
So, I’m going to show you how this
is done from both methods. You can stick with the method which feels you like
easy.
Method 1: - Mimikatz
Mimikatz is a shell for various modules.
Run the following commands to export RDP keys or Certificates with private
Keys. Run Mimikatz as an administrator.
#
Enable "debug" privilege to be able to patch CNG service
privilege::debug
#
Patch CNG service lasts until the next reboot
crypto::cng
#
Patch CAPI library in memory of this process
crypto::capi
# Export Remote Desktop certificate(s) with private keys, password
is "mimikatz"
crypto::certificates
-systemstore:CERT_SYSTEM_STORE_LOCAL_MACHINE -store:"Remote
Desktop" /export

As you can see Mimikatz successfully
dumped the certificate. You can find it in the Directory of Mimikatz.

Method 2: - Jailbreak
A jailbreak is an iSECPartners tool that
can export the RDP certificate of a server. We could extract the private key
from the exported certificate. On our newly developed RDP server, we downloaded
the following Jailbreak binaries from this GitHub repository to use Jailbreak.

After downloading the Jailbreak utility
navigate to the directory of Jailbreak-master > binaries and copy the
location of the binary folder

open a Command prompt with administrator
privileges and went to the directory of downloaded jailbreak binaries and
execute the following command.
jailbreak64.exe
%WINDIR%\system32\mmc.exe %WINDIR%\system32\certlm.msc -64
if you are running the 32-bit version of
windows then execute the following command
jailbreak32.exe
%WINDIR%\system32\mmc.exe %WINDIR%\system32\certlm.msc -32

These commands will open up a
certificate manager for the local machine. From the left column expand the
section of Remote Desktop and navigate to the certificate folder this will show
you a certificate with the most expiration date. Do the right click on the
certificate, select All Tasks, and then Export.

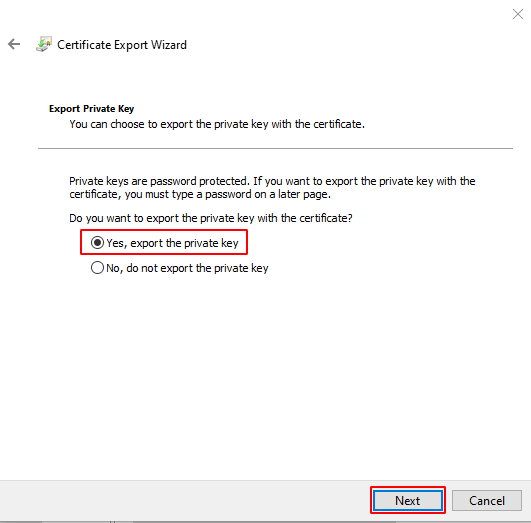
This will open up a Certificate Export
Wizard… to export the Certificate just hit the “Next” button.

Make sure to select the option to export
the private key when exporting the certificate.
We could only export the certificate as
a PKCS #12 (.PFX) file for our host.

The certificate needed to have a
password in the next step. We didn't have any difficulty criteria, so we went
with a simple password.

After that provide a directory where you
want to save the certificate.

Finally, we have successfully Exported
the Certificate with the Private key.

Since our certificate was obtained
through Mimikatz or Jailbreak, we transferred it to a Linux host and
extracted the key using OpenSSL. To extract the key in PEM format, we first
used the OpenSSL command
You can download the certificate from
here
openssl pkcs12 -in rdp.pfx -nocerts -out
rdp_key.pem -nodes
Password:
123
Then after we have to remove the
passphrase from the key, to do this run the following command
openssl rsa -in rdp_key.pem -out rdp.key

This will provide us the RDP Server’s
key

As you can see, we have successfully
extracted the RDP Server’s private key. Don’t forget to export this public key
to the windows system for the use of later purposes.
Reference: paloaltonetworks.com
Capture
RDP Traffic
We may use a tool like Wireshark to
record network traffic in the VLAN using promiscuous mode with our two Windows
hosts in the same virtual network. once the recording starts Our Windows
client uses RDP to log in to the other Windows host that was
operating as an RDP server. The server's host IP was 192.168.0.111.

We logged into 192.168.0.111 and
performed some simple tasks including web surfing and trying to connect to an FTP
server while the pcap is recording the traffic.

After of few minutes we logged out from
the RDP Server and stopped recording Network traffic from Wireshark

Analyzing
and Decrypting Wireshark Traffic
You can download the trace file from here
Open the pcap of RDP Session in
Wireshark. We did not see any results when filtering RDP on our Wireshark
display filter, as RDP traffic has been encrypted. We saw a blank column
display during filtering the RDP in our pcap as shown below.

Let’s Decrypt the Traffic
However, the results were quite
different when we used our private server key for decrypting RDP
Traffic in Wireshark.
The RDP server DESKTOP-CDE7HJC
was at IP address 192.168.0.111 in the pcaps we captured, and RDP
traffic was carried out over TCP port 3389. This information was
required in order for Wireshark to properly decrypt RDP traffic.
To do this navigate to Edit >
Preferences, Expand the Protocols section and select TLS
After selecting TLS navigate to the Edit
section and provide the following details such as IP address of the RDP server,
port no., and the path of the private key
Ip address: - 192.168.0.111
Port no.: - 3389
Protocol: - tpkt
Rsa key:- the path of the saved public
key.

We had much better results when
reviewing the pcap after Wireshark was configured to decrypt RDP traffic.
Forensics
with RDP Data
When we loaded our key, our column
display was no longer blank when we filtered for RDP. As shown in the image
below, we had a variety of outcomes.

Let’s do some Forensics with this data
like what we can find with this data.
Hmm!!! Exited….
As we can see that we have now
successfully decrypted the RDP data… but now have more question about what to
do with this kind of data ….
The answer is quite simple... we can
gather some pieces of information like User ID, Password, Time of login,
country of origin, etc… by arranging the binaries.
The
RDP Protocol
Understanding all of the underlying
protocols used in RDP was one of the most difficult aspects of creating this
library. It was difficult for some of them just to figure out what they were
here for. The connection sequence alone employs four protocols: TPKT, X224, MCS
(T.125), and GCC (T.124), as well as TLS at times and RC4 at others. This
implies that we must be able to initiate TLS after the first few packets of the
connection if necessary so we must keep an eye out for that.
Are you confused? We were, too. As a
result, we created this simple diagram to explain the connection sequence.

Security
Protocols used by RDP Server
Let’s first understand which type of
Security used by the RDP server

As shown in the figure of RDP protocol
now we’re much clear that the RDP server uses this type of protocol to secure
the connection.
Analyze
connectivity Duration between Client & Host
Using the packet capture file, we were
able to determine the time of the incident. We used a very cool Wireshark
feature that’s hidden in Statistics -> Conversations -> TCP:
Conversations between two endpoints.

As we can see there is something that happened
In the highlighted fields. I managed to understand they are using RDP protocol
(port no.3389) but won’t able to able
find out the actual duration of the connectivity between the client and the
host so, I applied “Limit to the Display filter”

Now, the scenario is pretty much clear
and we managed to see the actual duration of connectivity and we got two IP
addresses of the client and host that is 192.168.0.108 and 192.168.0.111. but
still, we were not able to identify which one is the host and which one is the client.
Analyzing
Credentials
So, have got the two specific IP address
and port number. Without wasting I applied a quick filter on behalf of this
information
Ip.addr == 192.168.0.111 &&
tcp.port==3389

And look what we have, a whole communication
between the client and host. But I can’t able to understand which type of
information has been shared. So, I managed to apply some more filters to make it
more understandable. For example, now we have the client and host IP address so
applied a display filter to find data shared by the client….
Let’s see what happen
rdp.client.address=192.168.0.108

Wooh!!! As you can see we are managed to
find user credentials used by clients on the RDP server just like user id, password,
working directory, Time zone, weekday… etc...
As an attacker, we can use these
credentials to completely take over the system.
But one more thing, still we don’t know
the actual user name that the client used to log in to the RDP Server. Let’s
find that
To find the client user name I quickly
apply a display filter that shows us the client user name is entered by the
client….
rdp.client.name

Whoa!!!... As you can see we have
successfully got the client user name and the keyboard used by the RDP server.
By applying these kinds of filters you
can easily drill down the traffic to gather the information.
Conclusion
This article discussed how to set up an
environment for decrypting RDP traffic. This is best accomplished in a virtual
environment with two hosts running Windows 10 Professional. We extracted the
private key from our Windows host acting as the RDP server after ensuring the
client did not use any forward secrecy ciphers. Then we quickly captured a pcap
of network traffic. We were able to decrypt RDP traffic after the session ended
by using the server's private key.
When creating signatures to detect RDP
vulnerabilities and attacks, this type of environment can be useful to security
professionals.


0 comments:
Post a Comment