Probing through every open port is practically the first step
hackers take in order to prepare their attack. And in order to work one is
required keep their port open but at the same time they are threatened by the
fear of hackers. Therefore, one must learn to secure their ports even if they
are open.
In this article we will secure SSH port so that even if it’s open
no one will be able to exploit it. First of all let’s install SSH server using
following command:
sudo apt-get install
openssh-server

Once the server is installed start SSH service by typing :
service ssh start
To confirm the working of SSH, use the following command :
service ssh status

As the service of SSH is started, scan it in your kali’s
terminal using nmap:
nmap -sV 192.168.1.17

Scanning will show that on port 22 is open with the service
of SSH. Configure this port using PUTTY.
For configuration in putty, give the IP address in host name along with
port number and then select SSH and then finally click on Open.

Upon connecting, it will ask for password, give the said
password and press enter.

How to Secure SSH Connection
Now that SSH has been configured. We can use our first
measure of security i.e. port forwarding. In computer>etc>ssh you will find a file with the name of “sshd_config”.

Open this file and wherever it says port 22, change it to
port 2222.

This way we have forwarded SSH service from port 22 to port
2222. Let’s check it on nmap to confirm.
nmap -sV 192.168.1.17

SSH Connection using
PGP Keys
This way we have applied our first measure of security. Now
for our second measure of security download and install PUTTY Key Generator. Open it and click on Generate button on low right side.
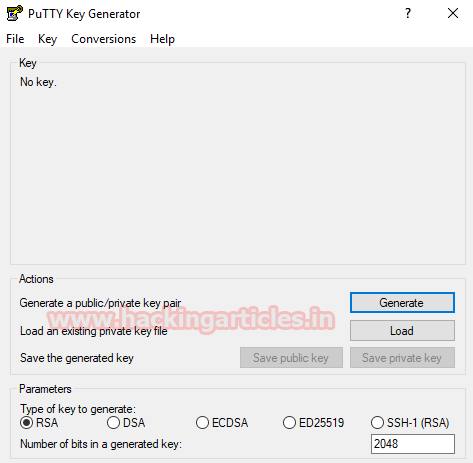
This
will generate a public and private key. Out of these save the private key.

The private key will be saved as shown in following image.
You can rename it at convenience as I have named it ssh login key.

Now open terminal of your server and type:
ssh-keygen

The
above command will create a folder named .ssh
and then create an empty text file with the name authorized_keys in the said folder.


In the terminal, move into .ssh folder and type the following
command:
puttygen –L “ssh login
key.ppk”

This command will generate a key. Copy this key in the empty
file which we created earlier with the authorized_keys.

Then in putty configuration tab, go to data and give Auto-login
username

The
open SSH>Auth and give the path of SSH login key (private key that was
generated).

And then in session tab give the IP address and port number
which is now 2222 due to our first measure of security.

And
then click on open. It will open
without asking for password as you have configured the key.

But this doesn’t mean it can’t be open using password. And
still we are vulnerable to hackers. Therefore we are going to apply third
measure of security i.e. to disable password completely. For this, go to computer>etc>sshd_config.

Here, change password authentication from yes (as shown the
image above) to no and uncomment (as shown in image below).

And now that we have successfully applied three measures of
security our port is safe from anyone and everyone. To this port the hacker
will require physical access to you hardware which is impossible. And if you
want to access SSH from another machine then just configure the same key in
that PC too and it have access to it.


0 comments:
Post a Comment