We all know that, after compromising the victim’s machine
we have a low-privileges shell that we want to escalate into a
higher-privileged shell and this process is known as Privilege Escalation. Today in this article we will discuss what
comes under privilege escalation and how an attacker can identify that
low-privileges shell can be escalated to higher-privileged shell.
Table of Content
§
Introduction
§
Vectors of Privilege Escalation
§
Windows-Exploit-Suggester
§
Windows Gather Applied Patches
§
Sherlock
§
JAWS - Just Another Windows (Enum) Script
§
PowerUp
Introduction
Basically privilege escalation is a phase that comes after
the attacker has compromised the victim’s machine where he try to gather critical
information related to system such as hidden password and weak configured
services or applications and etc. All these information help the attacker to
make the post exploit against machine for getting higher-privileged shell.
Vectors Privilege
Escalation
Following information are considered as critical
Information of Windows System:
§
Version of operating system
§
Any Vulnerable package installed or running
§
Files and Folders with Full Control or Modify
Access
§
Mapped Drives
§
Potentially Interesting Files
§
Unquoted Service Paths
§
Network Information (interfaces, arp, netstat)
§
Firewall Status and Rules
§
Running Processes
§ AlwaysInstallElevated Registry Key Check
§ Stored Credentials
§ DLL Hijacking
§ Scheduled Tasks
There are several script use in Penetration testing for
quickly identify potential privilege escalation vectors on Windows systems and today
we are going to elaborate each script which is working smoothly.
Windows-Exploit-Suggester
If you have victim’s low-privilege meterpreter or command
session then use can use Exploit-Suggester.
This module suggests local
meterpreter exploits that can be used. The exploits are suggested based on the
architecture and platform that the user has a shell opened as well as the
available exploits in meterpreter. It's important to note that not all local
exploits will be fired. Exploits are chosen based on these conditions: session
type, platform, architecture, and required default options.
use post/multi/recon/local_exploit_suggester
msf post(local_exploit_suggester) > set lhost
192.168.1.107
msf post(local_exploit_suggester) > set session 1
msf post(local_exploit_suggester) > exploit
As you can observe it has suggested some post exploits against
which the target is vulnerable and that can provide higher-privilege shell.
Windows
Gather Applied Patches
This module will attempt to enumerate which patches are
applied to a windows system based on the result of the WMI query: SELECT
HotFixID FROM Win32_QuickFixEngineering.
use
post/windows/gather/enum_patches
msf
post(enum_patches) > set session 1
msf
post(enum_patches) > exploit
As you can observe it has also shown that the target is
possibly vulnerable to recommended exploit that
can provide higher-privilege shell.
Sherlock
It is a PowerShell script to quickly find the missing
software patches for local privilege escalation vulnerabilities. It also as
similar as above post exploit as gives suggestion the target is possibly
vulnerable to recommended exploit that can provide
higher-privilege shell.
Download it from git hub with help of following command and
execute when you have victim’s meterpreter session at least once.
git clone
https://github.com/rasta-mouse/Sherlock.git
Since this script should be execute in power shell therefore
load power shell and then import the downloading script.
load powershell
powershell_import
‘/root/Desktop/Sherlock/Sherlock.ps1’
powershell_execute
“find-allvulns”
The above command will show that the target is possibly
vulnerable to recommended exploit that can be used to achieve higher-privilege
shell.
JAWS
- Just Another Windows (Enum) Script
JAWS is PowerShell script designed to help penetration
testers (and CTFers) quickly identify potential privilege escalation vectors on
Windows systems. It is written using PowerShell 2.0 so 'should' run on every
Windows version since Windows 7.
Current Features
·
Network Information (interfaces, arp, netstat)
·
Firewall Status and Rules
·
Running Processes
·
Files and Folders with Full Control or Modify
Access
·
Mapped Drives
·
Potentially Interesting Files
·
Unquoted Service Paths
·
Recent Documents
·
System Install Files
·
AlwaysInstallElevated Registry Key Check
·
Stored Credentials
·
Installed Applications
·
Potentially Vulnerable Services
·
MuiCache Files
·
Scheduled Tasks
git clone
https://github.com/411Hall/JAWS.git
Once you have meterpreter shell, upload the downloaded
script and use command shell to run the uploaded script
powershell.exe
-ExecutionPolicy Bypass -File .\jaws-enum.ps1 -OutputFilename JAWS-Enum.txt
It will store the critical information into a
text file named as “JAWS-Enum.txt
As said the JAWS-Enum.txt file must have been stored the
vector that can lead to privilege escalation, let’s open it and figure out the
result.
In the following image you can observe it has shown all user
name and IP configuration.
In this image we can clearly observe the result of NetStat.
In this image we can clearly observe the result of running process
and services.
In this image we can clearly observe all install program and
patches.
In this image we can clearly observe the folder with full
control and Modify Access and hence many more information can be extracted by
running this script.
PowerUp
PowerUp is a powershell tool to assist with local privilege
escalation on Windows systems. PowerUp aims to be a clearinghouse of common
Windows privilege escalation vectors that rely on misconfigurations.
Running Invoke-AllChecks
will output any identifiable vulnerabilities along with specifications for any
abuse functions. The -HTMLReport flag will also generate a
COMPUTER.username.html version of the report.
Current Feature
Service Enumeration:
§
Get-ServiceUnquoted : - returns services with unquoted paths that
also have a space in the name.
§
Get-ModifiableServiceFile :- returns services where the current user can
write to the service binary path or its config.
§
Get-ModifiableService : - returns services the current user can
modify.
§
Get-ServiceDetail :- returns detailed information about a
specified service.
Service Abuse:
§
Invoke-ServiceAbuse : -
modifies a vulnerable service to create a local admin or execute a
custom command.
§
Write-ServiceBinary : - writes out a patched C# service binary that
adds a local admin or executes a custom command.
§
Install-ServiceBinary :- replaces a service binary with one that adds
a local admin or executes a custom command.
§
Restore-ServiceBinary :- restores a replaced service binary with the
original executable.
DLL Hijacking:
§
Find-ProcessDLLHijack : - finds potential DLL hijacking opportunities
for currently running processes
§
Find-PathDLLHijack :- finds service %PATH% DLL hijacking
opportunities
§
Write-HijackDll : - writes out a hijackable DLL
Registry Checks:
§
Get-RegistryAlwaysInstallElevated :- checks if the AlwaysInstallElevated registry
key is set
§
Get-RegistryAutoLogon :- checks for Autologon credentials in the
registry
§
Get-ModifiableRegistryAutoRun :- checks for any modifiable binaries/scripts
(or their configs) in HKLM autoruns.
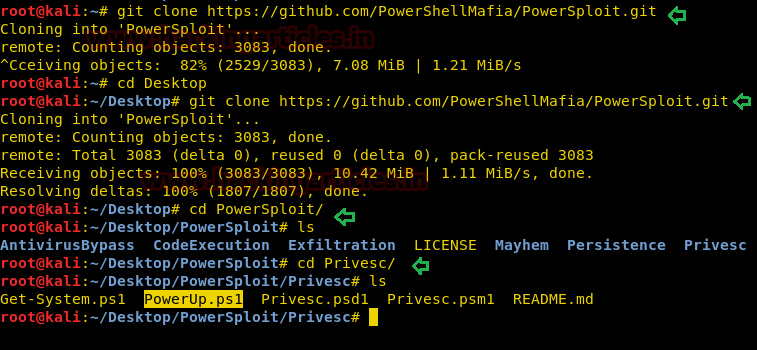
Now use following command to download it from git hub as
said above powerUp is the module of powersploit therefore we need to download
package of powersploit.
git clone https://github.com/PowerShellMafia/PowerSploit.git
cd PowerSploit
ls
cd Privesc
ls
Again load power shell and then import the downloading
script.
load powershell
powershell_import
‘/root/Desktop/PowerSploit/Privesc/PowerUp.ps1’
powershell_execute
Invoke-AllChecks
The above command will show that the target is possibly
vulnerable to recommended exploit that can be used to achieve higher-privilege
shell.