Hack the USV: 2017 (CTF Challenge)

Hello friends! Today we are going to take another CTF challenge known as USV: 2017. The credit for making this vm machine goes to “Suceava University” and it is another capture the flag challenge in which our goal is to find 5 flags to complete the challenge. You can download this VM here.
Let’s Breach!!!
Let us start form getting to know the IP of VM (Here, I have it at 192.168.0.18 but you will have to find your own)
Let’s do an nmap scan for port enumeration.

nmap -A -p- 192.168.0.18

We find port 21,22,80,4369,5222,5269,5280,15020,33939 to be open. Port 80 is running http and port 15020 is running https.
So we first open 192.168.0.18 in our browser.


We don’t find anything on this page so we enumerate the directories for further information.


During our directory enumeration we find a page called admin2, we open it in our browser and find it to be login page.


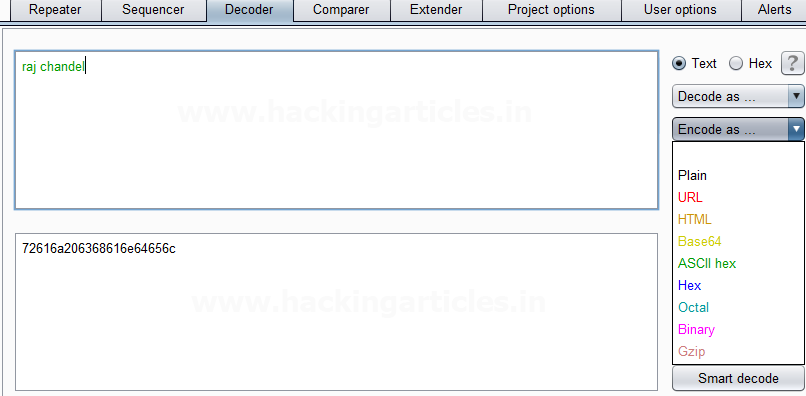
We take a look at the source code and find that the password is hidden itself in the page. The page uses javascript to verify the password. The javascript is in hex encode.


We first decrypt the hex encode and find that if the value is 1079950212331060 it will let you enter or it will show wrong password. Now the final value is calculated using a formula:
(stringconcat(password+4469)-234562221224)*1988=1079950212331060
Now when we calculate the value of the password we find it to be 77779673. When we enter it we get the 1st flag.


Now we open the ip 192.168.0.18 at port 15020 as it is running another apache service. When we open the ip on our browser we find that we need to install ssl certificate. We take a look at the details of the certificate for information; at the issuer section we find our 2nd flag.


We accept the certificate and open the web page.


We don’t find anything on the webpage. So we enumerate the directories on this page.


We open blog/ directory and find a few blogs with few comments.


Now goint through the blogs we find kevin’s blog with 1 comment that hints it has a flag inside his home directory.


We take a look inside source code and hint to open a php file called download.php.


When we open it we find to use image parameter to open file, this page maybe vulnerable to LFI.


We cannot exploit LFI vulnerability using the browser, we use post data using curl to exploit the LFI vulnerability.
curl -d “image=/etc/passwd” https://192.168.0.18:15020/blog/download.php -k


curl -d “image=/home/kevin/flag.txt” https://192.168.0.18:15020/blog/download.php -k


Now we go to the other vault/ directory, it contains a lot of directories so we download it on our system to make it easier for us to look through the directories. We download the entire site using recursive download utility of wget.
wget  -r –no-check-certificate “http://192.168.0.18:15020/vault


Now we use find command to look for files and we use grep to rule out .html files. We found two files rockyou.zip and and a cap file.
find ./ -type f | grep -v .html


We open it using wireshark going through the packets we found it to be a wifi handshake file.


We use this site here to convert the cap file to hccapx, to make it compatible for hashcat.


Now we use hashcat to decrypt the the handshake. We use the wordlist provided by the server just in case it had some extra keywords.
hashcat -m 2500 -a 0 ctf.hccapx 192.168.0.18:15020/rockyou.txt


We use username admin and the password we find from hashcat that is “minion.666” to login through the admin page.


As soon as we login this page, we find that this page maybe vulnerable to sql injection.
Now we use burpsuite to capture the request and use CO2 extension of burpsuite to exploit the sql injection but first we take a look at the source code.


When we look at the source code we find our 4th flag.


Now we use CO2 for SQL injection. We select database, tables and columns to dump all data on the server available on the database.


It gave us the name of the database, tables and columns. Unfortunately it couldn’t dump the database for some reason. So we manually exploit the sql injection through the browser.


We find that the server uses a firewall that blocks any sql query. We use normalization method to bypass this firewall. With name of the columns and table we were able to execute our SQL injection.
When we change the parameter of the id the output also changes, after going through different parameters we find that parameter 7 gave us our 5th and final flag.


Forensic Imaging through Encase

This article is about getting the forensic image of the digital evidence and restoring it to any other drive.
Since it is never advised to work, tamper the original evidence as accidently we may lose some relevant data, so we will image the original evidence and work on it further. So that the original evidence is safe and ash values will prove the integrity of the data that we will image.
This article is also very helpful if we need to back up the data safely.

To image the desktop we will use Encase Imager first download the Encase Imager from here

Open Encase Imager and Select Add local device option.


From the menu select all the options and uncheck “only show write blocked” as shown in the image and click next.


WE can see all the physical drives, logical partitions, Cd Rom , RAM and process running on the system. WE need to select what we need to image as our evidence , ideally it is a good practice to select the physical drives which contains the logical partitions as we get the complete disk image through physical drive. In certain case we may select only logical drive or RAM as required.
Select / Check the number of the evidence you want to image and click on finish.


The evidence you have selected will get listed in case more than one evidence is selected we will could have seen multiple evidence listed here.


Double Click on the evidence , we can see the contents present inside it and if we wish we can skip any part, file or folder from getting imaged at this stage.


Click on Acquire to proceed for the imaging. Now we need to enter the case related information, ie case number, output path, file format in which we want to generate the image
File format selected here is E01 as this is supported by multiple tools and is suitable for further analysis.
If we want to password protect/encrypt our image we can do this at this stage.
Note: It is ideal to store the image on any other external storage drive so that the storage space is not a constraint but for the sake of practical we are saving the image on desktop at the following path “C:\Users\.....\Desktop\Evidence Image\1.E01”.


Click ok and image acquisition will start, you can check the status of image acquisition on the same window at the lower right corner along with the time remaining (refer below image).


Once the acquisition is complete the image will get saved to the output folder (refer below image).


To prove the authenticity of the evidence we can generate the Hash value of the evidence
To generate the hash value of the image click on the evidence and select hash as shown in the image below.


Once the hashing process is complete click on the report section on the lower pane


Right Click and select Copy to copy the report and paste in a word /text document.


Save the report along with the Image (E01) files. This report contains all the relevant details along with the detailed report containing the hash values.


The Evidence acquisition is complete
Restoring the Evidence Image
We are done with imaging of the disk/evidence. Now we will restore this acquired image to the drive. To start with open Encase Imager and add the evidence to Encase imager


Browse to the image (.E01) file and add it to the case. The evidence added will get listed


When we click on restore, connect the drive where we want to restore the image and click next


All the drives will be read


All the drives will be displayed, select the drive where the image is to be restored. Use the blank drive for restring the image as the existing data will be wiped.


If required we can verify the Hash values and click on finish.


Type “Yes” in the text box and click on OK this will wipe the existing data on the drive and start with the image restoration.


Image Restoration will start, we can check the progress on the lower right corner of the window.


Once the restoration is complete, we can see the data in the drive we have selected.


To ensure the integrity of the data , we can see the report section on the bottom pane and check the hash values. The hash values should be same as of the image (we can check the original hash value in the image report.)


If required we can copy and save the report in any text / word file for any future reference.

Burpsuite Encoder & Decoder Tutorial

Burpsuite Decoder can be said as a tool which is used for transforming encoded data into its real form, or for transforming raw data into various encoded and hashed forms. This tool is capable of recognizing several encoding formats using defined techniques. Encoding is the process of putting a sequence of character’s (letters, numbers, punctuation, and symbols) into a specialized format which is used for efficient transmission or storage. Decoding is the opposite process of encoding the conversion of an encoded format back into the original format. Encoding and decoding can be used in data communications, networking, and storage.
Today we are discussing about the Decoder Option of 'Burp Suite'. Burp Suite is a tool which is used for testing Web application security. Its various tools work seamlessly together to support the entire testing process, from initial mapping and analysis of an application’s attack surface, through to finding and exploiting security vulnerabilities. This tool is written in JAVA and is developed by PortSwigger Security.
There are 9 types of decoder format in Burp Suite:
·         Plain text
·         URL
·         HTML
·         Base64
·         ASCII Hex
·         Hex
·         Octal
·         Binary
·         Gzip
URL Encoder & Decoder
When you will explore decoder option in burp suite you will observe two section left and right. The left section is further divided in two and three section for encode and decode option respectively. The right section contains function tab for encode and decode option. And if you will observe given below image you can notice there is two radio buttons for selecting type of content you want to encode or decode.


Enable the radio button for text option and then we can give any input in the box to be encoded, here we have given Raj chandel as an input as shown in the image. After that click on the Encoded as option and select URL field from given list as shown in the image. We will get the encoded result in URL format in the second box as shown in the image.


 We can directly decode the Encoded URL Text by clicking on the Decoded as option and selecting URL field from given list of options as shown in the image.  This will decode the encoded URL text into plain text in the third box as shown in the image.


HTML Encoder & Decoder

Repeat the same and give any input in the first box to be encoded, here we have given Raj chandel as an input as shown in the image. After that click on the Encoded as option and select HTML field as shown in the image. We will get the encoded result in HTML format in the second box as shown in the image.


We can directly decode the Encoded HTML Text by clicking on the Decoded as option and selecting HTML field as shown in the image.  This will decode the encoded HTML text into plain text in the third box as shown in the image.


Base64 Encoder & Decoder

Repeat the same process and give any input in the first box to be encoded, here we have given Raj chandel as an input as shown in the image. After that click on the Encoded as option and select Base64 field as shown in the image. We will get the encoded result in Base64 format in the second box as shown in the image.


We can directly decode the Encoded Base64 Text by clicking on the Decoded as option and selecting Base64 field as shown in the image.  This will decode the encoded Base64 text into plain text in the third box as shown in the image.


ASCII Hex Encoder & Decoder

Again repeat the same process and give any input in the first box to be encoded, here we have given Raj chandel as an input as shown in the image. After that click on the Encoded as option and select ASCII Hex field as shown in the image. We will get the encoded result in ASCII Hex format in the second box as shown in the image.


We can directly decode the Encoded ASCII Hex Text by clicking on the Decoded as option and selecting ASCII Hex field as shown in the image.  This will decode the encoded ASCII Hex text into plain text in the third box as shown in the image.


Hex Encoder & Decoder

Repeat same as above and give any input in the first box to be encoded, here we have given Raj chandel 123456789 as an input as shown in the image. After that click on the Encoded as option and select Hex option as shown in the image. We will get the encoded result in Hex format in the second box as shown in the image.


We can directly decode the Encoded Hex Text by clicking on the Decoded as option and selecting Hex field as shown in the image.  This will decode the encoded Hex text into plain text in the third box as shown in the image.

Octal Encoder & Decoder

Repeat again and give any input in the first box to be encoded, here we have given Raj chandel 123456789 as an input as shown in the image. After that click on the Encoded as option and select Octal field as shown in the image. We will get the encoded result in Octal format in the second box as shown in the image.


We can directly decode the Encoded Octal Text by clicking on the Decoded as option and selecting Octal field as shown in the image.  This will decode the encoded Octal text into plain text in the third box as shown in the image.


Binary Encoder & Decoder

Repeat the same and give any input in the first box to be encoded, here we have given Raj chandel 123456789 as an input as shown in the image. After that click on the Encoded as option and select Binary field as shown in the image. We will get the encoded result in Binary format in the second box as shown in the image.


We can directly decode the Encoded Binary Text by clicking on the Decoded as option and selecting Binary field as shown in the image.  This will decode the encoded Binary text into plain text in the third box as shown in the image.


Gzip Encoder & Decoder

Give any input in the first box to be encoded, here we have given Raj chandel as an input as shown in the image. After that click on the Encoded as option and select Gzip field as shown in the image. We will get the encoded result in Gzip format in the second box as shown in the image.


We can directly decode the Encoded Gzip Text by clicking on the Decoded as option and selecting Gzip field as shown in the image.  This will decode the encoded Gzip text into plain text in the third box as shown in the image.