Nmap ("Network Mapper") is a free and open
source (license) utility for
network discovery and security auditing. Many systems and network
administrators also find it useful for tasks such as network inventory,
managing service upgrade schedules, and monitoring host or service uptime. Nmap
uses raw IP packets in novel ways to determine what hosts are available on the
network, what services (application name and version) those hosts are offering,
what operating systems (and OS versions) they are running, what type of packet
filters/firewalls are in use, and dozens of other characteristics. It was
designed to rapidly scan large networks, but works fine against single hosts.
Nmap runs on all major computer operating systems, and official binary packages
are available for Linux, Windows, and Mac OS X.
For detail visit nmap.org
Host Scan
Host scan is used by penetration tester to identify
active host in a network by sending ARP request packets to all system in that
network. As result it will show a message “Host is up” by receiving MAC address
from each active host.
Syntax: nmap
-sP
nmap -sn
Above syntax describes how to
execute a host scan, to discover live hosts in a network by using Nmap. By
default nmap is in-built in kali Linux, now open the terminal and enter the
following command which will send ARP request packet to each system one-by-one.
nmap -sP 192.168.1.1-225
From given below image you can
observe result of response generated by nmap for active host.

How it Works
Nmap uses the –sP/-sn flag for
host scan and broadcast ARP request packet to identify IP allocated to
particular host machine.
It will broadcast ARP request
for a particular IP [suppose 192.168.1.100] in that network which can be the
part of IP range [192.168.1.1-225] or CIDR [192.168.1.1/24 for class C] is used
to indicate that we want to scan all the 256 IPs in our network. After then
active host will unicast ARP packet by sending its MAC address as reply which
gives a message Host is up.
Port scan /TCP scan
If penetration testers want to identify open or close
state of a particular port on target machine then they should go with nmap port
scan.
Port Status: After scanning, you may see some results
with a port status like filtered, open, closed, etc. Let me explain this.
§ Open: This indicates that an application is
listening for connections on this port.
§ Closed: This indicates that the probes were
received but there is no application listening on this port.
§ Filtered: This indicates that the probes were
not received and the state could not be established. It also indicates that the
probes are being dropped by some kind of filtering.
§ Unfiltered: This indicates that the probes
were received but a state could not be established.
§ Open/Filtered: This indicates that the port
was filtered or open but Nmap couldn’t establish the state.
§ Closed/Filtered: This indicates that the port
was filtered or closed but Nmap couldn’t establish the state.
Syntax: nmap -p
[port number]
nmap -sT [port number]
nmap -p135
192.168.1.127
Above command will try to connect with port 135 as result
if port is open then it will display state “open” as well as “service” running
on that particular port.

How it Works
Nmap uses the argument -p for defining
the port range to be scanned. This flag can be combined with any scanning
method. In the above example, we used the argument –p135 to indicate to Nmap
that we are only interested in port 135. You can apply it the CIDR /24 in
192.168.1.1/24 which is used to indicate that we want to scan all of the 256
IPs in our network.
There are several accepted formats for the argument –p:
PORT LIST
nmap -p135,139 192.168.1.127
If penetration testers want to scan more than one port of
target then they should go with Port list scan where they can add multiple ports
for scanning. This scan is quite useful to identify state of multiple selected
ports which also describe status “host is up” if any single port is found to be
opened.
PORT RANGE:
Using port range scan you can scan a particular range of
ports of target network as per your requirement.
nmap -p1-1000
192.168.1.127
Above command will perform scanning from port
number 1 to till port number 1000 and identify the state and service for open
ports.

ALL PORTS:
If penetration testers want to scan all 65535 ports; then they
should execute given below command which will enumerates the open ports of
target system:
Syntax: nmap -p-
Above syntax is used for scanning all ports of target
network, keep patience while executing above format because it will take some
time to enumerate open port or you can also execute given below command which
uses parameter “--open” to perform same task in order to save time.
nmap
–p1-65535 192.168.1.127 --open

SPECIFIC PORTS by
PROTOCOLS:
By default port scan prefer to enumerate the state of TCP
ports but if you want to scan TCP port as well as UDP port then execute
following command given below:
Syntax: nmap
-pT:25,U:53
PORTS SERVICE
NAME:
If you don’t known accurate port number for enumeration
then you can also mention service name for port state scanning .
Syntax: nmap
–p[service]
nmap -p msrpc
192.168.1.127
From given image you can observe that same result has
been obtained by executing above command without referring any port number.

UDP Scan
UDP services are mostly ignored
during penetration tests, but fine penetration testers know that they often expose
host essential information or can even be vulnerable moreover used to
compromise a host. This method demonstrates how to utilize Nmap to list all
open UDP ports on a host.
Syntax: nmap –sU
Nmap –sU 192.168.1.127
From given below image you can
observe the result for UDP port scan.

nmap -sU -p 137 192.168.1.127
In order to scan particular UDP port it is suggested that
you should use the flag -p for Port selection. Here you can observe that we
have chosen port 137 which is a UDP port for NetBIOS service.
There are so many way to perform UDP scan as per your
requirement, for example read given below method to perform UDP scan:
UDP PORT RANGE
If you want to scan multiple UDP ports or range of UDP
ports then use –p flag to address the range of port.
Syntax: nmap
-p1-500 -sU
ALL UDP PORT
Syntax: nmap
-sU -p-
Above syntax is applicable for scanning all UDP ports of
target’s network.
How it Works
UDP scan works by
sending a UDP packet to every destination port and analyzes the response
to determine the port's state; it is a
connection less protocol. For some common ports such as 53 and 161, a
protocol-specific payload is sent to increase response rate, a service will
respond with a UDP packet, proving that it is “open”. If the port
is “closed”, an ICMP Port Unreachable message is received from the target. If no response is received after
retransmissions, the port is classified as “open|filtered”. This means that the port could be
open, or perhaps packet filters are blocking the communication.
OS Detection Scan
Apart from open port enumeration nmap is quite useful in
OS fingerprinting. This scan very helpful to penetration tester in order to
conclude possible security vulnerabilities and determining the available system
calls to set the specific exploit payloads.
Syntax: nmap -O
nmap -O
192.168.1.127
Above command will dump following information:
Device type: All
fingerprints are classified with one or more high-level device types, such
as router, printer, firewall, general purpose. These
are further described in the section called “Device and OS
classification (Class lines)”. If you notice given below image here “Device Type: general
purpose”.
Running: This
field is also related to the OS classification scheme described in the section called “Device and OS
classification (Class lines)”. It shows the OS Family (Windows in this case) and OS generation if available. If there are multiple OS
families, they are separated by commas. When Nmap can't narrow down OS
generations to one specific choice, options are separated by the pipe symbol
('|') Examples include OpenBSD 3.X, NetBSD 3.X|4.X and Linux 2.4.X|2.5.X|2.6.X.
If you will image
given below again then here you will observe OS generations is specified as 7|2008|8.1
OS CPE: This
shows a Common Platform Enumeration (CPE) representation
of the operating system when available. It may also have a CPE representation
of the hardware type. OS CPE begins with cpe:/o and hardware CPE begins with cpe:/h.
OS details: This
line gives the detailed description for each fingerprint that matches. While
the Device type and Running lines are from predefined enumerated
lists that are easy to parse by a computer, the OS details line contains free-form
data which is useful to a human reading the report. This can include more exact
version numbers, device models, and architectures specific to a given
fingerprint.

How it Works
The option -O inform Nmap to
enable OS detection that identify a wide variety of systems, including
residential routers, IP webcams, operating systems, and many other hardware
devices
You can also execute following
command for os detection
Syntax: nmap -O -p- --osscan-guess
In case OS detection fails,
you can use the argument –osscan-guess to try to guess the operating system:
To launch OS detection only
when the scan conditions are ideal, uses the argument --osscan-limit:
Syntax: nmap -O --osscan-limit
Version Scan
When doing vulnerability
assessments of your companies or clients, you really want to know which mail
and DNS servers and versions are running. Having an accurate version number
helps dramatically in determining which exploits a server is vulnerable
to. Version detection helps you obtain this information. Fingerprinting a
service may also reveal additional information about a target, such as
available modules and specific protocol information. Version scan is also
categories as “Banner Grabbing” in
penetration testing.
Syntax: nmap -sV
Following command will dump
the result for installed version of running services of target’s machine.
nmap –sV 192.168.1.127
From given below image you can observed that it has shown
current installed version of running application. . Additional information will
be enclosed in parenthesis. The hostname field and two more fields that version detection can
discover are operating system and device type is reported on a
Service Info line following the port table.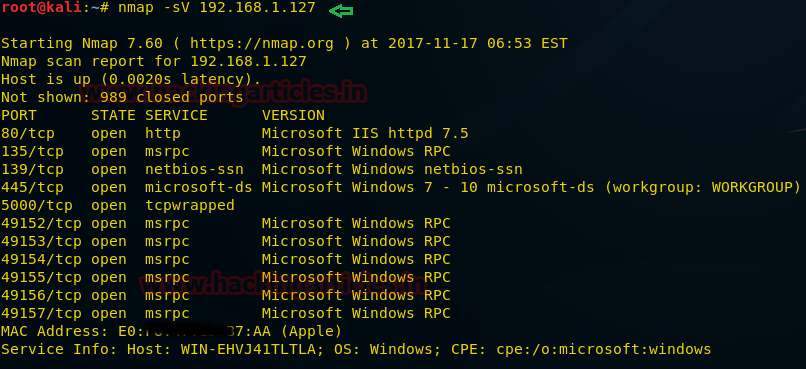
Specific Port Version scan
For scanning version of a
particular port or service you can use argument –p in the command as shown
below.
Syntax: nmap -sV -p135
How it Works
The –sV flag inform nmap to works by sending different
query from nmap-service-probes to the list of assumed open ports for banner
grabbing. As result it will give output as table which has an additional column
named VERSION, displaying the particular service version. Additional
information will be enclosed in parenthesis.
Protocol Scan
IP Protocol scan is quite helpful
for determining what communication protocols are being used by a host. This method
shows how to use Nmap to enumerate all of the IP protocols, where sends a raw IP packet without any
additional protocol header, to each protocol on the target machine. For
the IP protocols TCP, ICMP, UDP, IGMP, and SCTP, Nmap will set valid header
values but for the rest, an empty IP packet will be used.
Syntax: nmap -sO
The results will show what protocols are supported, along
with their states.
nmap -sO
192.168.1.254
From given below
image you can observer the result of protocol scan for open and open|filtered
state.

How it Works
The flag -sO tells Nmap to
perform an IP Protocol Scan, This kind of scan repeat throughout the protocols
found in the file nmap-protocols, and creates IP packets for every entry.
To verify the port state, Nmap
categorize the different responses received, as follows:
·
When it received an ICMP protocol unreachable
error type=3 or code=2, the port state is marked as “closed”.
·
ICMP unreachable errors type=3 or code 1,3,9,10
or 13 indicate that a port state is “filtered”.
·
If no response is received, the port state is
marked as “filtered|open”.
·
Any other response will cause the port state to
be marked as “opened”.
To specify what protocols
should be scanned, we could set the argument -p:
Syntax: nmap -p1,3,5 -sO
nmap
-p1-10 -sO
Fast Scan
The
-F option scans only those ports listed in the nmap_services file (or the
protocols file if the scan type is -sO). This is far faster than scanning all
65,535 ports.
If you will compare scanned time from above scanned
result you will notice time difference between these scans, moreover it has not
shown open ports of other running services which above scan has shown.
Syntax: nmap
–F
nmap –F
192.168.1.127
From given below image you can observe scanned time: 14.42 seconds where as in above scanning method [protocol
scan] scanned time: 307.45 seconds

Timing Template Scan
The main timing
option is set through the -T parameter if you may want more control over the
timing in order get the scan over and done with quicker. However, Nmap adjusts
its timings automatically depending on network speed and response times of the
victim.
Nmap
offers a simpler approach, with six timing templates. You can specify them with
the
-T option and their
number (0–5) or their name as shown below:
T0:
paranoidT1: sneakyT2: polite
T3:
normalT4: aggressiveT5: insane
Syntax: nmap T[option]
nmap –T4 192.168.1.127Above command will
perform aggressive scan and reduce scanning timing for enumeration of target’s
system, here from given below image you can observe scanned time: 14.36 seconds.
Exclude Scan
There will be circumstances where
host exception is required to avoid scanning of certain machines. Such as government
website or IP, you may not have the authorization, or might that the host has
been already scanned. Nmap option --exclude
help you to eliminate a host or list of hosts from complete network scan.
Syntax: nmap
--exclude
Above syntax defines that from given range of IPs do not
perform scanning for excluded target IP else dump the scanned result for remaining
IPs.
Nmap –F
192.168.1.110-255 --exclude 192.168.1.114
Above command will perform scan for al IPs between
192.168.1.110 and 192.168.1.255 except “192.168.1.114” which you can confirm
from given below image.

How it works
The arguments –F --exclude 192.168.1.114
inform Nmap to perform fast scanning for all IPs [between 192.168.1.110 and
192.168.1.255] in this private network, excluding the machines with the IPs
192.168.1.114.
nmap -sV -O --exclude-file remove.txt 192.168.1.1/24
Excluding a host list from
your scans Nmap also supports the argument --exclude-file in
order to exclude the targets listed in
Aggressive Scan
This option enables additional advanced and aggressive
options. Presently this enables OS detection (-O), version scanning (-sV),
script scanning (-sC) and traceroute (--traceroute). This option only enables
features, and not timing options (such as -T4) or verbosity options (-v)
that you might want as well. You can see this by using one of the following
commands:
Syntax: nmap -A
nmap –A 192.168.1.127
If you will notice given below
image then you will observe that the result obtain by it is the combination of
multiple scan. As its dump “version” of running application, “OS fingerprint”, “traceroute”
and “host script scanning”g which is showing some very essential information
related to host system.

How it Works
The argument –A
inform nmap to perform advance aggressive scan to enumerate version of
running service, OS detection, traceroute of hop and host script scanning of
host machine. Therefore it will take some time in scanning, you can add –T4
timing template to increase the rate of scanning.
List Scan
When you want to scan multiple
host to perform more than one scanning then –iL option is used which support
nmap to load the targets from an external file. Only you need to add all
targeted IP in a text file and save it at a location.

To load the targets from the
file targets.txt, the following command can be used:
Syntax: nmap -iL targets.txt [path of file]
nmap –iL /root/Desktop/scan.txt

https://nmap.org/book/osdetect-usage.html


