Logical Forensics of an Android Device using AFLogical

First need to install SANTOKU tool kit. How to install it read this article given below


Note : You need an Android mobile device with USB debugging on

Now, click bottom left of your conputer screeen select SANTOKU then Device Forensics and click on AF Logical OSE.


Note : make sure your android device is connected to computer via USB.

Enable USB debugging on your device. For Android 3.x and below, go to Settings –> Applications –> Development, then check ‘USB debugging’.


Now you will get a Terminal, In terminal type : aflogical-ose  It will show you the success message on the terminal.


ON your mobile screen you will see couple of options like Call log, MMS etc, select the option which you want to extract and then click on Capture. (I have selected all the options as you can see below ).


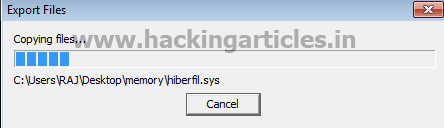
Now on your mobile screen you will see the Extracting Data as shown in Image.


In terminal press Enter and now it will save the data and make a new folder in SD card by the name of Forensics .


Here is it will look like(I have selected the forensics folder see below )


Click on Forensics folder here you will see the data you have selected.

SANTOKU Linux- Overview of Mobile Forensics Operating System

Santoku is dedicated to mobile forensics, analysis, and security, and packaged in an easy to use, Open Source platform.

First Download Santoku ISO image from here

After having started the Santoku boot loader, you will see a screen with several boot options. Now click on Install – start the installer directly then press Enter


You will see this screen, then click on Continue


Click Continue here as well


Select first option – Erase disk and install Santoku, then click on Install Now


Now you will see a Map which shows your location, and then click on Continue


You will see the form, please fill all the fields like Name, Password etc and then click Continue


You will get a Pop up on your computer screen says Installation Complete, please restart your Computer. Click on Restart Now


Once the computer is ready to use it will ask you for the login details. Please enter your password to login.


Now you are on the Home screen of SANTOKU, click on bottom left of your computer screen. You will get couple of options, please select SANTOKU and click on Development Tools; here you can find all available development tools in SANTOKU.


Click on Device Forensics, here you can find all available Device Forensics tools in SANTOKU


Click on Penetration Testing, here you can find all available Penetration Testing tools in SANTOKU.


Click on Reverse Engineering, here you can find all available Reverse Engineering tools in SANTOKU.


Click on Wireless Analyzers, here you can find all available Wireless Analyzers tools in SANTOKU.

How to Recover Deleted from RAW Image using FTK Imager and Recover My File

How to create Disk Image read this article


After installing the program, run it. In the window that shall appear, click on the option “File” and “Image Mounting.


Now select the image file to mount image to drive.


In the window “Mount Image to Drive”, choose the forensic image that shall be mounted and select
The Drive letter and click on mount option

Now it will show the mounted image as G:  Drive in your system.


Now, download Recover my file from here after installing, run the program. In the window let´s choose the option “Recover files” and click on next.


 In the next window l choose the option “In a specific location” and indicate the mounted drive  through FTK Imager. Now click on “Next”.


Now select search for deleted files option and click on start.


Now it will show all the deleted files, which are recovered and now select your desired deleted file and save in your pc.

Forensics Analysis of Pagefile, hibersys File

In forensic investigation, Memory dump, pagefile and hiberfil files can provide us a lot of data. Memory dump is the file which contains the   information about the cause of the system crash.
Pagefile.sys: Microsoft Windows uses a paging file, called pagefile.sys, to store frames of memory that do not current fit into physical memory. Although Windows supports up to 16 paging files, in practice normally only one is used.

Hiberfil.sys: hiberfil file stores the data when Microsoft windows computer system is on Hibernate mode.
These files are very useful for digital investigation because these files are not stored in physical Hard Disk.

First of all download Access Data FTK Imager from here so to capture the memory dump, click on capture memory option.


A new window will pop up. Click on browse button to select destination path. Select the option Include Pagefile & click on Capture Memory.


After completion of process, two files will be carved in the specified folder.


To Extract the Hiberfil  file, click on add all attached devices


 Now click on the directory where windows are installed.  Select Root Folder and click on hiberfil.sys file.


Now right click on Hiberfil file & click on Export files.


Select the folder


After process completion, it will show the message about exported file


Now to analyze the Live RAM image file, we will use Belkasoft Evidence Center.

Now open Belkasoft Evidence Center.  Click on New Option. Click ok.


Enter all the details as well as root folder. 


Now select the option Live RAM Image.


Now select the specified path to mount an image file. In File Name option select All Files (*) It will show the files.  Select Pagefile .sys.


Now select the option Analyze Data Source click on Next.


 To select the supported data types to curve, Click on Select All option and click on Finish.


To analyze visited URL. Click on Chrome Live Ram


Similarly Click on Opera Live Ram.


Click on Found Pictures to see the images.


Same method use for hibersys file