How to Create and Convert RAW Image in Encase and AFF Format

Forensic Imager is a Windows based program that will acquire, convert, or verify a forensic image in one of the following common forensic file formats:
·         DD /RAW (Linux “Disk Dump”)
·         AFF (Advanced Forensic Format)
·         E01 (Encase®)

Program Functions
Forensic Image provides three separate functions:

·         Acquire: The acquire option is used to take a forensic image (an exact copy) of the target media into an image file on the investigators workstation;
·         Convert: The convert option is used to copy an existing image file from one image format to another, e.g. DD to E01;
·         Hash or verify: The hash or verify option is used to calculate a hash value, MD5, SHA1 or SHA256, for a device or an existing image file.

Includes the option to SHA256 sector hash a device so that known sectors can be located within an image files (e.g. a single sector of a jpeg file left in unallocated clusters can be identified by its sector hash).


First Download Forensics Imager from here and install in your pc then open Forensics Imager and click on Acquire option.


It will show you all drives. Select the desired Drive whose image to be created. Click on next.
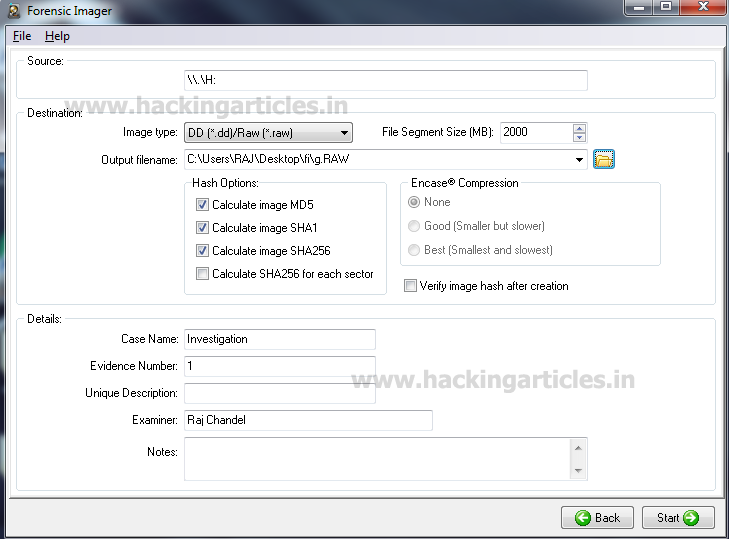

Now select image type from drop down menu and select the output filename in Folder option where you want to save your Evidence Image and fill the details such as Case Name, Evidence Number, and Examiner etc. And click on start.


Now it will show you the Acquisition Progress. After the completion of this progress, it will create a raw image in the specified folder.


Now we will proceed further to Convert RAW File in to Encase Format.

Now again open forensics imager click on add image and select your desired image which is to be converted.  Then click on next.


Now we will select image type from Drop Down Menu now select your desired format you want to be converting and select the output file in the folder Option where you want to save your Raw image in Encase format. Click on Start Option.


Now it will show us Conversion Progress & after the completion of this progress a Encase formatted file will be created in the specified folder

How to mount Forensics image as a Drive using P2 eXplorer Pro

P2 eXplorer Pro is a specialized component of P2C that allows you to virtually mount forensic images such as raw DD, E01, and even virtual machine images  Free with any puchase of P2C. as local drive letters

P2 eXplorer Pro can mount the following image formats: Encase (E01), Forensic Replicator (PFR), SafeBack 1, 2, & 3, SMART, FTK DD & E01, Raw DD, WinImage, Paraben's Forensic Containers (P2S), vmWare, VirtualPC, & VirtualBox (VDI).


First of all, we are clicking on My Computer option & it will show us all physical drives and removable storage drives.


First Download P2 eXplorer from here and install in your pc then open P2 eXplorer and click on Mount Storage button.


Now load the Evidence Disk Image by clicking on Browse Option

How to create Disk Image read this article


Now it will show the mounted Image.


Now click on My Computer. It will show you the Mounted Image as a Drive.

How to Convert Encase, FTK, DD, RAW, VMWare and other image file as Windows Drive

Mount Image Pro mounts EnCase, FTK, DD, RAW, SMART, SafeBack, ISO, VMWare and other image files as a drive letter (or physical drive) on your computer.

Features of Mount Image Pro

It enables the mounting of forensic images including:
·         EnCase .E01, EX01, .L01, .LX01
·         AccessData .AD1
·         DD and RAW images (Unix/Linux)
·         Forensic File Format .AFF
·         NUIX .MFS01
·         ProDiscover
·         Safeback v2
·         SMART
·         XWays .CTR
And other common image formats including:
·         Apple DMG
·         ISO (CD and DVD images)
·         Microsoft VHD
·         VMWare
Image files as a drive letter under the Windows file system.

IMPORTANT: When dealing with forensic evidence files ensure that you have a Verified and Secured Master copy.


First of all, we are clicking on My Computer option & it will show us all physical drives and removable storage drives.


First Download Mount Image Pro from here and install in your pc then open Mount Image Pro and click on Mount button.


It will open the selection window. To add Image file to the selection window, click Add Image option to add an Evidence Raw Image


Now load the Evidence Disk Image.

How to create Disk Image read this article

 After selecting the Evidence Image, click on Open.


Now Evidence Image is selected & click on Mount Disk.


The Options window will open now. Click on ok.


Now it will show the mounted image.


Now click on My Computer. It will show you the Mounted Image as a Drive.

Note: This tool is also used to convert VMware Image as a Drive.

How to gather Forensics Investigation Evidence using ProDiscover Basic

The ARC Group ProDiscover® Basic edition is a self-managed tool for the examination of your hard disk security. ProDiscover Basic is designed to operate under the National Institute of Standards’ Disk Imaging Tool Specification 3.1.6 to collect snapshots of activities that are critical to taking proactive steps in protecting your data.
ProDiscover Basic has a built-in reporting tool to present findings as evidence for legal proceedings. You gather time zone data, drive information, Internet activity, and more, piece by piece, or in a full report as needed. You have robust search capabilities for capturing unique data, filenames and filetypes, data patterns, date ranges, etc. ProDiscover Basic gives clients the autonomy they desire in managing their own data security.
At the ARC Group, we provide the tools you need to identify security issues before they escalate, and we use ProDiscover solutions to maintain your corporate safety and preserve your data. With ProDiscover Basic, professional consultants, system administrators, and investigators take the upper hand to manage cyber security at every level and protect information in the case of impending legal actions.

First Download the ProDiscover Basic from here and install it in pc and enter the Project Number, Project File Name and Description in prodiscover basic software. Click on Open.


In main window click on Capture & Add Image


Now select the source drive that we want to capture, this could be a USB Drive or physical Drive.In my case I select drive Physical Drive 1 which is my USB drive.

Now set the destination of the image file where we want to store it, in my case I used E: drive and named the image folder as pd and the name of the image which is to be saved in desired folder is PD.EVE .

Now enter the ‘Technician Name’, ‘Image Number’ and ‘description’ Now Click on ok.


After finishing the following steps, windows will appear.


After imaging the drive close the prodiscover program then it will ask you to save your project.


Now starts prodiscover program again and click on open project and browser your project image select it and click open


Now the project will open & go to the left menu and click on Content View. Then it will show you all   the contents of evidence image.


To generate the automatic report click on report tab under the view menu. Then it will show you Evidence Report.


How to study Forensics Evidence of PC using P2 Commander (Part 1)

Now we are studying about the forensic evidence which we have collected in the previous article.

 If you are interested to see the collection of forensic evidence, please click on the below link.


First of all, we will look into the Trash folder (which contains the files and folders deleted by the user but not erased permanently from system yet).


By clicking on Trash folder, it will show us the different files and folders with their Creation Time, Last Access Time, Last Change Time, and File Size.


Now click on Advanced Registry and System Analyzer and then Auto Run Option.
Go to Run option. It will Show all the programs that can run automatically at the time of booting of the system.


Now Select OS Info option. Through OS Info, we can see the Root Path, Current Version, Registered User, Product ID, Edition ID, and Installation Type.

Now select Uninstall Option from Programs Option. By Uninstall Option, we can see all the programs which are installed in the system.


To see the running services in the system, select Services option.

Now  click on Known DLLs to see the Dynamic Link Libraries ( which contains data and code that are used by different programs simultaneously.)


Now to get the information about the removable disks used recently or in the past, first click on USB Storage and then select USBSTOR. It will show the name of the Disks.


Now Select any one of the disk and it will show us the size as well as the manufacturer name.


To see the history of most recently used commands from the Run command on the Start menu click on Users Info Option. Select a user; in my case we are selecting Raj. Now click on RunMRU.

 To see the user-based web activities, click on the TypedURLs ,which will show the recently visited web sites.

AuthorMukul Mohan is a Microsoft Certified system engineer in security and messaging .He is a Microsoft Certified Technology Specialist with high level of expertise in handling server side operations based on windows platform. An experienced IT Technical Trainer with over 20 years’ Technical Training experience you can contact him at mukul@ignitetechnologies.in