This article will be focused on The LaZagne project and its
usage in Post Exploitation.
Table of Content:
·
Introduction of LaZagne Project
·
Syntax and Parameters
·
Achieve Meterpreter and Upload LaZagne
·
Help Screen
·
Mails Argument
·
Windows Argument
·
Browsers Argument
·
Databases Argument
·
Wi-Fi Argument
·
All Argument
·
oN Parameter
·
Verbose Mode Parameter
·
Quiet Parameter
Introduction of LaZagne Project
The LaZagne is an open source application. It retrieves
stored passwords on a System. It directly injects the Python code in the memory
without writing anything on disk. This makes it difficult to trace. Usually,
when we get a session on a target system, our main aim is to gather
credentials. When an attacker attacks a target, there are two ways through it
can compromise the target. If the attacker gets the meterpreter session, then
all it does is compromise the device security.
But using some scripts and post exploitation modules, the
target can compromise every nook of security of the victim. This includes Email
Passwords, Social Networking Passwords, SSH Passwords, Banking Information, etc.
Usually, this extracting of passwords is a noisy and clumsy task but with
LaZagne it is very simple and stealthy.
Without LaZagne, Attackers normally run a bunch of
different scripts targeting different applications that are installed on the
Target System. But LaZagne does this automatically, it first checks which
application is installed on the target system and then it runs that specific
script targeting the password for that particular application.
Famous Scripts
Included in LaZagne
·
KeeThief
·
mimipy
·
mimikatz
·
pypykatz
·
creddump
·
chainbreaker
·
pyaes
·
pyDes
·
secretstorage and many more.
Target Software
·
Firefox
·
Google Chrome
·
Opera
·
Skype
·
Postgresql
·
Thunderbird
·
Keepass
·
CoreFTP
·
FileZilla and many more.
Syntax and Parameters
On Linux Systems, LaZagne will be executed as a Python
file. But when out target is Windows then we will have to use executable(exe)
file. We can download more executables from here.
Parameters

LaZagne has a lot of other parameters and conditions, but
here we have used only certain parameters and targets due to technological
limitations.
Achieve Meterpreter and Upload LaZagne
Open Kali Linux terminal and type msfconsole in order to
load Metasploit framework. Now we need to compromise victim’s machine one to
achieve any type of session either meterpreter or shell and to do so we can
read our previous article from here.
After getting meterpreter on the remote system, we need
to upload the executable file to the target machine to extract credentials. We
will use upload command for this.
upload lazagne.exe .

Now that we have the LaZagne on the target system, it’s
time to enumerate passwords.
Use shell command on the meterpreter shell to get to the
command line on the target system.
Help Screen
To get details about the LaZagne we will use the -h
parameter. This will print the list of parameters and arguments with the
working examples on our screen. This is an informative banner as it not only
gives us various methods that we can use but it also tells us how to use those
parameters.
lazagne.exe -h

Mails Argument
This argument targets mail clients like Mozilla
Thunderbird and Microsoft Outlook. When this argument is selected, a script
runs in the background which extracts the Login Credentials that are stored by
these email clients. As we can see in the given image that it has successfully
extracted the credentials that were stored in the Email Clients.
lazagne.exe mails

Windows Argument
This argument targets Windows Security on all fronts.
When this argument is selected, a script runs in the background which includes
autologon, cachedump, credman, hashdump, lsa_secrets, and others. This
compromises all of the Windows defenses and gives the attacker the credentials,
he is craving for. As we can see in the given image that it has successfully
extracted the credentials.
lazagne.exe
windows

Browsers Argument
This argument targets Browsers like Mozilla Firefox,
Google Chrome, Opera, UC Browser, Microsoft Edge and much more. When this
argument is selected, a script runs in the background which extracts the Login
Credentials that are stored inside the browsers. Browsers hide the passwords
and show them only after verifying the windows credentials. So, in order to
extract the Credentials stored inside the browser, LaZagne attacks the SAM and
gets the Windows password and then use it to extract the rest passwords. As we
can see in the given image that it has successfully extracted the credentials
that were stored in Firefox and Chrome.
lazagne.exe
browsers

Databases Argument
This argument targets database clients like Postgresql.
When this argument is selected, a script runs in the background which extracts
the Login Credentials that are stored by any database client. As we can see in
the given image that it has successfully extracted the credentials that were
stored in the Postgresql Client.
lazagne.exe
databases

Wi-Fi Argument
This argument targets the stored Wi-Fi Credentials. When
this argument is selected, a script runs in the background which extracts the
Wi-Fi Credentials. All the Wi-Fi Network that the user had connected and opted
for saving the password. As we can see in the given image that it has
successfully extracted the Wi-Fi credentials.
lazagne.exe wifi

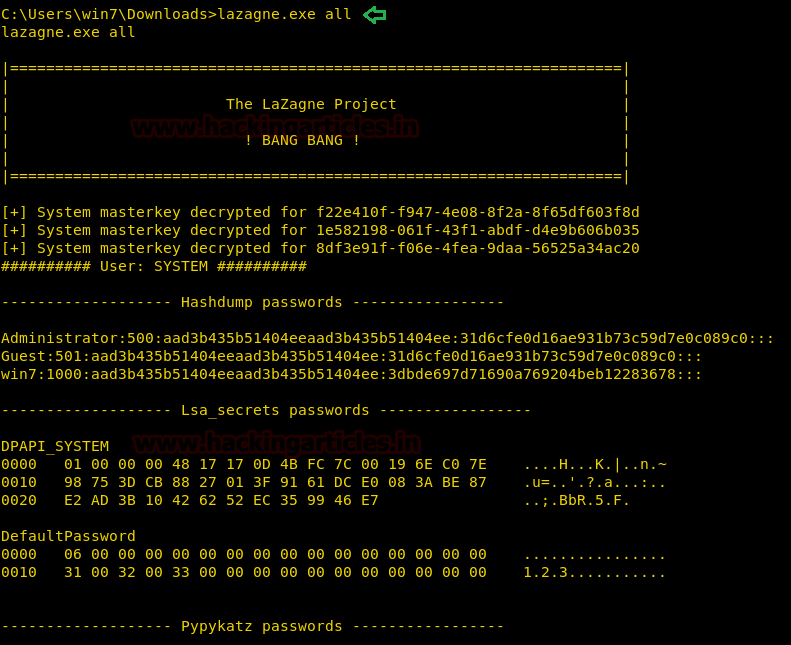
All Argument
This argument runs all the module in the LaZagne. When
this argument is selected, a script runs in the background which extracts all
the Login Credentials that are stored on the Target System. As we can see in
the given image that it has successfully extracted all the possible credentials
from the target.
lazagne.exe all
oN Parameter
This parameter should be run with some argument otherwise,
it will give an error (We are using all argument here). This parameter is
optional to run. This parameter not only prints the output on the terminal
screen but also creates a file in the Directory it was run and writes it with
the output of the Script.
lazagne.exe all
-oN

Let’s check if the file was created. As we can see in the given image that a file
named credentials is created and on opening it using the cat command it shows
the same result that we saw on the terminal.

Verbose Mode Parameter
This parameter should be run with some argument otherwise,
it will give an error (We are using all argument here). This parameter is
optional to run. In LaZagne by default, we have 2 levels of verbosity. They are
Level 0 and Level 1. If no parameter is given Level 0 is selected
automatically. But when we give -vv parameter, it increases the verbosity of
the extraction. The output also changes. Now LaZagne forcefully runs each and
every script in its arsenal and try to extract more and more credentials.
lazagne.exe all
-vv

Quiet Parameter
This parameter should be run with some argument otherwise,
it will give an error (We are using all argument here). This parameter is
optional to run. This parameter doesn’t print any output on the terminal screen.
Scripts do run in the background but there is no visibility of the passwords
extracted so we use the parameter with the oN parameter we discussed earlier as
it creates a file in the Directory it was run and writes it with the output of
the Script.
lazagne.exe all
-quiet -oN


