Comprehensive Guide to Gobuster Tool


Hello Friend!! Today we are going demontrate URLs and DNS brute force attack for extracting Directtories and files from inside URLs and subdomains from DNS by using “Gobuster-tool”.
Table of Content
·         Introuction & Installation
·         Using Wordlist for Directory Brute-Force
·         Obtaining Full Path for a directory or file
·         Hide Status Code
·         Verbose Mode
·         Identify Content Length
·         Disable Banner
·         User-Agent Mode
·         Obtain Result with Specify Status Code
·         Timeout
·         Appending Forward slash
·         Saving Output Result inside Text File
·         Enumerating Directory with Specific Extension List
·         Follow Redirect
·         HTTP AUTHORIZATION (-u username: password)
·         DNS Mode
·         Set Threads Number
·         Obtain Subdomain IPs
·         Force Processing Brute Force
·         Hide Process of Extracting
·         Extracting CNAME Records

Introuction & Installation
Gobuster is a tool used to brute-force on URIs (directories and files) in web sites and DNS subdomains. Gobuster can be downloaded through apt- repository and thus execute following command for installing it.
apt-get install gobuster


When it will get installed, you can interact with it and can perceive all available option with the help of following command.
gobuster -h
Common Parameters
  • -fw - force processing of a domain with wildcard results.
  • -np - hide the progress output.
  • -m  - which mode to use, either dir or dns (default: dir).
  • -q - disables banner/underline output.
  • -t  - number of threads to run (default: 10).
  • -u  - full URL (including scheme), or base domain name.
  • -v - verbose output (show all results).
  • -w  - path to the wordlist used for brute forcing (use - for stdin).

Dir mode Parameter
  • -a  - specify a user agent string to send in the request header.
  • -c  - use this to specify any cookies that you might need (simulating auth).
  • -e - specify extended mode that renders the full URL.
  • -f - append / for directory brute forces.
  • -k - Skip verification of SSL certificates.
  • -l - show the length of the response.
  • -n - "no status" mode, disables the output of the result's status code.
  • -o  - specify a file name to write the output to.
  • -p  - specify a proxy to use for all requests (scheme much match the URL scheme).
  • -r - follow redirects.
  • -s  - comma-separated set of the list of status codes to be deemed a "positive" (default: 200,204,301,302,307).
  • -x  - list of extensions to check for, if any.
  • -P  - HTTP Authorization password (Basic Auth only, prompted if missing).
  • -U  - HTTP Authorization username (Basic Auth only).
  • -to  - HTTP timeout. Examples: 10s, 100ms, 1m (default: 10s).

DNS mode Parameters
·         -cn - show CNAME records (cannot be used with '-i' option).
·         -i - show all IP addresses for the result.


Using Wordlist for Directory Brute-Force
You can use -w option for using a particular wordlist, for example common.txt or medium.txt to launch a brute-force attack for extracting web directories or files from inside the target URL.

gobuster -u http://192.168.1.108/dvwa -w /usr/share/wordlists/dirb/common.txt
The above command will dump the all possible files and directories with the help of common.txt wordlist.

Obtaining Full Path for a directory or file
Using -e option provides more significant result, as it Prints complete URL when extract any file or directories.
gobuster -e -u http://192.168.1.108/dvwa -w /usr/share/wordlists/dirb/common.txt
You can compare the following output result from the previous result.

Hide Status Code
Using -n Option "no status" mode, it print the output of the result's without displaying the status code.

gobuster -u http://192.168.1.108/dvwa -w /usr/share/wordlists/dirb/common.txt -n

The above command will dump the all possible files and directory without displaying their status code.


Verbose Mode
Using -v option - it enables verbose parameter and make brute-force attack vigorously on each file or directory.
gobuster -u http://192.168.1.108/dvwa -w /usr/share/wordlists/dirb/common.txt -v
As you can observe from the following option that, this time it has dump the result including status 404 for missing directories or files.
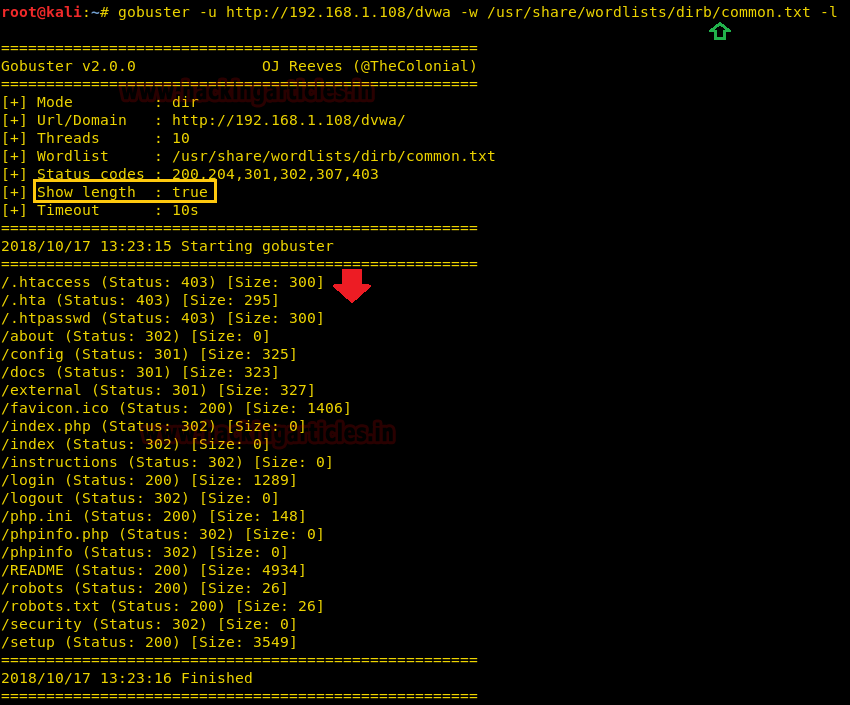


Identify Content Length

Using -l option enables content-length parameter which display size of response. The Content-Length header is a number denoting and the exact byte length of the HTTP body for extracted file or directory.
gobuster -u http://192.168.1.108/dvwa -w /usr/share/wordlists/dirb/common.txt -l


Disable Banner
Gobuster always add banner to specify brief introduction of applied options while launching brute force attack. By using -q option we can disable the banner to hide additional information.
gobuster -u http://192.168.1.108/dvwa -w /usr/share/wordlists/dirb/common.txt -q
From given below image, you can perceive the difference between last output results and in the current result.


User-Agent Mode
Using -a option enables User-Agent mode to specify a user agent string to send in the request header for extracting directories and files from inside the target URL.
gobuster -u http://192.168.1.108/dvwa -w /usr/share/wordlists/dirb/common.txt -a Mozilla/5.0 -fw


Obtain Result with Specify Status Code
Using -s Option, enables the status code for specific value such 302, 200, 403, and 404 and so on to obtain certain request pages.
gobuster -u http://192.168.1.108/dvwa -w /usr/share/wordlists/dirb/common.txt -s 302
gobuster -u http://192.168.1.108/dvwa -w /usr/share/wordlists/dirb/common.txt -s 202
From the given below image, you can take reference for the output result obtained for above commands.


Timeout
Using -to option enables the timeout parameter for HTTP request and 10 second is the Default time limit for HTTP request. 
gobuster -u http://192.168.1.108/dvwa -w /usr/share/wordlists/dirb/common.txt -to 10s


Appending Forward slash
Using -f option, appending the forward slash while making brute-force attack on the target URL.
gobuster -u http://192.168.1.108/dvwa -w /usr/share/wordlists/dirb/common.txt -f


Saving Output Result inside Text File
Using -o option, enables saving output result parameter in a text file which can be useful in future.

gobuster -u http://192.168.1.108/dvwa -w /usr/share/wordlists/dirb/common.txt -o result.txt
We can ensure the result.txt file with the help of cat command
cat result.txt


Enumerating Directory with Specific Extension List
There are a lot of situations where we need to extract the directories of a specific extension over the target server, and then we can use the -X parameter of this scan. This parameter accepts the file extension name and then searches the given extension files over the target server or machine.
gobuster -u http://192.168.1.108/dvwa -w /usr/share/wordlists/dirb/common.txt -x .php


Follow Redirect
Using -r options enables redirect parameter which redirect HTTP request to another and modify the Status code for a directory or file.
gobuster -u http://192.168.1.108/dvwa -w /usr/share/wordlists/dirb/common.txt -q
gobuster -u http://192.168.1.108/dvwa -r -w /usr/share/wordlists/dirb/common.txt -q
You can compare the output result of default scan with redirect output result.


HTTP AUTHORIZATION (-u username: password)
HTTP Authentication/Authentication mechanisms are all based on the use of 401-status code and WWW-Authenticate response header. The most widely used HTTP authentication mechanisms are Basic. The client sends the user name and password as unencrypted base64 encoded text.
So, in order to bypass this kind of authentication with the help of Gobuster we have used the command below:
gobuster -u http://192.168.1.108/dvwa -w /usr/share/wordlists/dirb/common.txt -U test -P test
As a result it is shown Status –code 200 for the test: test and authorized credential on target URL.


DNS Mode
Using -m option is enable DNS mode which is effect for public network IP and extract the subdomain.
gobuster -m dns -u google.com -w /usr/share/wordlists/dirb/common.txt
As you can observe the output result from the given below result.


Set Threads Number
Using -t option, its enables number of thread parameter to be apply while brute-forcing subdomain name or directories.
gobuster -m dns -u google.com -t 100 -w /usr/share/wordlists/dirb/common.txt


Obtain Subdomain IPs
Using -i option enables the IP parameter which should be showing IPs of extracted subdomain.
gobuster -m dns -u google.com -t 100 -w /usr/share/wordlists/dirb/common.txt -i
From the given below result, you can observe that it showing IPv4 of Ipv6 for each extracted subdomains.


Force Processing Brute Force
It stop extracting the subdomain name if meet any Wildcard DNS which is a non-existing domain, therefore use -fw option to enable force processing parameter to continue the attack even if there is any Wildcard Domain.
gobuster -m dns -u google.com -t 100 -w /usr/share/wordlists/dirb/common.txt -fw


Hide Process of Extracting
Using -np option hides the process of extracting subdomain name while making brute force attack.
gobuster -m dns -u google.com -t 100 -w /usr/share/wordlists/dirb/common.txt -fw -np


Extracting CNAME Records
Using -cn option enables CNAME Records parameter of the extracted subdomains and show their CNAME records.
gobuster -m dns -u google.com -t 100 -w /usr/share/wordlists/dirb/common.txt -cn
You can observe the output for above executed command in the given below result.


Proxy URL

Using –p option, enables proxy URL to be use for all requests, by default it works on port 1080. As you can observe, on exploring target network IP in the web browser it put up “Access forbidden error” which means this web page is running behind some proxy.


To ensure this prediction, we run the gobuster command twice, firstly on port 80 which is by default and further on port 3129 along with –p option which enables proxy parameter.

gobuster -u http://192.168.1.108/ -w /usr/share/wordlists/dirb/common.txt
gobuster -u http://192.168.1.108/ -w /usr/share/wordlists/dirb/common.txt –p 192.168.1.108:3129

From the given below image, you can take reference for the output result obtained for above commands, here we haven’t obtain any directory or file on executing first command where else in second command executed successfully.


Comprehensive Guide to Dirb


In this article, we are focusing on transient directory using Kali Linux tool DIRB and trying to find hidden files and directories within a web server.
A path traversal attack is also known as “directory traversal” aims to access files and directories that are stored outside the web root folder. By manipulating variables with reference files with “dot-dot-slash (…/)” sequences and its variations or by using absolute file paths, it may be possible to access arbitrary files and directories stored on file system including application source code, configuration and critical system files.
Source: https://www.owasp.org/index.php/Path_Traversal
Requirements
Target- BWAPP Labs, DVWA Labs, webscantest.com
Attacker - Kali Linux

Table of content
·         Introduction to DIRB
·         Utilizing Multiple Wordlist for Directory Traversing
·         Default working of Dirb
·         Enumerating Directory with Specific Extension List
·         Save Output to Disk
·         Ignore Unnecessary Status-Code
·         Default Working Vs Not stop on WARNING messages Working
·         Speed delay
·         Not recursively (-r)
·         Show NOT Existence Pages
·         Extension List (-X parameter) Vs Extension Header (-H parameter)
·         Not forcing an ending '/' on URLs (-t)
·        HTTP Authentication (-u username: password)

What is DIRB?
DIRB is a Web Content Scanner. It looks for existing (and/or hidden) Web Objects. It basically works by launching a dictionary-based attack against a web server and analyzing the response.
It comes with a set of preconfigured attack wordlists for easy usage but you can use your custom wordlists. Also, DIRB sometimes can be used as a classic CGI scanner, but remember is a content scanner not a vulnerability scanner.
The main purpose is to help in professional web application auditing. Especially in security related testing. It covers some holes not covered by classic web vulnerability scanners. DIRB looks for specific web objects that other generic CGI scanners can’t look for. It doesn’t search vulnerabilities nor does it look for web contents that can be vulnerable.
Source: https://tools.kali.org/web-applications/dirb
Tool DIRB is built in Kali Linux. Open the terminal and type the following command to get an overview of the tools included in the package:
dirb
 -a : Specify your custom USER_AGENT.
 -c : Set a cookie for the HTTP request.
 -f : Fine tunning of NOT_FOUND (404) detection.
 -H : Add a custom header to the HTTP request.
 -i : Use case-insensitive search.
 -l : Print "Location" header when found.
 -N : Ignore responses with this HTTP code.
 -o : Save output to disk.
 -p : Use this proxy. (Default port is 1080)
 -P : Proxy Authentication.
 -r : Don't search recursively.
 -R : Interactive recursion. (Asks for each directory)
 -S : Silent Mode. Don't show tested words. (For dumb terminals)
 -t : Don't force an ending '/' on URLs.
 -u : HTTP Authentication.
 -v : Show also NOT_FOUND pages.
 -w : Don't stop on WARNING messages.
 -X / -x : Append each word with this extensions.
 -z : Add a miliseconds delay to not cause excessive Flood.

Utilizing Multiple Wordlist for Directory Traversing
The above attack works by using the default wordlist_files common.txt, but we can change this word list and could select other wordlist for directory traversal. You must follow the following path to view all available wordlists.
cd /usr/share/wordlists/dirb
cd /usr/share/wordlists/vulns
ls
ls –l

You can see from the image below that there are so many text files as wordlist; we can use them as required.

Default working of Dirb
In this attack the common.txt is set as a default word list for directory traversal, the protester can use the following command. Open the terminal and type the following command to start the Brussels Directory attack.
Syntax: dirb
dirb http://192.168.1.106/dvwa/
Using the common.txt file, the DIRB returns the enumerated directories found within the target URL as shown in the below image.

Enumerating Directory with Specific Extension List
There are a lot of situations where we need to extract the directories of a specific extension over the target server, and then we can use the -X parameter of the dirb scan. This parameter accepts the file extension name and then searches the given extension files over the target server or machine.
dirb http://192.168.1.106/dvwa/ -X .php
The above command will extract all directory path related to php extension as shown the following image.


Save Output to Disk
For the purpose of the record maintenance, better readability and future references, we save the output of the dirb scan onto a file. To this we will use the parameter -o of the dirb scan we can save the output of the dirb scan in a text file.
dirb http://192.168.1.106/dvwa/ -o output.txt
The above command will generate an output.txt file at the desktop of the enumerated directories.
Now that we have successfully executed the command, now let’s traverse to the location to ensure whether the output has been saved on the file on not. In this case our location for output is /root/Desktop/output.txt.

Ignore Unnecessary Status-Code
The Status-Code element is a 3-digit integer where first digit of the Status-Code defines the class of response and the last two digits do not have any categorization role. In this attack we are using –N parameter on code 302 as shown below.
dirb http://192.168.1.106/dvwa/ -N 302
As you can grasp form the given screenshot that the dirb scan is ignoring the NOT FOUND code that is., 302.

Default Working Vs Not stop on WARNING messages Working
During the normal dirb scan as show below, some of the pages generate warnings; the dirb scan skips those directories where it encounters any warnings.
dirb http://192.168.1.106/ 

While doing a scan that is to be done very deeply and verbosely, we want that the dirb scan to not avoid these warnings and do an in-depth scan, hence we use the -w parameter of the dirb scan.
dirb http://192.168.1.106/ -w
As you can observe the highlighted directory /dev/shell is enumerated even after warning message which is missing in the default scan.
Speed delay
While working in different scenarios, there are some environment we come across that cannot handle the flood created by the dirb scan, so in those environments it is important that we delay the scan for some time. This can be done easily with the -z parameter of the dirb scan. In this parameter, the time is provided on the scale of milliseconds. Like as shown in our given example, we have given 100 seconds delay to dirb.
dirb http://192.168.1.106/dvwa -z  100

Not recursively (-r)
The dirb scan, by default scans the directories recursively. It means it scans a directory and then traverses inside that directory to scan for more sub directories. But in some scenarios, where time is insufficient, we set the dirb to not scan recursive. This can be achieved using the -r parameter.
dirb http://192.168.1.106/dvwa -r

Show NOT Existence Pages
A 404 error is an HTTP status code that means that the page you were trying to reach on a website couldn't be found on their server. 404 Not Found error messages are frequently customized by individual websites. In some scenarios we need to find the 404 pages too, which dirb skips by default. To find those pages we will use -v parameter.
dirb http://192.168.1.106/dvwa -v
From given below the image you can observe it has also extract all those directories are relevant to 404 errors.

Extension List (-X parameter) Vs Extension Header (-H parameter)
By using –X parameter along with target URL with a specific extension, for example .php, it enumerates all file or directory with .php extension, but by using –H parameter with specific extension, for example .php along with target URL it will enumerate all files or directories named with php as shown in the given below image.
dirb http://192.168.1.106/dvwa -H .php

Not forcing an ending '/' on URLs (-t)
From the attacks used in the previous situations, in order to run the dirb tool we will have to add a forward slash (/) at the end of the URL to be accepted in dirb. In order to check that we need try one attack on url ending without any forward slash.
dirb http://192.168.1.105/bwapp/portal.php
You will observe that the scan doesn’t get executed successfully because of the lack of the forward slash, the importance of which we discussed earlier in this article.
Try this attack once again with the same command with some changes so in order to run that command we have to add –t in the previous command.
dirb http://192.168.1.105/bwapp/portal.php -t
As now we can observe that the even in the absence of the forward slash, we still have successfully executed the dirb scan.


HTTP AUTHORIZATION (-u username: password)
HTTP Authentication/Authentication mechanisms are all based on the use of 401-status code and WWW-Authenticate response header. The most widely used HTTP authentication mechanisms are Basic. The client sends the user name and password as unencrypted base64 encoded text.
So, in order to bypass this kind of authentication with the help of dirb we have used the command below:
dirb http://testphp.vulnweb.com/login.php -u  test:test
As a result it is shown Status –code 200 for the test: test and authorized credential on target URL.


Using –p option, enables proxy URL to be use for all requests, by default it works on port 1080. As you can observe, on exploring target network IP in the web browser it put up “Access forbidden error” which means this web page is running behind some proxy.

dirb http://192.168.1.108 –p 192.168.1.108:3129
From the given below image, you can take reference for the output result obtained for above commands, here we haven’t obtain any directory or file on executing first command where else in second command executed successfully.