DOS Attack Penetration Testing (Part 2)

In our previous “DOS Attack Penetration testing” we had described about several scenario of DOS attack and receive alert for Dos attack through snort. DOS can be performed in many ways either using command line tool such as Hping3 or GUI based tool. So today you will learn how to Perform Dos attack using GUI tools as well as command line tool and get an alert through snort.

Let start!!
TCP Flood Attack  using LOIC
As we have discribed in our both article Part 1 and part 2 that in target system Snort is working as NIDS for analysing network traffic packets.  Therefore first we had build a rule for in snort to analysis random TCP packets coming in our network rapiditly.

Execute given below command in ubuntu’s terminal to open snort local rule file in text editor.
sudo gedit /etc/snort/rules/local.rules
alert TCP any any -> 192.168.1.10 any (msg: “TCP Flood”; sid:1000001;)

Above rule will monitor incoming TCP packets on 192.168.1.10 by generating alert for it as “TCP Flood”. Now turn on IDS mode of snort by executing given below command in terminal:

sudo snort -A console -q -u snort -g snort -c /etc/snort/snort.conf -i eth0


LOIC: It stands for low Orbit iron cannon which is GUI tool developed by Praetox Technologies which is network stress testing tool. We had used it only for educational purpose in our local network, using it over public sector will consider as crime and take as illegal job.  Download it from Google.  

We had downloaded LOIC in our Windows system run the setup file for installation. Start the tool follow the given below step:
Select your target: Here we will go with IP option and enter the victims IP: 192.168.1.10 then click on Lock on tab.
Attack Option: Enter port no. and select method such as TCP and enter no. of threads. If you want to wait for reply packet from victim’s network then enable the check box else disable it.
Adjust the scale:  Drawn the cursor left or right for setting the speed of your TCP packet either faster or slower mode.
Attack status: describe the attack state such as connecting or request or etc.
Ready:  Now click on IMMA CHARGIN MAH LAZER to launch the DOS attack and click on stop flood In order to stop DOS attack.


We are involving wireshark in this tutorial so that you can clearly see the packet sends from attacker network to targets network. Hence in given below image you can notice endless TCP packet has been sent on target’s network. It is considered as Volume Based DOS Attack which floods the target network by sending infinite packets to demolish its network for other legitimate users.


Return to over your target machine where you will notice that snort is exactly in same way capturing all in coming traffic, here you will observe that it is generating alerts for “TCP Flood”.  Hence you can block attacker’s IP (192.168.1.16) to protect your network from discard all further coming packets toward your network.


UDP Flood Attack  using LOIC
I think now everything is clear to you how you can build rule in snort get alert for suspicious network again repeat the same and  execute given below command in ubuntu’s terminal to open snort local rule file in text editor and add rule for UDP flood.
sudo gedit /etc/snort/rules/local.rules
alert UDP any any -> 192.168.1.10 any (msg: “UDP Flood”; sid:1000003;)

Above rule will monitor incoming UDP packets on 192.168.1.10 by generating alert for it as “UDP Flood”. Now turn on IDS mode of snort by executing given below command in terminal:
sudo snort -A console -q -u snort -g snort -c /etc/snort/snort.conf -i eth0


Repeat the whole steps as done above only change the method attack option choose UDP method and launch the DOS attack on target IP. You can set any set number of threads for attack since it is tutorial therefore I had set 20 for UDP. It is considered as Volume Based DOS Attack which floods the target network by sending infinite packets to demolish its network for other legitimate users.


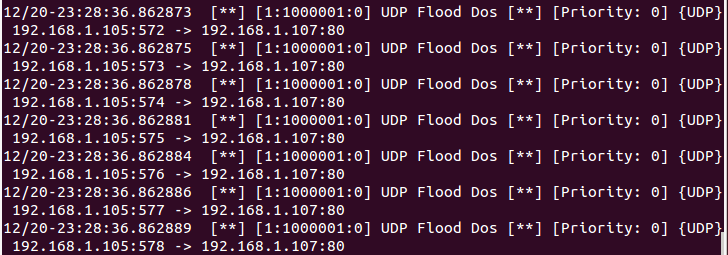
Return to over your target machine where you will observe that snort is precisely capturing all in coming traffic in same way, here you will observe that it is generating alerts for “UDP Flood”.  Hence again you can block attacker’s IP (192.168.1.16) to protect your network from discard all further coming packets toward your network on port 80.


TCP Flood Attack  using HOIC
Next we are using HOIC which is alos GUI tool for tcp attack and if you remember we ahd already configure TCP flood rule in our local rule file. Now turn on IDS mode of snort by executing given below command in terminal:
sudo snort -A console -q -u snort -g snort -c /etc/snort/snort.conf -i eth0

HOIC: It stands for higher orbit ion cannon developed by Praetox Technologies which is network stress testing tool. We had used it only for educational purpose in our local network, using it over public sector will consider as crime and take as illegal job. Download it from Google.
We had downloaded HOIC in our Windows system run the setup file for installation. Start the tool follow the given below step:
Add the target by making Click on plus symbol “+


A list of attack option will get pop up as shown in given below image and follow the given below step:
 URL: Enter your target network address as http://192.168.1.10
Power: Low/medium/high to decide the speed of packet to bent to target machine.
At last click on Add.


You can clearly observe the TCP packet is sending from attacker network to targets network. In given below image you can notice the endless TCP packet has been sent on target’s network using TCP Flags such as SYN/RST/ACK. It is considered as Volume Based DOS Attack which floods the target network by sending infinite packets to demolish its network for other legitimate users.


Return to over your target machine where you will notice that snort is capturing all in coming traffic exactly in same way as above, here you will observe that it is generating alerts for “TCP Flood”.  Hence you can block attacker’s IP (192.168.1.11) to protect your network from discard all further coming packets toward your network on port 80.


GoldenEye
Goldeneye is command line tool use for security testing purpose we had used only for tutorial don’t use it over public sector it will consider as crime and take as illegal job. Execute given below in your kali Linux to download it from github.

git clone https://github.com/jseidl/GoldenEye.git


Now give all permission to the python script and execute given below command for Launching DOS attack on target network. Basically goldeneye is used for HTTP dos testing for testing any webserver network security.
 ./goldeneye.py http://192.168.1.10


Using wireshark you can observe the flow of traffic between victim and attacker network. So if notices given below image then you will find that first attacker (192.168.1.103) sends TCP syn packet for establishing connection with victim’s network then attacker is sending http packet over victim’s network.


Here you will observe that it is generating alerts for “TCP Flood” since port is 80 follow TCP protocol therefore snort captured the traffic generated by goldeneyes. Hence you can block attacker’s IP (192.168.1.103) to protect your network from discard all further coming packets toward your network on port 80.


Slowloris
Slowloris is command line tool use for security testing purpose we had used only for tutorial don’t use it over public sector it will consider as crime and take as illegal job. Execute given below in your kali Linux to download it from github.

git clone https://github.com/llaera/slowloris.pl.git


perl slowloris.pl -dns 192.1681.10


Using wireshark you can observe the flow of traffic between victim and attacker network. So if notices given below image then you will find that first attacker (192.168.1.103) sends TCP syn packet for establishing connection with victim’s network then victim’s is sending SYN,ACK packet over attacker’s network and then attacker sends ACK packet and this will keep on looping.


Return to over your target machine where you will notice that snort is capturing all in coming traffic exactly in same way as above, here you will observe that it is generating alerts for “TCP Flood”.  Hence you can block attacker’s IP (192.168.1.11) to protect your network from discard all further coming packets toward your network on port 80.


Xerxer is command line tool use for security testing purpose we had used only for tutorial don’t use it over public sector it will consider as crime and take as illegal job. Execute given below in your kali Linux to download it from github.

git clone https://github.com/zanyarjamal/xerxes.git


Since it is written in c language there we need to compile it using gcc as shown in given below command and run then run the script in order to launch DOS attack.
gcc xerxes.c -o xerxes
./xerxes 192.168.1.10 80


You can clearly observe the TCP packet is sending from attacker network to targets network. In given below image you can notice the endless TCP packet has been sent on target’s network using TCP Flags such as SYN/ACK/PSH. These packet are sent in a loop between attacker can target network.


Return to over your target machine where you will notice that snort is capturing all in coming traffic exactly in same way as above, here you will observe that it is generating alerts for “TCP Flood”.  Hence you can block attacker’s IP (192.168.1.11) to protect your network from discard all further coming packets toward your network on port 80.

Well in this tutorial we had use most powerful top 5 tool for DOS attack.


DOS Penetration Testing (Part 1)

Hello friends! Today we are going to describe DOS/DDos attack, here we will cover What is dos attack; How one can lunch Dos attack on any targeted network and What will its outcome and How victim can predict for Dos attack for his network.

Requirement
Attacker machine: kali Linux: 192.168.1.105
Victim machine: ubtuntu (without IDS) 192.168.1.10
Victim machine: ubuntu: 192.168.1.107 (using IDS: Snort)
Optional: Wireshark (we have added it in our tutorial so that we can clearly confirm all incoming and outgoing packet of network)


What is DOS/DDOS ATTACK?

Form Wikipedia
denial-of-service attack (DoS attack) is a cyber-attack where the attacker looks for to make a machine or network resource unavailable to its deliberated users by temporarily or indefinitely services of disturbing a host connected to the Internet. Denial of service is usually accomplished by flooding the targeted machine or resource with excessive requests in an attempt to overload systems and prevent some or all legitimate requests from being fulfilled.

In a distributed denial-of-service attack (DDoS attack), the incoming traffic flooding the victim originates from many different sources. A DoS or DDoS attack is analogous to a group of people crowding the entry door or gate to a shop or business, and not letting legitimate parties enter into the shop or business, disrupting normal operations.

Basically attacker machine either himself sends infinite request packets on target machine without waiting for reply packet form target network, or uses bots (host machines) to send request packet on target machine. Let study more above it using given below image, here you can observe 3 Phases where Attacker machine is placed at the Top while Middle part holds Host machine which is control by attacker machine and at Bottom you can see Target machine.

From given below image you can observe that the attacker machine want to send ICMP echo request packet on target machine with help of bots so this will increase the number of attacker and number of request packet on target network and cause traffic Flood. Now at that time the targeted network get overloaded and hence lead some service down then prevent some or all legitimate requests from being fulfilled.

DOS/DDOS can Majorly Categories into 3 Ways

Volume Based Attack: The attack’s objective is to flood the bandwidth of the target networks by sending ICMP or UDP or TCP traffic in per bits per second.
Protocol Based Attack: This kind of attack focus actual target server resources by sending packets such TCP SYN flood, Ping of death or Fragmented packets attack per second to demolish the target and make it unresponsive to other legitimate requests.

Application Layer Attack: Rather than attempt to demolish the whole server, an attacker will focus their attack on running applications by sending request per second for example attacking on WordPress, Joomla web server by infinite request on apache to make it unresponsive to other legitimate requests.


How to Perform DOS Attack?
If you are aware of OSI 7 layers model then you may know that whenever we send request packet to server for accessing any particular service for example browsing Google.com then this process execute by passing through 7 layers of OSI model and at last we are able to access Google.com on browser.

Now suppose port 80 is open in target’s network (192.168.1.10) for accessing its HTTP services so that you can open their website through your browser and get the information available in those web pages. So basically attacker plan to slow down HTTP service for other user who wants to interact with target machine through port 80 as result server will not able to reply the other legitimate requests and this will consider as Protocol Dos attack.

Attacker can use any tool for DOS attack but we are using Hping3 for attacking to generate traffic flood for target’s network to slow down its HTTP service for other users.

hping3 -F --flood -p 80 192.168.1.10

Above command will send endless request packet per second on port 80 of target’s network.


What will Effect of Dos Attack?

As we had described that any kind of Dos attack will affect the server services to their users and clients in establishing connection with it. Here also when we had sent infinite request packet on port 80 of target’s network then it should make HTTP service unable for legitimate users.
So now if I will explore target IP on your browser for accessing their web site as a legitimate users then you can observe that the browser is unable to connect with server for HTTP services as shown in given below image.


Configure IDS in your network which will monitor the incoming network traffic on your network and generates the alert for suspicious traffic to system administrators. We had install Snort on system (ubuntu: 192.168.1.107) as NIDS (Network Intrusion Detection System) kindly read our previous both articles related to Snort Installation (Manually or using apt-respiratory)and its rule configuration to enable it as IDS for your network.

Predict SYN Flood Dos Attack

Execute given below command in ubuntu’s terminal to open snort local rule file in text editor.
sudo gedit /etc/snort/rules/local.rules

alert tcp any any -> 192.168.1.107 any (msg: “SYN Flood Dos”; flags:S; sid:1000006;)

Above rule will monitor incoming TCP-SYN packets on 192.168.1.107 by generating alert for it as “SYN Flood Dos”. Now turn on IDS mode of snort by executing given below command in terminal:
sudo snort -A console -q -u snort -g snort -c /etc/snort/snort.conf -i eth0


Now test the above rule by sending infinite SYN packet using attacker’s machine. Open the terminal and enter msfconsole for metasploit framework and execute given below command to run the syn flood exploit.
This exploit will send countless syn packets on target’s network to demolish its services.
use auxiliary/dos/tcp/synflood
msf auxiliary(synflood) > set rhost 192.168.1.107 (target IP)
msf auxiliary(synflood) > set shost 192.168.1.105 (attacker’s IP )
msf auxiliary(synflood) > exploit

We have set shost for attacker’s IP only for tutorial else it was optional or you can address any random IP of your network, now can see SYN flood has been lunched on port 80 by default it is consider as Protocol Based Dos Attack as described above.


As I had declaimed above why we are involving wireshark in this tutorial so that you can clearly see the packet sends from attacker network to targets network. Hence in given below image you can notice endless SYN packet has sent on target’s network on port 80.


Come back to over your target machine where you will notice that snort is exactly in same way capturing all in coming traffic here your will observe that it is generating alerts for “SYN Flood Dos”.  Hence you can block attacker’s IP (192.168.1.105) to protect your network from discard all further coming packets toward your network.


Predict UDP Flood Dos Attack

Now again open local rule files for generating alert for UDP flood Dos attack and enter given below rule and save the file.
alert udp any any -> 192.168.1.107 any (msg: “UDP Flood Dos”; sid:1000001;)

Above rule will monitor incoming UDP packets on 192.168.1.107 by generating alert for it as “UDP Flood Dos”. Now turn on IDS mode of snort by executing given below command in terminal:

sudo snort -A console -q -u snort -g snort -c /etc/snort/snort.conf -i eth0


We are using Hping3 for attacking to generate traffic flood for target’s network to slow down its UDP service for other users it is consider as Volume Based Dos Attack as described above.

hping3 --UDP –flood -p 80 192.168.1.107

Above command will send endless bits packet per second on port 80 of target’s network.


From given below image you can observe wireshark has captured UDP packets from 192.168.1.105 to 192.168.1.107


Come back to over your target machine where snort is capturing all in coming traffic here your will observe that it is generating alert for UDP Flood Dos attack. Hence you can block attacker’s IP to protect your network from further scanning.


Predict SYN_FIN Flood Dos Attack

Now again open local rule files for generating alert for some combination of flags such as SYN-FIN packets and enter given below rule and save the file.

alert tcp any any -> 192.168.1.107 any (msg: “SYN-FIN Flood Dos”; sid:1000001; flags:SF;)

Above rule will monitor incoming TCP-SYN/FIN packets on 192.168.1.107 by generating alert for it as “SYN-FIN Flood Dos”. Now turn on IDS mode of snort by executing given below command in terminal:
sudo snort -A console -q -u snort -g snort -c /etc/snort/snort.conf -i eth0


Again we are using Hping3 for attacking to generate traffic flood for target’s network to slow down network services for other users.

hping3 -SF –flood -p 80 192.168.1.107

Above command will send endless bits packet per second on port 80 of target’s network.


Hence in given below image you can notice endless SYN-FIN packet has sent from 192.168.1.105 to 192.168.1.107 on port 80.


Come back to over your target machine where you will notice that snort is exactly in same way capturing all in coming traffic here your will observe that it is generating alerts for “SYN-FIN Flood Dos”.  Hence you can block attacker’s IP (192.168.1.105) to protect your network from discard all further coming packets toward your network.


Predict PUSH_ACK Flood Dos Attack

Now again open local rule files for generating alert for some combination of flags such as PSH-ACK packets and enter given below rule and save the file.

alert tcp any any -> 192.168.1.107 any (msg: “PUSH-ACK Flood Dos”; sid:1000001; flags:PA;)

Above rule will monitor incoming TCP-PSH/ACK packets on 192.168.1.107 by generating alert for it as “PUSH-ACK Flood Dos”. Now turn on IDS mode of snort by executing given below command in terminal:
sudo snort -A console -q -u snort -g snort -c /etc/snort/snort.conf -i eth0


hping3 -PA –flood -p 80 192.168.1.107

Above command will send endless bits packet per second on port 80 of target’s network.


Hence in given below image you can notice endless PSH-ACK packet has sent from 192.168.1.105 to 192.168.1.107 on port 80.


Come back to over your target machine where you will notice that snort is exactly in same way capturing all in coming traffic here your will observe that it is generating alerts for “PUSH-ACK Flood Dos”.  Hence you can block attacker’s IP (192.168.1.105) to protect your network from discard all further coming packets toward your network.


Predict Reset Flood Dos Attack

Now again open local rule files for generating alert for Reset flag packets and enter given below rule and save the file.

alert tcp any any -> 192.168.1.107 any (msg: “Reset Dos”; sid:1000001; flags:R;)

Above rule will monitor incoming TCP-RST packets on 192.168.1.107 by generating alert for it as “Reset  Dos”. Now turn on IDS mode of snort by executing given below command in terminal:
sudo snort -A console -q -u snort -g snort -c /etc/snort/snort.conf -i eth0


Again we are using Hping3 for attacking to generate traffic flood for target’s network to slow down network services for other users.

hping3 -R –flood -p 80 192.168.1.107

Above command will send endless bits packet per second on port 80 of target’s network.


Hence in given below image you can notice endless RST (Reset) packet has sent from 192.168.1.105 to 192.168.1.107 on port 80.


Come back to over your target machine where you will notice that snort is exactly in same way capturing all in coming traffic here your will observe that it is generating alerts for “Reset Dos”.  Hence you can block attacker’s IP (192.168.1.105) to protect your network from discard all further coming packets toward your network.


Predict FIN Flood Dos Attack

Now again open local rule files for generating alert for Fin flag packets and enter given below rule and save the file.

alert tcp any any -> 192.168.1.107 any (msg: “FIN Dos”; sid:1000001; flags:F;)

Above rule will monitor incoming TCP-RST packets on 192.168.1.107 by generating alert for it as “FIN Dos”. Now turn on IDS mode of snort by executing given below command in terminal:
sudo snort -A console -q -u snort -g snort -c /etc/snort/snort.conf -i eth0


Again we are using Hping3 for attacking to generate traffic flood for target’s network to slow down network services for other users.

hping3 -F –flood -p 80 192.168.1.107

Above command will send endless bits packet per second on port 80 of target’s network.


Hence in given below image you can notice endless FIN (Finished) packet has sent from 192.168.1.105 to 192.168.1.107 on port 80.


Come back to over your target machine where you will notice that snort is exactly in same way capturing all in coming traffic here your will observe that it is generating alerts for “FIN Dos”.  Hence you can block attacker’s IP (192.168.1.105) to protect your network from discard all further coming packets toward your network.


Predict Smruf Attack

Smurf attack is DDOS attack in which large numbers of Internet Control Message Protocol packets are used to generate a fake Echo request (icmp type : 8) containing a spoofed source IP which is actually the target network address. This request packet is then is transmitted to all of the network hosts on the network and then each host sends an ICMP response to the spoofed source address (target IP).  The target's computer will be flooded with traffic; this can slow down the target's computer and make it unable for other users.

Now again open local rule files for generating alert for ICMP packets and enter given below rule and save the file.

alert icmp any any -> any any (msg: “Smruf Dos Attack”; sid:1000003;itype:8;)

Above rule will monitor ICMP packets on 192.168.1.103 by generating alert for it as “Smurf Dos Attack”. Now turn on IDS mode of snort by executing given below command in terminal:
sudo snort -A console -q -u snort -g snort -c /etc/snort/snort.conf -i eth0


Again we are using Hping3 for attacking to generate traffic ICMP flood for target’s network to slow down network services for other users.

hping3 --icmp --flood -c 1000 --spoof 192.168.1.103 192.168.1.255

Above command will generate fake ICMP echo request packet containing a spoofed source IP: 192.168.1.103 which is basically our victim’s network and this request packet is then is transmitted to host’s network on 192.168.1.255 and then this host sends an ICMP response to the spoofed source address which our victim’s machine in IDS mode.


From given below image you can observe it is showing source machine 192.168.1.103 sending  icmp echo request packet to 192.168.1.255 but as we know in actually attacker is main culprit behind this senario.


Come back to over your target machine where you will notice that snort is capturing all the traffic flowing from 192.168.1.103 to 192.168.1.255 and generating alerts for “Smurf Dos Attack” which means is our machine (victim’s machine) is pinging other host machine of that network. Therefore the network administrator should be attentive with this kind of traffic and must check the system activity and legitimate ICMP request of packet of his network.