Setup IDS,IPS Pentest Lab with Security Onion

Security Onion is a Linux distro for intrusion detection, network security monitoring, and log management. It’s based on Ubuntu and contains Snort, Suricata, Bro, OSSEC, Sguil, Squert, ELSA, Xplico, NetworkMiner, and many other security tools. The easy-to-use Setup wizard allows you to build an army of distributed sensors for your enterprise in minutes!

Security Onion effortlessly merges collectively two main roles i.e. complete packet capture another Network-based [NIDS] and host-based intrusion detection systems [HIDS].

There are some Analysis tool are available that also work as real time program by capturing network packets.

 NIDS: Snort or Suricata and Bro as network intrusion detection for fingerprints and identifiers that contest identified malicious, abnormal otherwise suspicious traffic.
HIDS:  Security Onion offers OSSEC for host-based intrusion detection.
Sguil: It is the crucial Security Onion tool for network security analysts. Sguil's main component is an intuitive GUI that gives access to real-time events, session data, and raw packet captures.
Squert: It is a web application that is used to query and view event data stored in a Sguil database.
ELSA: Enterprise Log Search and Archive is a three-tier log receiver, archiver, indexer, and web frontend for incoming syslog. 
For more details visit here

Let’s start!!

Create VM for Security Onion installation
Open vmware, select option “creates new virtual machine”, now for install from wizard select second option:
Install disc image file in order to browser iso file of security onion.

Then click on next.


Now select 2nd option “Linux” for guest operating system and select version “ubuntu”. Then click on next and next as per your requirements.


Select bridges connection and enable the check box for replicate connection for network adapter setting. Similarly add one more network adapter and also select bridges connection for 2nd adapter
Then click on finish.


Installation
It will start booting the vm automatically, now for SECURITY ONION


At welcome screen; Select language and click "Continue". Here we had chosen English as preferred language.


Read the content and then click on "Continue".


Choose the radio button for “Erase the disk and install Security Onion” to begin installation and click “Install Now”


Click on “Continue” then it will proceed for disk partitions.


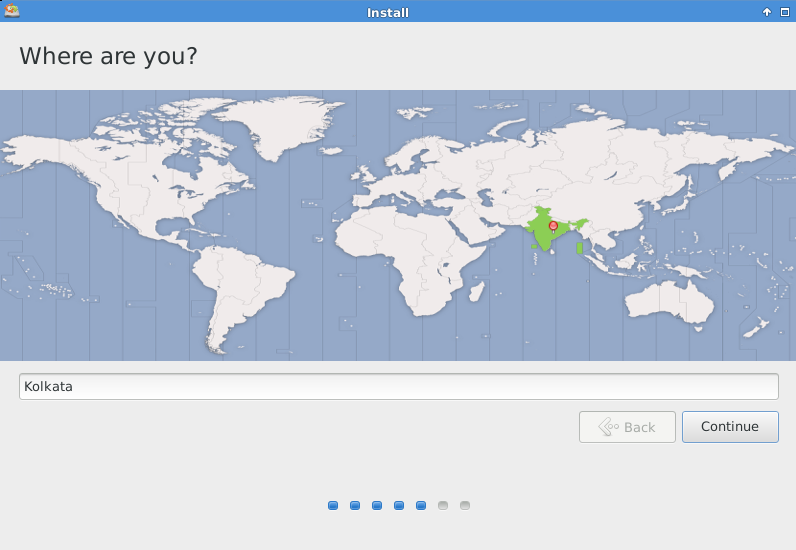
Check your location, without holdup, select your time zone and then click on “Continue”.


Choose keyboard layout “English (US)” and then click on “Continue”.


Now crate your profile by giving yours detail as given below:
Enter your name: Ignite
Enter your computer’s name: Ignite-pc
Select a username: Ignite
Enter a password: 1234

Click "Continue"


Security onion configuration 1st part
In order to configure security onion as real time system for NIDS and HIDS we have divided configuration setting in two parts.
Now enter your username and password for login as shown in given below image.


 At Desktop screen you have can see setup icon; click on “setup” icon for configuration of network interface.


Configure 1st network adapter for management interface
Click on “setup” icon present at desktop to configure security onion on your system.
Click "Yes, Continue"


Click "Yes” to configure /etc/network/interface now as shown in given below image.


Choose eth0 as network interface should be the management interface as shown in given below image.


Choose Static addressing for eth0 utilization as shown in given below image.


Enter a static IP for your management interface as shown in given image.


Enter subnet mask of for static addressing as shown in given below image.


Enter gateway as shown in given below image.


Enter DNs server IP it can be 192.168.1.1 or 8.8.8.8 or can be both separated by spaces.


Enter you local domain name as shown in given below image.


Configure 2nd network adapter for sniffing interface
Click "Yes” to configure sniffing interfaces now as shown in given below image.


Choose eth1 as network interface should be used for sniffing interface.


Network configuration is completed now click “Yes Reboot”


Security onion configuration 2nd part
Now once it gets restarted then again click on “setup” icon for further configuration of security onion setup as real-time machine. Then click “yes, Continue”


Since we had already configure network interface therefore click on “yes, Skip network configuration”


Select “Stable setup” which will configure ELSA; then Click OK


Enter password for username used while you want to login into Sguil, Squert and ELSA a shown in given below image.


Here it will proceed for stopping all NSM services which manages all network services from creation to deletion.


Security Onion configuration is now completed. You will see it will launch icon for SGUIL, Squert and ELSA. Now click on squil icon and then enter username and password to login into sguil.


Select network eth1 to be monitor as shown in given below image and click on “start SGUIL”


Great!! Now analysis your network traffic will real-time machine


Understanding Guide to Nmap Firewall Scan (Part 2)

In our pervious article we had demonstrated “Nmap firewall scan (part 1)” by making use of Iptable rules and then try to bypass firewall filter to perform NMAP Advance scanning, today we are going to discuss second part of it.  

Requirement
Attacker: Kali Linux
Target: Ubuntu  

Allow TCP Packet from Specific Mac Address

If network admin wants to establish TCP connect from specific MAC address and do not want to connect with other system then he could use following Iptable rules to apply firewall filter in his network.  

iptables -I INPUT -p tcp -m mac --source-mac "AA:AA:AA:AA:AA:AA" -j ACCEPT


iptables -I INPUT -p tcp -j REJECT --reject-with tcp-reset


Now when attacker will perform basic network scanning on target’s network, he could not able to enumerate ports and running service of victim’s system. 
nmap 192.168.1.117


Spoof MAC Address and Bypass firewall
In order to bypass above applied filter attacker may run netdiscover command or nmap Host Scan in Kali Linux terminal to identify the active host in the network. As result he will get a table which contains MAC address and IP address of active host in local network.


Now either use one by one all MAC address in nmap command or save all MAC address in a text file and give its path in nmap command but to perform this attacker first need to enable “Promiscuous mode” of his network. Well, to do so type given below commands first for Promiscuous mode and second for nmap scanning.
ip link set eth0 promisc on
nmap –spoof-mac AA:AA:AA:AA:AA:AA 192.168.1.117

Hence if you are lucky to spoof correct Mac address then you can easily bypass the firewall filter and able to establish TCP connect with victim’s network for port enumeration.

Nice!!! If you will notice in given below image you will observe open ports of target’s network.


Allow TCP Packet from Specific IP

If network admin wants to establish TCP connect from specific IP and do not want to connect with other system then he could use following Iptable rules to apply firewall filter in his network. 

iptables -I INPUT -p tcp -j REJECT --reject-with tcp-reset

iptables -I INPUT -p tcp -s 192.168.1.120 -j ACCEPT


Now when again attacker will perform basic network scanning on target’s network, he could not able to enumerate ports and running service of victim’s system.
nmap 192.168.1.117


Spoof IP Address and Bypass firewall
In order to bypass above applied filter attacker may again run netdiscover command or nmap Host Scan in Kali Linux terminal to identify the active host in the network. As result he will get a table which contains MAC address and IP address of active host in local network.

Now either use one by one all IP address in nmap command or save all IP address in a text file and give its path in nmap command and then execute following command:
nmap -e eth0 -S 192.168.1.120 192.168.1.117
Hence if you are lucky to spoof correct IP address then you can easily bypass the firewall filter and able to establish TCP connect with victim’s network for port enumeration.

Great!! If you will notice in given below image you will observe open ports of target’s network.


If network admin wants to establish TCP connect from a system which contain specific string and do not want to connect with other system does not contain that special string packets then he could use following Iptable rules to apply firewall filter in his network. 

iptables -I INPUT -p tcp -m string --algo bm --string "Khulja sim sim" -j ACCEPT
iptables -A INPUT -p tcp -j REJECT --reject-with tcp-reset

In above rule you can see we had used "Khulja sim sim" as special string to establish TCP connection. Hence only those TCP connection could be establish which contain "Khulja sim sim"in packets.


Now when again attacker will perform basic network scanning on target’s network, he could not able to enumerate ports and running service of victim’s system because traffic generate from his network does not contain special string in packets thus firewall of target system will discard all TCP packet of attacker’s network.
nmap 192.168.1.117


Use NMAP Data-String and Bypass firewall
If attacker somehow sniffs special string “khulja sim sim” to connect with target’s network then he could use –data-string argument in nmap command to bypass the firewall.
nmap --data-string "Khulja sim sim" 192.168.1.117
Hence if you are lucky to sniff correct data string then you can easily bypass the firewall filter and able to establish TCP connect with victim’s network for port enumeration.

Wonderful!! If you will notice given below image you will observe open ports of target’s network.


Allow TCP Packet from Specific Hex String

If network admin wants to establish TCP connect from a system which contain hexadecimal value of particular string and do not want to connect with other system does not contain hexadecimal value of that special string in packets then he could use following Iptable rules to apply firewall filter in his network. 

iptables -I INPUT -p tcp -m string --algo kmp --hex-string "RAJ" -j ACCEPT
iptables -A INPUT -p tcp -j REJECT --reject-with tcp-reset

In above rule you can see we had used hex value for "RAJ" as special string to establish TCP connection. Hence only those TCP connection could be established which contain hex value of "RAJ" in packet.


Now when again attacker will perform basic network scanning on target’s network, he could not able to enumerate ports and running service of victim’s system because traffic generate from his network does not contain hex value of special string in packets thus firewall of target system will discard all TCP packet of attacker’s network.
nmap 192.168.1.117


Use NMAP Data-String and Bypass firewall
If attacker somehow sniffs special string “RAJ” to connect with target’s network then he could used its hex values with --data argument in nmap command to bypass the firewall.
nmap --data "\x52\x41\x4a" 192.168.1.117
Hence if you are lucky to sniff correct hex value of particular data string then you can easily bypass the firewall filter and able to establish TCP connect with victim’s network for port enumeration.

Hence, if you will notice given below image you will observe open ports of target’s network.


Reject TCP Packets contains tcp-option
By default nmap sends 24 bytes of TCP data in which 4 bytes of data is reserve for TCP Options if network admin reject 4 bytes tcp –option packet to discord tcp connection to prevent his network from scanning. Type following iptable rule to reject 4 bit tcp-option in his network:

iptables -A INPUT -p tcp –tcp-option 4  -j REJECT --reject-with tcp-reset


Now when attacker will perform TCP scanning [sT] on target’s network, he could not able to enumerate ports and running service of victim’s system. Since tcp-option is 4 bytes hence firewall discard tcp packet of attacker’s network.
nmap -sT 192.168.1.117


Use NMAP ip-option to Bypass TCP-Option Filter
The IP protocol gives numerous options that could be placed in packet headers. Contrasting the omnipresent TCP options, IP options are seldom observed because of security reasons. The most powerful way to specify IP options is to simply pass in hexadecimal data as the argument to --ip-options.

Precede every hex byte value with \x. You may repeat certain characters by following them with an asterisk and then the number of times you wish them to repeat. For example, \x01\x07\x04\x00*4 is the same as\x01\x07\x04\x00\x00\x00\x00 this is also called NuLL bytes

Now type following command with ip-option argument as shown below:
nmap –ip-option “\x00\x00\x00\x00\x00*” 192.168.1.117

Note that if you denote a number of bytes that is not a multiple of four; an incorrect IP header length will be set in the IP packet. The reason for this is that the IP header length field can only express multiples of four. In those cases, the length is computed by dividing the header length by 4 and rounding down. 
GOOD! If you will notice given below image you will observe open ports of target’s network.

https://nmap.org/book/nping-man-ip-options.html