Forensic Investigation of Any Mobile Phone with MOBILedit Forensic

With MOBILedit Forensic you can view, search or retrieve all data from a phone with only a few clicks. This data includes call history, phonebook, text messages, multimedia messages, files, calendars, notes, reminders and raw application data. It will also retrieve all phone information such as IMEI, operating systems, firmware including SIM details (IMSI), ICCID and location area information. Where possible MOBILedit Forensic is also able to retrieve deleted data from phones and bypass the passcode, PIN and phone backup encryption.

Note: USB Debugging must be enabled.

Download the MOBILedit!  Forensic from here & Install on your PC. Now Click on MOBILedit! Forensic.

Click on Connect Option. MOBILEedit! Forensic Wizard will run and ask for Phone, Data file or SIM Card. Select Phone Option.  Click on Next.


Now it will ask for type of connection. Select Cable Connection. And click on Next.


Now follow the instructions such as install Driver or turn on USB debugging if connecting Android.
Now connect the phone via data cable. If prompted choose connection mode to PC Sync or COM port. Click on Next Option.


It will show the connected mobile. Check your Mobile model and click on Next.


To take the Backup, first of all enter Owner Name, Device Evidence Number and Owner Phone Number.
Click on Browse Option to select the path folder where backup data will be stored and click on Next.


Now it will ask for part of file system to   backup. Choose Whole File System or Specified File Types such as Audio, Video or pictures. Then Click on Next.


Now it will show the progress bar for Back Up and after completion click on Next.


Now select the check box for Phone memory extraction and click on Next.


Now it will show the message for creation of memory dump on memory card file. Click on Next.


Now select the group….Cases   to organize device data or click on   <New Case > to create new case and click on Next.


If we have selected New Case Option, then it will ask for Case Number and investigator details .Enter
 Investigator Details and click on Next.


Now select the Template for Data Export and Click on Finish.


Now select the Template for Data Export and Click on Finish.


Now it will show the generated Forensic Report.


Select Connected Device Option.


Now it will generate a report with all the details such as Phone book, Call logs, messages, Files etc.


To get phone book details, select Phone book option.


Now you can select sub option such as WhatApp to see WhatsApp Messages.


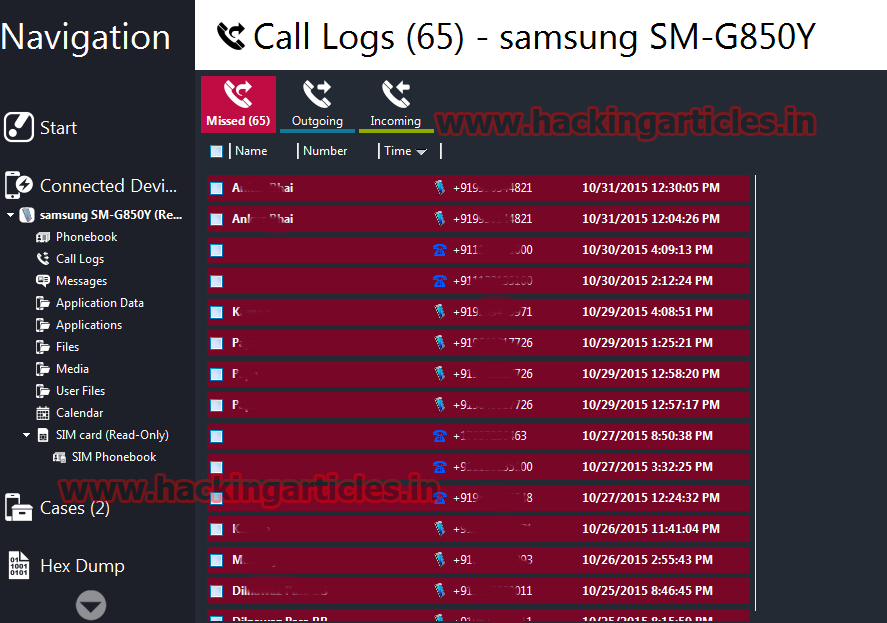
Click on Call Logs to see Missed Calls, Outgoing calls and Incoming calls.


Now Click on Messages to see all received, sent and draft messages.


Click on Application Data to get all the details about content providers.


Click on Application to see all the installed Apps in Mobile.


Select Files Option to see all the details about system files in Mobile.


Now Click on Media and select internal media or user media and then select pictures option to see Pictures.


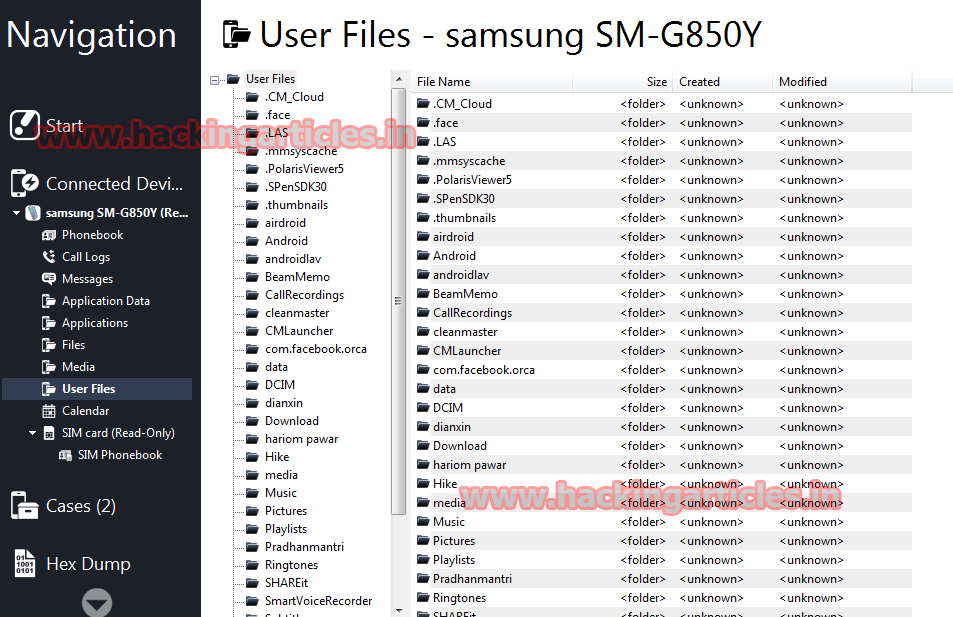
To view User‘s Files, Click on Option User Files.

Android Mobile Device Forensics with Mobile Phone Examiner Plus

AccessData (AD) Mobile Phone Examiner Plus (MPE+) is a powerful mobile device data review tool that can be used in the field as part of a mobile field unit or in the lab. Additionally, data extracted from mobile devices using MPE+ can be easily imported into an FTK case, which offers more in-depth drill-down, categorization, full-text index searching, and all of this is right alongside other digital evidence collected for a case. MPE+ can extract information such as phone and address book data, media files, call logs, SMS and MMS messages, calendar, and file system data stored in the memory of a mobile device.

Download MPE+ from here & install in your PC.


Now Double click on MPE+ Icon to open it.


Note: USB Debugging must be enabled.

Now select the Drive Management option from Home tab.

To install the mobile driver in your system, click on download option from the given list.
It will install the driver. Click on Select Device.


Now enter the Manufacturer and Model No of the mobile. Click on Connect.


Now select the mobile android version and click on finish.


It will display a message. Connecting to Android Device.


Now it will show the Select Data for Extraction Pop Up. Click on Select All Option and select Extract Option.


It will show the Progress Bar for Android Logical Device Data Extraction.


Now click on Device Information, it will show all the details about the Android Mobile.


 Select Call History Option to see all incoming and outgoing call details with duration as well as date and time.


To view all the contacts in the mobile, select Contacts option.


To get all the SMS messages, Select SMS Option.


To see how many android packages have been installed, select Android Packages.


To see all the connected Bluetooth devices, click on Bluetooth Devices Option.


To get the information about the WIFI connections connected with this android mobile, select WiFi Hotspots.


To see the bookmarks, click on WEB option and then select Bookmarks Sub option.


To get Browser History, Click on Web Option and select Browser History Sub option.


To see all the images existing in the Android Mobile from different resources, select Media option and click on Image Sub option.


To get the information about all video files, Select Video sub option from Media Option.

How to Retrieve Saved Password from RAW Evidence Image

First Download OS Forensic from here and install in your pc then open OSForensic and click on Create  Case  button to  create a new forensic case.


Now enter the details such as Case Name, Investigator Name, Default Drive, and Acquisition Type To specify the case folder, click on browse & select the Location where you want to save your Evidence Report. Now click on ok.


Now it will show us the registered case in this tool. Now to manage this case, click on Add Device option available in Manage Case.


Now select Image File option in Select Device to add option. Now assign the path of the folder where image file exists and also give the Display Name which is compulsory. Click on OK Button.


Now to get the saved browser password clicks on Find Browser Passwords Option and selects the Scan Drive option and then click on Retrieve Password. It will show you all saved passwords  in RAW Image.

How to Hack Windows Wallpaper of Remote PC


Today we will learn how change the wallpaper on a Remote System.

Table of Content:
·        Introduction of set_wallpaper module
·        Change Wallpaper on Windows
·        Change Wallpaper on Android

Requirements
Attacker: Kali Linux
Targets: Windows, Android

Introduction of set_wallpaper module
Metasploit Framework is primarily made on Ruby Language. This post exploitation module is also made on Ruby. On the in-depth analysis we get to understand that it targets different services on different platforms to do its job. This module is pretty simple as all it does is set the desktop wallpaper background on the specified session.

When we run the module, Firstly the wallpaper file is located on the attacker machine. After that the file is uploaded to the Victim System on which we have a meterpreter session. The location on which the file is uploaded varies from platform to platform. Next the script uses the suitable method and changes the wallpaper. This module is made by timwr. This module is Normally reliable. Now that we know about the working of the module, let’s change the wallpaper.

Change Wallpaper on Windows
Open Kali Linux terminal and type msfconsole in order to load Metasploit framework.  Now we need to compromise victim’s machine once to achieve any type of session either meterpreter or shell and to do so we can read our previous article from here.

After getting meterpreter on the remote system, now time to use the post exploitation module. But this can’t be done from the meterpreter shell. So, we will use background command in meterpreter session or “Ctrl + z” shortcut to keep the session in background. Now follow the steps shown in the image to use the set_wallpaper post exploitation module.

set session 1
set wallpaper_file /root/Desktop/1.jpeg
exploit

This will change the wallpaper on the target system.


Change Wallpaper on Android
Firstly, get a meterpreter session on an Android system. Learn this here.
After getting meterpreter on the remote system, now time to use the post exploitation module. But this can’t be done from the meterpreter shell. So, we will use background command in meterpreter session or “Ctrl + z” shortcut to keep the session in background. Now follow the steps shown in the image to use the set_wallpaper post exploitation module.
use post/multi/manage/set_wallpaper
set session 1
set wallpaper_file /root/Desktop/1.jpeg
exploit

This will change the wallpaper on the target system.